Introduction to CAT4 Spatial Reasoning
The CAT4 test is made up of four main parts, and one of them is Spatial Reasoning. This section measures how well students can understand fold, and compare shapes and visual forms in space.
On this page, you will learn:
- what CAT4 Spatial Reasoning is really testing
- why it matters for CAT4 success
- tips and resources to prepare effectively
- sample questions with explanations
👉 Before diving in, we recommend reading our full CAT4 Test Guide to understand the complete structure and scoring system.
The CAT4 Spatial Reasoning battery focuses on two main question types:
- Figure Analysis
- Figure Recognition
Spatial Ability · Figure Analysis
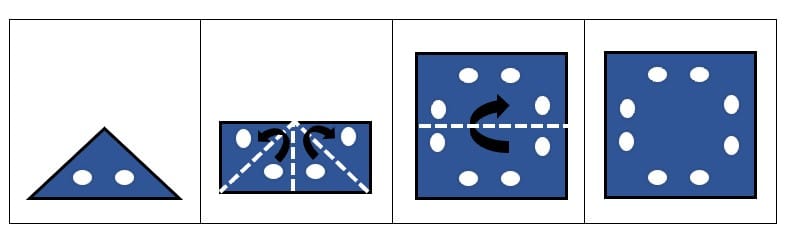
A piece of paper is folded twice, then two holes are punched through it. Which option shows the correct pattern of holes when the paper is unfolded?

Figure Analysis · Question
The key is to track how each fold doubles the layers of paper — two folds create four layers, so each hole punched multiplies by four when unfolded.
What to notice first
Two folds are made — one horizontal, one diagonal. Each fold doubles the layers. Two folds = 2 × 2 = 4 layers. Two holes punched through 4 layers = 8 holes when the paper is fully unfolded. Count the folds first, then apply the multiplication rule.
Check 1
Count the folds
Two folds total — first horizontal, then diagonal. Each fold doubles the number of layers.
Check 2
Calculate the layers
2 folds = 2² = 4 layers of paper stacked together when the holes are punched.
Check 3
Apply to hole count
2 holes punched through 4 layers means 8 holes appear when the paper is fully unfolded.
Core rule
Each fold doubles the number of holes when the paper is unfolded. Count the folds, calculate the layers (2ⁿ), then multiply by the number of holes punched.
Model the pattern
Step 1 — First fold (horizontal)
The paper folds from top to bottom, creating 2 layers. Any hole punched now would appear twice when unfolded.
Step 2 — Second fold (diagonal)
The folded paper folds again diagonally, doubling the layers to 4 total (2 × 2). All four layers are now stacked together.
Step 3 — Holes punched and unfolded
Two holes are punched through all 4 layers. When the paper is fully unfolded, each punch point appears 4 times — giving 8 holes total across the sheet.
Answer diagram
Option check
Eliminate
2 holes would only be correct if no folds were made at all. The folds multiply the result.
Eliminate
4 holes would result from punching one hole through 4 layers — but two holes were punched, not one.
Eliminate
6 holes does not follow from any consistent fold-and-multiply calculation for this question.
Correct
8 holes — 2 folds create 4 layers, and 2 holes punched through 4 layers = 8 holes when unfolded.
Eliminate
16 holes would require 3 folds (8 layers × 2 holes). Only 2 folds were made here.
Use this quick checklist next time
- Count the folds and identify the fold type — horizontal, vertical, or diagonal.
- Track where the holes land relative to the fold lines — diagonal folds create mirrored positions.
- Multiply holes by layers to get the total count, then visualise where each hole will appear when unfolded.
Reflection
The most common trap is counting the punched holes (2) and choosing A — without thinking through what happens to each layer when the paper unfolds.
Bridge forward
In all Figure Analysis fold questions, count folds first. The answer always comes from the multiplication rule — not from guessing the visual pattern.
Conclusion
Option D is correct. Two folds create 4 layers. Two holes punched through 4 layers produce 8 holes when the paper is fully unfolded.
Spatial Ability · Figure Analysis
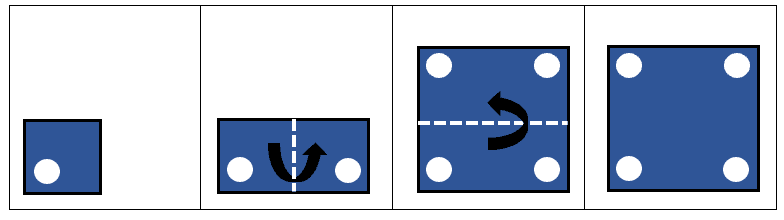
A piece of paper is folded twice, then one hole is punched through it. Which option shows the correct pattern of holes when the paper is unfolded?
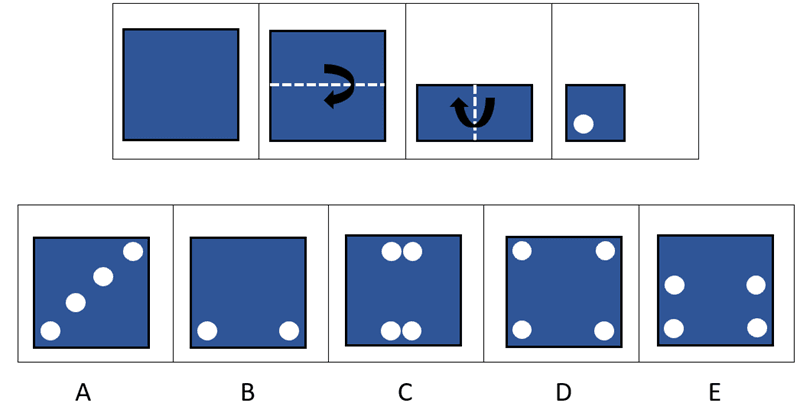
Figure Analysis · Question
The key is to unfold the paper in reverse order — tracking exactly where each fold line mirrors the hole back across the paper.
What to notice first
Two folds are made — first horizontal (top folds down), then vertical (right folds left). This creates 4 layers. One hole is punched in the bottom-left corner of the folded paper. To find where holes appear when unfolded, reverse each fold: the vertical fold mirrors the hole to the bottom-right, then the horizontal fold mirrors both holes upward — placing holes at all four corners.
Check 1
Identify the fold types
Fold 1 is horizontal — top half folds down. Fold 2 is vertical — right half folds left. Both folds create a quarter-sized paper with 4 layers.
Check 2
Note where the hole is punched
The hole is punched in the bottom-left corner of the folded paper — near the folded edges, not the open edges.
Check 3
Unfold in reverse order
Reverse the vertical fold first — hole mirrors to bottom-right. Then reverse the horizontal fold — both bottom holes mirror to the top row. Result: 4 holes at all corners.
Core rule
Always unfold in reverse order. Each fold line acts as a mirror — the hole reflects across it. Two perpendicular folds with one hole always produce 4 holes forming a rectangle.
Model the pattern
Step 1 — After punching: 1 hole in bottom-left
The folded paper is quarter-sized. The hole sits in the bottom-left corner — near both fold edges. This is the starting point for unfolding.
Step 2 — Reverse the vertical fold: 2 holes along the bottom
Unfolding the vertical fold mirrors the bottom-left hole across to the bottom-right. Now 2 holes sit symmetrically along the bottom edge of the half-folded paper.
Step 3 — Reverse the horizontal fold: 4 holes at all corners
Unfolding the horizontal fold mirrors both bottom holes upward. The result is 4 holes — one at each corner of the fully unfolded paper. This matches option D.
Answer diagram
Option check
Eliminate
A diagonal pattern would only occur if the folds were diagonal — both folds here are straight (horizontal and vertical), producing a rectangular arrangement.
Eliminate
2 holes along the bottom ignores the horizontal fold. Reversing that fold mirrors the bottom holes upward — doubling the total.
Eliminate
Holes grouped in the centre would only appear if the hole were punched in the middle of the folded paper — it was punched in the corner.
Correct
4 holes at all four corners — the vertical fold mirrors the hole left-to-right, the horizontal fold mirrors both holes top-to-bottom. One hole punched through 4 layers produces 4 corner holes.
Eliminate
Two holes on each side (left and right) would result from a different punch position — not a corner punch through these two specific folds.
Use this quick checklist next time
- Identify the fold types and their order — horizontal, vertical, or diagonal each mirror differently.
- Note exactly where the hole is punched — corner, edge, or centre determines the final pattern.
- Unfold in reverse order, one fold at a time — each fold line mirrors the existing holes across it.
Reflection
The most common mistake is stopping after one unfold — remembering there are two folds means two mirroring steps, not one.
Bridge forward
Two perpendicular folds with a corner punch always produce 4 corner holes. Recognise this pattern quickly and you can answer similar questions in seconds.
Conclusion
Option D is correct. One hole punched through 4 layers — created by two perpendicular folds — produces 4 holes symmetrically placed at all four corners of the unfolded paper.
Spatial Ability · Figure Recognition
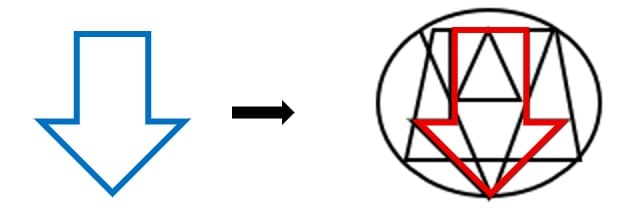
The shape on the left is hidden inside one of the five options. Which option contains the target shape?
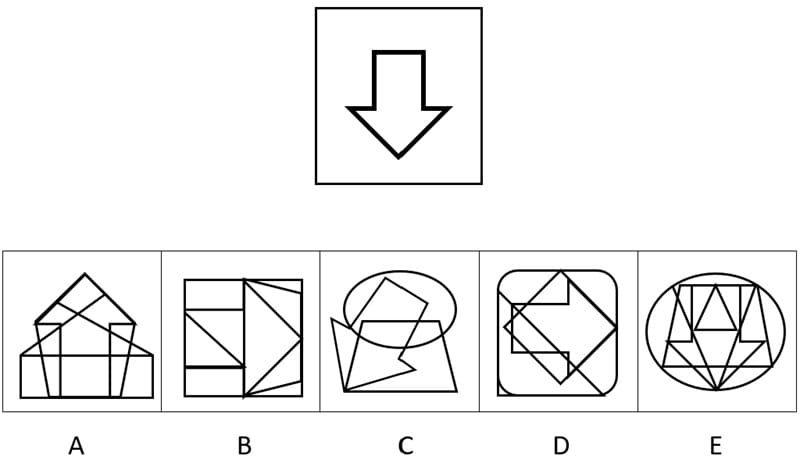
Figure Recognition · Question
The fastest way to solve this is to break the target shape into its key lines and edges first — then search for those specific lines inside each option, ignoring everything else.
What to notice first
The target is a downward-pointing arrow. It has three key features: two vertical sides at the top, a horizontal crossbar where the arrow head begins, and two diagonal sides meeting at a point at the bottom. All three features must appear together — connected — inside the correct option. The surrounding lines are deliberate distractors. Ignore them and search only for the arrow's outline.
Check 1
Name the key lines
Two vertical sides at top, a horizontal crossbar, and two diagonal lines meeting at a downward point. That is the complete arrow outline.
Check 2
Ignore distractors
Complex options are designed to hide the shape. Extra lines, overlapping shapes, and different orientations are all distractors — trace only the arrow's own edges.
Check 3
Find the connected outline
The arrow's lines must be connected and in the correct arrangement — not scattered across the figure. Trace them as a continuous path.
Core rule
Break the target into its fewest key lines. Search for those lines connected together inside each option — the surrounding complexity is there to distract you, not to help you.
Model the pattern
Step 1 — Describe the target in simple terms
The downward arrow has a rectangular shaft at the top and a wider triangular head pointing down. Think of it as a rectangle sitting above an inverted triangle — joined at their shared edge.
Step 2 — Eliminate options that cannot contain it
Options A, B, C, and D do not contain the correct combination of vertical sides, horizontal crossbar, and downward point connected in the right arrangement. The shapes present are different orientations or different outlines entirely.
Step 3 — Trace the arrow in option E
Inside the circle in option E, trace from the top-left vertical line across the horizontal crossbar, down the right vertical, across the diagonal sides, and to the bottom point. The complete arrow outline is present and connected within the overlapping triangles.
Answer diagram
Option check
Eliminate
The house-like shape contains triangles but no connected downward arrow outline — the lines form a different arrangement entirely.
Eliminate
The square with diagonals contains triangular sections but the arrow's shaft and connected point cannot be traced within it.
Eliminate
The oval contains rotated shapes — none of which form the specific vertical-crossbar-diagonal arrangement of the downward arrow.
Eliminate
The rounded square contains arrow-like shapes but they point sideways — the orientation does not match the downward target shape.
Correct
The circle contains overlapping triangles and lines — within them, the complete downward arrow outline can be traced: vertical sides, horizontal crossbar, and downward point all connected correctly.
Use this quick checklist next time
- Break the target into its fewest key lines before scanning the options.
- Search for those lines connected together — not scattered — within each option.
- Eliminate options where the orientation or arrangement is clearly wrong before looking closely.
Reflection
The trap here is option D — it contains arrow-like shapes which feel similar. Always check orientation: the target points down, not sideways.
Bridge forward
In all Figure Recognition questions, describe the target in the fewest possible lines first. That description becomes your search filter — everything else is visual noise.
Conclusion
Option E is correct. The downward arrow is hidden within the circle of overlapping triangles — its complete outline can be traced from the vertical sides at the top, across the horizontal crossbar, down the diagonals, and to the bottom point.
Spatial Ability · Figure Recognition
The shape on the left is hidden inside one of the five options. Which option contains the target shape?
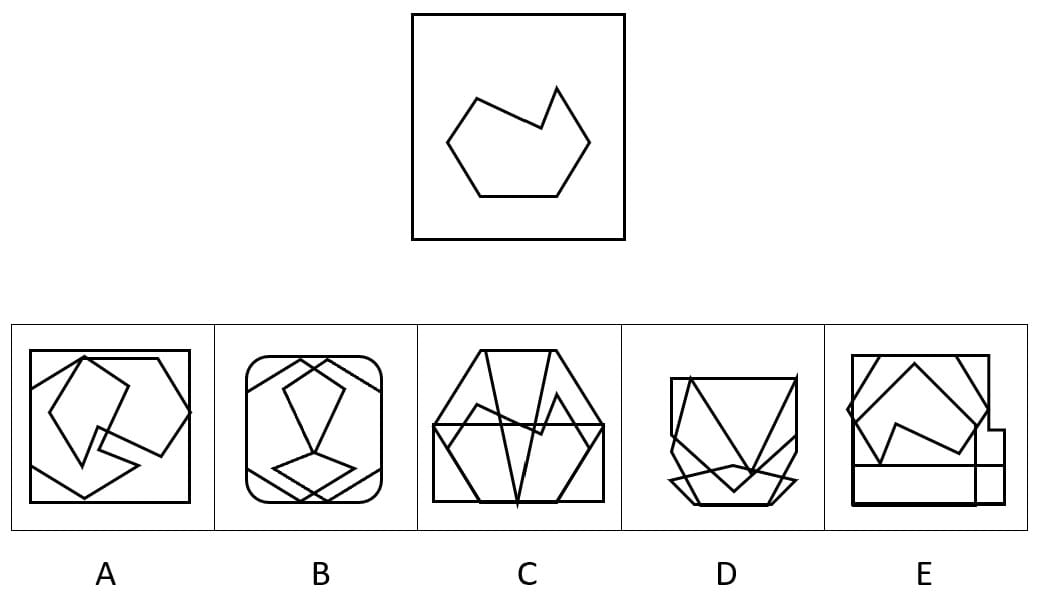
Figure Recognition · Question
The fastest approach is to identify the most unusual feature of the target shape — the notch — and search specifically for that edge combination inside each option, ignoring all surrounding lines.
What to notice first
The target is an irregular hexagon with a distinctive notch cut into its top-right edge — two short lines meeting at a sharp inward point. This notch is the shape's most unique feature. A general hexagonal outline alone is not enough — the notch must be present and correctly positioned. Search for that specific combination of lines, not just a hexagon-like shape.
Check 1
Identify the unique feature
The notch at the top-right is the defining detail. It creates two short angled lines meeting inward — unlike a standard hexagon edge.
Check 2
Search for that feature first
Scan each option for the notch — two inward-angled lines at the top-right of a hexagonal outline. Eliminate any option where this cannot be found.
Check 3
Confirm the full outline
Once you spot the notch, trace the rest of the shape's outline to confirm all edges are present and connected correctly in the same option.
Core rule
Always lead with the most distinctive feature of the target — not the most common one. The notch rules out most options immediately, saving time under timed conditions.
Model the pattern
Step 1 — Describe the target precisely
The shape is broadly hexagonal — wider than it is tall — with a flat bottom, gently angled sides, and a notch cutting into the top-right edge. The notch creates a sharp inward V shape at that corner.
Step 2 — Eliminate using the notch
Options A, B, D, and E do not contain the correct notched hexagonal outline in the right orientation. Their internal lines create different shapes or the hexagonal boundary is absent or distorted.
Step 3 — Trace the full outline in option C
Inside option C — the hexagonal figure with internal triangular lines — trace the outer boundary: flat bottom, angled left side, top-left edge, the notch at top-right, and down the right side. The complete target outline is present and connected.
Answer diagram
Option check
Eliminate
Option A contains overlapping rectangles and angled shapes — the notched hexagon outline cannot be traced within its lines.
Eliminate
Option B has a rounded square boundary with internal overlapping shapes — the target's flat-edged hexagonal outline is not present here.
Correct
Option C contains the complete target outline — the notched hexagon can be traced within the internal triangular line network, with the notch clearly visible at the top-right.
Eliminate
Option D contains hexagon-like shapes but the specific notched edge at top-right is not present in the correct position or proportion.
Eliminate
Option E uses rectangular grid-like lines — the curved and angled edges of the target hexagon are not present within this structure.
Use this quick checklist next time
- Find the most unusual feature of the target shape — lead your search with that, not the overall shape.
- Eliminate options where that distinctive feature cannot be found before looking at anything else.
- Once you find the feature, trace the complete outline to confirm all edges connect correctly.
Reflection
Options B and D are the main traps — both contain hexagonal-looking shapes. The notch is what separates the correct answer from these near-misses.
Bridge forward
In all Figure Recognition questions, spend five seconds identifying the target's most unusual feature before scanning options. That single step eliminates most wrong answers instantly.
Conclusion
Option C is correct. The irregular notched hexagon is hidden within the complex figure — its complete outline, including the distinctive notch at the top-right, can be traced within the internal line network.