CAT4 Level E (Year 8) Practice Test 2026: Free PDF, Sample Questions & Tips

Free CAT4 Level E guide for Year 8 students and families — sample questions across all four batteries, a downloadable CAT4 Year 8 practice test PDF, and clear preparation tips.

  • Free CAT4 Level E practice PDF with Year 8 sample questions and clear guidance
  • Understand the CAT4 Year 8 test format, timing, and all four batteries
  • Learn how to prepare with strategies designed for Year 8 students aged 12–13
  • No sign-up needed to access the free guide and downloadable PDF

Test at a Glance

72 minDuration
4Batteries
12–13Age range
DigitalFormat

Who Takes This Test?

United KingdomAges 12–13
Year 8
GlobalAges 12–13
Grade 7
Free — no sign-up required · Updated for 2026 · Covers all 4 CAT4 batteries · Trusted by UK & international families

What to Expect in the CAT4 Level E Test

What Is the CAT4 Year 8 Test (Level E)?

CAT4 Level E is the Cognitive Abilities Test designed for Year 8 students (ages 12–13), also referred to as the CAT Tests Year 8. It is delivered online and covers four reasoning batteries: Verbal, Quantitative, Non-Verbal, and Spatial.

Schools use CAT4 Year 8 results to update the reasoning profile established at secondary entry — with GCSE options and set reviews on the immediate horizon, Level E results carry more weight than any previous sitting. Some independent and international schools also use the assessment as part of their admissions process.

CAT4 Level E Test Structure and Timing

Batteries Verbal Non-Verbal Quantitative Spatial

Part 1 → Part 2 → Part 3

  1. Part 120 min
  2. Part 226 min
  3. Part 326 min

Part 1

Non-Verbal battery

20 min
  • Figure Classification

    10 min · 24 questions

    10:00
  • Figure Matrices

    10 min · 24 questions

    10:00

Part 2

Verbal + Quantitative

26 min
  • Verbal Classification

    8 min · 24 questions

    8:00
  • Verbal Analogies

    8 min · 24 questions

    8:00
  • Number Analogies

    10 min · 18 questions

    10:00

Part 3

Quantitative + Spatial

26 min
  • Number Series

    8 min · 18 questions

    8:00
  • Figure Analysis

    9 min · 18 questions

    9:00
  • Figure Recognition

    9 min · 18 questions

    9:00

CAT4 Level E (Year 8): 4 batteries · 8 timed subtests · 3 parts totalling 72 minutes.

Timings exclude instructions, examples, practice items and breaks. Format can vary slightly by school delivery.

Source: GL Education Support — Pre-testing essentials

Free CAT4 Level E Sample Questions

Practice CAT4 Level E questions for Year 8 students and their international equivalents — covering Verbal, Quantitative, Non-Verbal, and Spatial Reasoning. Select your answer, then reveal the full step-by-step explanation.

Download our free CAT4 Level E practice test PDF for more Year 8 sample questions.

Verbal Reasoning Sample Questions

Verbal Reasoning · Verbal Analogies

Reluctant : Hesitant :: Fragile : ?

Verbal Analogies · CAT4 Level E

Identify the precise relationship in the first pair, then transfer that exact relationship — not just the topic — to the second pair.

Synonymy method — works on all near-synonym analogy questions

Question type

Verbal Analogies

Skill tested

Identifying near-synonyms

Difficulty

Hard

What to notice first

Reluctant and hesitant are near-synonyms — both describe someone unwilling or slow to act. That is the relationship to transfer. Now apply it to fragile: you need a word that means nearly the same as fragile. The answer is delicate — both describe something easily damaged or broken.

Check 1

Read the first pair

Reluctant and hesitant share the same core meaning — unwilling to act. Label this as synonymy.

Check 2

Fix the relationship precisely

The connection is synonymy — same meaning, not just the same topic area or theme.

Check 3

Apply to fragile

You need a near-synonym of fragile — a word that shares its core meaning of being easily damaged.

Core rule

At Level E, the relationship must be named precisely before you look at the options. Synonymy means same meaning — not same topic, not same word family. Test every option against the label, not against vague association.

Model the pattern

1

Step 1 — Name the relationship

Look at reluctant and hesitant. Both mean unwilling or slow to commit to an action. They are near-synonyms. Write that label down mentally before moving on.

2

Step 2 — Apply the label to the second pair

The missing word must be a near-synonym of fragile. Fragile describes something easily broken or damaged. Lock that meaning in before reading the options — Level E distractors are designed to catch students who look at the options first.

3

Step 3 — Test each option against the label

Delicate means easily damaged or broken — it is a near-synonym of fragile in the same way that hesitant is a near-synonym of reluctant. No other option shares that core meaning.

Option check

A

Correct

Delicate is a near-synonym of fragile — both describe something that breaks or is damaged easily. The synonymy relationship holds exactly across both pairs.

B

Eliminate

Heavy describes physical weight — an entirely different dimension from fragility. Trap: domain lure. It is not related to fragile in meaning, only loosely in the physical world.

C

Eliminate

Secure is close to the opposite of fragile — something secure is protected and difficult to damage. Trap: reversed direction. Choosing an antonym is the most common error on synonymy analogies.

D

Eliminate

Ancient describes age, not physical condition or strength. Trap: domain lure. Something ancient may or may not be fragile — age and fragility are unrelated properties.

E

Eliminate

Flexible is the Level E trap. Both flexible and fragile describe physical properties — but flexible objects resist breaking by bending, while fragile objects break precisely because they cannot bend. Trap: partial match. Shared property category does not mean shared meaning.

Use this checklist on every Verbal Analogy

  • Name the relationship in the first pair using a precise label — synonymy, antonymy, degree — not just "related".
  • Apply that exact label to the second word before reading the options.
  • At Level E, reject any option that shares a property category with the target word but not its core meaning.

Reflection

The Level E challenge here is not knowing the word delicate — it is resisting option E. Flexible sounds physically similar to fragile, but the relationship runs in the opposite direction. Naming the relationship before reading the options is what separates strong scores from average ones.

Bridge forward

In harder Verbal Analogies, the wrong answer will always share a surface feature with the correct one. The defence is always the same: fix the relationship label first, then test options against the label — not against your instinct.

Conclusion

The answer is A — Delicate. Reluctant and hesitant are near-synonyms; fragile and delicate are near-synonyms. The synonymy relationship transfers exactly across both pairs. Option E (Flexible) is the designed trap — it shares a physical domain with fragile but reverses the meaning.

Verbal Reasoning · Verbal Classification

deteriorate, decline, wane

Verbal Classification · CAT4 Level E

Name the exact shared meaning — not just the general topic, but the precise semantic connection including direction, speed, and degree.

Synonym-group method — works on all Verbal Classification questions

Question type

Verbal Classification

Skill tested

Identifying synonym groups

Difficulty

Hard

What to notice first

Deteriorate, decline, and wane all share the same core meaning: to gradually become less, weaker, or worse over time. Three qualifiers define the group — the process is gradual, it moves in one downward direction, and it is ongoing, not a single event. The correct answer must satisfy all three.

Check 1

Name the shared meaning

All three stem words mean to gradually become less or weaker. That is the group label.

Check 2

Fix all three qualifiers

Gradual — not sudden. Downward — not neutral or upward. Ongoing — not a single moment of change.

Check 3

Test each option against all three

An option fails if it breaks even one qualifier — wrong speed, wrong direction, or wrong type of change.

Core rule

At Level E, the designed distractor always shares the general theme but fails a qualifier. Name all the qualifiers of the shared meaning — not just the topic — before reading the options.

Model the pattern

1

Step 1 — Name the shared meaning

Read deteriorate, decline, and wane together. All three describe something gradually becoming less or weaker over time. That shared meaning is your group label.

2

Step 2 — Fix the qualifiers precisely

The process must be gradual (not sudden), downward (not neutral change or upward movement), and ongoing (not a single event). Lock all three qualifiers before looking at the options.

3

Step 3 — Test each option against the full label

Diminish means to gradually become less or smaller — gradual ✓, downward ✓, ongoing ✓. It is the only option that satisfies all three qualifiers of the group.

Option check

A

Eliminate

Collapse means to fail suddenly and completely. It shares the theme of worsening but breaks the gradual qualifier — collapse is abrupt and total, not a slow process. Trap: partial match.

B

Eliminate

Alter means to change, without specifying direction or speed. Something can alter for better or worse, quickly or slowly. It breaks the downward qualifier. Trap: wrong relation.

C

Eliminate

Fluctuate means to vary repeatedly up and down. It involves change but has no consistent downward direction. It breaks the downward qualifier. Trap: partial match.

D

Correct

Diminish means to gradually become less or weaker — the same precise meaning as deteriorate, decline, and wane. Gradual ✓ · Downward ✓ · Ongoing ✓.

E

Eliminate

Improve moves in the opposite direction — upward, not downward. It breaks the downward qualifier immediately. Trap: reversed direction.

Use this checklist on every Verbal Classification question

  • Name the shared meaning of the stem words in one precise phrase.
  • Identify all qualifiers — direction, speed, degree — not just the general topic.
  • Reject any option that shares the theme but fails even one qualifier.

Reflection

The Level E trap here is collapse. It belongs to the same general idea of things getting worse, but deteriorate, decline, and wane all describe slow, ongoing processes. Collapse is sudden and total — a different mechanism that breaks the gradual qualifier.

Bridge forward

In synonym-group questions at Level E, one distractor will always share the theme but differ in a qualifier — speed, direction, or degree. Naming all qualifiers before reading the options is the skill that prevents this trap every time.

Conclusion

The answer is D — diminish. Deteriorate, decline, wane, and diminish all mean to gradually become less or weaker over time. Collapse breaks the gradual qualifier. Alter and Fluctuate break the downward qualifier. Improve breaks the direction entirely.

Quantitative Reasoning Sample Questions

Quantitative Reasoning · Number Analogies

[8 → 21]   [11 → 30]   [14 → ?]

Number Analogies · CAT4 Level E

Work out a candidate rule from the first pair, confirm it holds on the second pair, then — and only then — apply it to find the missing number.

Confirm-then-apply method — works on all Number Analogies questions

Question type

Number Analogies

Skill tested

Identifying a two-step rule

Difficulty

Hard

What to notice first

Do not jump to the last pair. The first pair alone allows more than one possible rule — the second pair is what eliminates them. From 8 to 21: the difference is +13, so simple addition is not constant. Try ×3: 8×3 = 24, which needs −3 to reach 21. Candidate rule: ×3−3. From 11 to 30: test the candidate — 11×3 = 33, 33−3 = 30. Confirmed. Apply to 14: 14×3 = 42, 42−3 = 39.

Check 1

Build a candidate rule

8 → 21: try ×3 → 24, spot the −3 offset. Candidate rule: ×3−3.

Check 2

Confirm on pair 2

11×3−3 = 30 ✓. The rule holds across both known pairs — it is now reliable.

Check 3

Apply the confirmed rule

14×3 = 42. 42−3 = 39. The missing number is 39.

Core rule

The first pair always allows more than one candidate rule at Level E. The confirmation step on pair 2 is not optional — it is the step that separates the correct rule from the plausible ones.

Model the pattern

1

Step 1 — Build a candidate rule from pair 1

Start with 8 → 21. The difference is +13 — not a clean constant, so try multiplication. 8×3 = 24. That overshoots by 3. Adjust: 24−3 = 21. Candidate rule: ×3−3. Do not apply it yet.

2

Step 2 — Verify on pair 2

Test ×3−3 on 11 → 30: 11×3 = 33. 33−3 = 30. ✓ The rule holds. Two matching pairs confirm it is reliable — apply with confidence.

3

Step 3 — Apply to the missing pair

Use the confirmed rule on 14 → ?: 14×3 = 42. 42−3 = 39. That is Option C.

Option check

A

Eliminate

33 comes from applying ×2+5, which works for pair 1 (8×2+5 = 21) but fails pair 2 (11×2+5 = 27 ≠ 30). This is the designed Level E trap — it catches students who skip the confirmation step.

B

Eliminate

36 comes from ×3−6. The multiplier is correct but the offset is wrong — subtracting 6 instead of 3. A calculation error in identifying the offset from pair 1.

C

Correct

39 is correct. The rule ×3−3 is confirmed across both known pairs: 8×3−3 = 21 and 11×3−3 = 30. Applying it: 14×3−3 = 39.

D

Eliminate

42 comes from applying ×3 without the −3 offset. The multiplier is found correctly but the second step of the rule is dropped entirely.

E

Eliminate

45 comes from ×3+3 — adding 3 instead of subtracting it. The multiplier and the constant are both identified but the direction of the offset is reversed.

Use this checklist on every Number Analogies question

  • Build a candidate rule from pair 1 — do not apply it yet.
  • Test it on pair 2 to confirm it holds — this step is never optional.
  • Only apply the confirmed rule to find the missing number.

Reflection

The Level E trap is option A (33). The rule ×2+5 looks convincing after pair 1 — and students who move straight to the missing pair without confirming will choose it. The confirmation step is the entire defence against this trap.

Bridge forward

At Level E, every Number Analogies question will have at least one distractor built from a rule that fits pair 1 but fails pair 2. Treat the second known pair as a filter, not a formality.

Conclusion

The answer is C — 39. The rule ×3−3 is confirmed across both known pairs: 8×3−3 = 21 and 11×3−3 = 30. Applying the same rule: 14×3−3 = 39.

Quantitative Reasoning · Number Series

3   8   18   38   78   ?

Number Series · CAT4 Level E

Check every transition in the sequence before extending it — one unchecked step is where errors hide at Level E.

Verify-then-extend method — works on all Number Series questions

Question type

Number Series

Skill tested

Identifying a recursive two-step rule

Difficulty

Hard

What to notice first

Check the difference between each pair of terms: 8−3 = 5, 18−8 = 10, 38−18 = 20, 78−38 = 40. The differences 5, 10, 20, 40 double each time. This confirms the rule: each term is the previous term ×2+2. The next difference must be 80, so the missing term is 78+80 = 158. Verify: 78×2+2 = 158 ✓.

Check 1

Check all transitions

Differences: 5, 10, 20, 40 — each doubles. Rule confirmed across all four steps.

Check 2

State the rule precisely

Each term = previous term ×2+2. Both steps must be applied — dropping either one produces a distractor.

Check 3

Extend one step

Next difference = 40×2 = 80. Or: 78×2+2 = 158. Both paths confirm the same answer.

Core rule

With a two-step recursive rule, both steps must be applied every time. The most common Level E error is finding the first step (×2) and dropping the second (+2) — producing a plausible but wrong answer.

Model the pattern

1

Step 1 — Verify the rule across every transition

3×2+2 = 8 ✓ · 8×2+2 = 18 ✓ · 18×2+2 = 38 ✓ · 38×2+2 = 78 ✓. The rule ×2+2 holds without exception across all four transitions.

2

Step 2 — State both steps of the rule explicitly

The rule has two parts: multiply by 2, then add 2. Write both down before calculating. Dropping the +2 gives 156 — the most common error on this question.

3

Step 3 — Apply both steps to the last term

78×2 = 156. Then 156+2 = 158. That is Option D. Check: the next difference would be 40×2 = 80, and 78+80 = 158 ✓ — both paths agree.

Option check

A

Eliminate

118 comes from adding the last difference again without doubling it: 78+40 = 118. The differences 5, 10, 20, 40 double each time — the next must be 80, not 40.

B

Eliminate

154 comes from applying ×2−2 instead of ×2+2: 78×2−2 = 154. The direction of the constant is reversed. Check any earlier term to catch this: 3×2−2 = 4 ≠ 8.

C

Eliminate

156 comes from applying ×2 only and dropping the +2 entirely: 78×2 = 156. This is the Level E trap — the multiplication is correct but the second step is missing.

D

Correct

158 is correct. 78×2+2 = 158. The rule ×2+2 is confirmed across all four transitions and the extension holds perfectly.

E

Eliminate

160 comes from doubling the additive constant along with the term: 78×2+4 = 160. The +2 constant does not scale — it stays fixed at +2 across every transition.

Use this checklist on every Number Series question

  • Check every transition — do not rely on just the last two terms to identify the rule.
  • State both steps of a two-step rule explicitly before calculating.
  • Verify your answer against the confirmed rule — both calculation paths should agree.

Reflection

The Level E trap is option C (156). Finding ×2 is quick — but the +2 is easy to drop under time pressure. Verifying the rule on all four transitions makes the +2 visible every time and removes any doubt.

Bridge forward

Whenever a Number Series rule has two steps, write both steps out explicitly before touching the last term. The second step is always where the distractors are built — knowing this in advance removes the trap entirely.

Conclusion

The answer is D — 158. The rule ×2+2 holds across all four transitions without exception: 3→8→18→38→78→158. Applying both steps to the last term: 78×2+2 = 158.

Non-Verbal Reasoning Sample Questions

Non-Verbal Reasoning · Figure Classification

CAT4 Level E Figure Classification sample question. Three stem figures, each showing a polygon with internal vertical lines, dots above, and short lines below. Stem 1: trapezoid, 4 dots, 3 internal vertical lines, 3 short lines below. Stem 2: pentagon, 5 dots, 2 internal vertical lines, 2 short lines below. Stem 3: triangle, 3 dots, 1 internal diagonal line, 1 short line below. Five answer options labelled A to E.

Figure Classification · CAT4 Level E

Find every rule that holds across all three stem figures — at Level E there will be more than one, and the correct answer must satisfy all of them simultaneously.

Multi-rule elimination method — works on all Figure Classification questions

Question type

Figure Classification

Skill tested

Identifying and applying two simultaneous rules

Difficulty

Hard

What to notice first

Two separate rules run through all three stem figures at the same time. Rule 1: the number of short lines below the shape always equals the number of internal lines inside it — 3 and 3 in stem 1, 2 and 2 in stem 2, 1 and 1 in stem 3. Rule 2: the number of dots above the shape always equals the number of sides — 4 dots on a trapezoid, 5 dots on a pentagon, 3 dots on a triangle. The correct answer must satisfy both rules at once.

Check 1

Count bottom lines vs internal lines

Stem 1: 3 internal, 3 bottom. Stem 2: 2 internal, 2 bottom. Stem 3: 1 internal, 1 bottom. Rule 1 confirmed: bottom lines = internal lines.

Check 2

Count dots vs sides

Trapezoid (4 sides) = 4 dots. Pentagon (5 sides) = 5 dots. Triangle (3 sides) = 3 dots. Rule 2 confirmed: dots = sides.

Check 3

Apply both rules to eliminate

Test every option against Rule 1 first, then Rule 2. Any option that fails either rule is eliminated immediately.

Core rule

At Level E, Figure Classification questions carry two independent rules. Finding only one rule and applying it will always leave more than one option standing — both rules are needed to reach a single correct answer.

Verify the rules — stems

Count every attribute across all three stems. The two rules emerge immediately from the numbers.

StemShapeSidesDotsInternalBottomRule 1Rule 2
1Trapezoid4433
2Pentagon5522
3Triangle3311

Apply both rules — options

Rule 1 first (eliminates the most). Then Rule 2 on what remains. Only one option survives both.

OptionSidesDotsInternalBottomRule 1Rule 2Verdict
A8233Out
B4432Out
C3111Out
D8522Out
E6644

Option check

A

Eliminate

Rule 1 holds (3 internal = 3 bottom ✓) but Rule 2 fails — the octagon has 8 sides, yet only 2 dots appear above it. Both rules must hold simultaneously.

B

Eliminate

Rule 2 holds (parallelogram = 4 sides, 4 dots ✓) but Rule 1 fails — 3 internal lines do not match 2 bottom lines. Eliminated at the first check.

C

Eliminate

Rule 1 holds (1 internal = 1 bottom ✓) but Rule 2 fails — the triangle has 3 sides, yet only 1 dot appears above it. Both rules must hold simultaneously.

D

Eliminate

Rule 2 fails — 5 dots do not match 8 sides. Rule 1 holds (2 internal = 2 bottom ✓) but Rule 2 eliminates it: 5 ≠ 8.

E

Correct

A hexagon has 6 sides — 6 dots appear above it ✓. It contains 4 internal vertical lines — 4 short lines appear below it ✓. Both rules are satisfied simultaneously. This is the only option that passes both checks.

Use this checklist on every Figure Classification question

  • Look for every rule that holds across all three stem figures — at Level E there will be more than one.
  • Apply each rule as a separate filter, starting with the one that eliminates the most options.
  • The correct answer is the only option that passes every rule at the same time.

Reflection

Options A and C each satisfy Rule 1 but fail Rule 2. Options B and D each satisfy one rule but fail the other. At Level E, distractors are designed to satisfy one rule convincingly — spotting that a second rule exists is the real challenge.

Bridge forward

In harder Figure Classification questions, look for rules in: line style, shading, rotation, size, count, and position. When one rule leaves multiple options standing, a second rule is always present — keep looking until only one option survives all checks.

Conclusion

The answer is E — a hexagon with 6 dots above and 4 internal lines matched by 4 short lines below. It is the only option that satisfies both rules simultaneously: dots equal sides, and internal lines equal bottom lines.

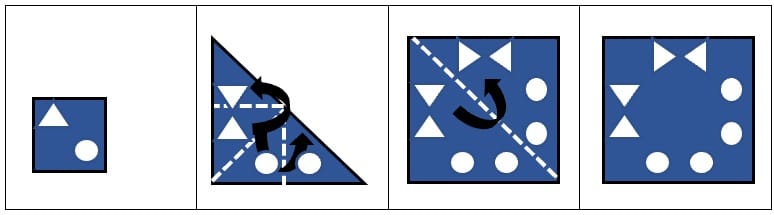
Non-Verbal Reasoning · Figure Matrices

CAT4 Level E Figure Matrices sample question. A 3×3 grid. Row 1: outlined rectangle; outlined T-shape (rectangle with narrower rectangle on top); solid black T-shape rotated 90° clockwise. Row 2: outlined triangle; outlined triangle with square on top; solid black combined shape rotated 90° clockwise. Row 3: outlined diamond; outlined diamond with trapezoid on top; missing cell. Five answer options labelled A to E.

Figure Matrices · CAT4 Level E

Read across the columns, not down the rows. Each column applies a transformation — find both transformations, confirm them across two complete rows, then apply them to the missing cell.

Column-transformation method — works on all Figure Matrices questions

Question type

Figure Matrices

Skill tested

Tracking two simultaneous transformations

Difficulty

Hard

What to notice first

Two transformations operate across the columns. Col 1 → Col 2: a new shape is added on top of the base shape, forming a combined figure — both shapes remain outlined (white). Col 2 → Col 3: the combined figure is rotated 90° clockwise and filled solid black. Both transformations must be applied together to reach the correct answer.

Rule 1

Col 1 → Col 2

A new shape is added on top of the base shape. The combined figure stays outlined — no fill, no rotation yet.

Rule 2

Col 2 → Col 3

The combined figure rotates 90° clockwise AND is filled solid black. Both changes happen at the same time.

Apply

Row 3 missing cell

Diamond + trapezoid on top → rotate 90° CW → trapezoid moves to the right → fill black = Option C.

Core rule

At Level E, Figure Matrices apply two transformations simultaneously. Missing one — here, the rotation direction or the fill — produces a plausible but wrong answer. Both must be verified across rows 1 and 2 before applying to row 3.

Verify the rules across all three rows

Confirm both transformations hold in rows 1 and 2 before applying them to row 3.

RowCol 1 — base shapeCol 2 — base + addition on topCol 3 — rotated 90° CW + black
1Rectangle (outlined)T-shape — rect + narrower rect on top (outlined)T-shape rotated 90° CW, filled black ✓
2Triangle (outlined)Triangle + square on top (outlined)Combined rotated 90° CW, filled black ✓
3Diamond (outlined)Diamond + trapezoid on top (outlined)Rotate 90° CW → trapezoid moves right · fill black = C

Rotation logic for row 3

In col 2, the trapezoid sits on top of the diamond — a vertical arrangement. Rotating 90° clockwise moves whatever was at the top to the right. So the trapezoid ends up to the right of the diamond — a horizontal arrangement — and both shapes are filled black.

Option check

A

Eliminate

Both shapes are outlined, not filled. This option applies the rotation correctly (trapezoid on right) but misses the fill transformation entirely. Col 3 must always be solid black.

B

Eliminate

Filled black ✓ but the trapezoid is on the left — this is a 90° counter-clockwise rotation, not clockwise. The rotation direction is wrong.

C

Correct

Filled black ✓ · trapezoid on the right ✓ · correct proportions ✓. Both transformations are applied exactly: 90° clockwise rotation moves the trapezoid from top to right, and the combined shape is filled solid black.

D

Eliminate

Filled black ✓ · trapezoid on the right ✓ — but the trapezoid is oversized, noticeably wider than the diamond. The proportions do not match the combined shape from col 2. The Level E trap: B, C, and D all look similar at a glance.

E

Eliminate

Both shapes are outlined and the arrangement is still vertical — this is simply col 2 of row 3 with no transformations applied. Neither rotation nor fill has been carried out.

Use this checklist on every Figure Matrices question

  • Read across the columns first — identify what changes from col 1 to col 2, then from col 2 to col 3.
  • Confirm both transformations hold in every complete row before applying them to the missing cell.
  • At Level E, always check rotation direction (clockwise vs counter-clockwise) and fill separately — each is a distinct trap.

Reflection

Options B, C, and D are all solid black with a horizontal arrangement — they look nearly identical at a glance. The Level E difficulty is distinguishing between them: B has the trapezoid on the wrong side, D has the wrong size. Only C matches both the rotation direction and the proportions exactly.

Bridge forward

In harder Figure Matrices, two or three transformations may apply simultaneously. Always list each one before looking at the options — rotation direction, fill, size, and position are all independent checks. Missing even one leads to a plausible distractor.

Conclusion

The answer is C — a solid black diamond with a solid black trapezoid on the right. The col 2 figure (diamond + trapezoid on top) is rotated 90° clockwise, moving the trapezoid from the top to the right, then filled solid black. Both transformations are confirmed across rows 1 and 2 before applying to row 3.

Spatial Ability Sample Questions

Spatial Ability · Figure Analysis

CAT4 Level E Figure Analysis sample question. Four-panel folding sequence: Panel 1 shows a blue square. Panel 2 shows a diagonal fold line from top-left to bottom-right with a curved arrow indicating the upper-right triangle folds over the lower-left, creating a right triangle. Panel 3 shows the triangle with two further fold lines and arrows — the top portion folds down and the right portion folds left. Panel 4 shows the final small folded shape with one triangular hole and one circular hole punched through. Five answer options labelled A to E show different arrangements of triangles and circles on a blue square.

Figure Analysis · CAT4 Level E

Track every fold in order before thinking about the answer. Each fold doubles the number of holes — and the direction of each fold determines the orientation of the triangle holes when the paper is unfolded.

Fold-count-then-unfold method — works on all Figure Analysis questions

Question type

Figure Analysis

Skill tested

Tracking folds, layers, and hole orientation

Difficulty

Hard

What to notice first

There are three folds before the holes are punched. Fold 1: the square is folded diagonally from top-left to bottom-right — the upper-right triangle folds over the lower-left, creating a right triangle. Fold 2: the top portion of the triangle folds down. Fold 3: the right portion folds left. Two holes are then punched — one triangular, one circular. Three folds create multiple layers, so when the paper is fully unfolded, 8 holes appear in total: 4 triangles and 4 circles. The key question is not how many holes, but which orientation the triangle holes take — that is what separates the correct answer from the distractors.

Rule 1

Count the folds

3 folds = multiple layers. Two holes punched through those layers = 8 holes when fully unfolded (4 triangles + 4 circles).

Rule 2

Track hole orientation

Each fold reflects the hole across that fold line. The triangle hole's pointing direction changes with each reflection — track it through all three unfolds.

Rule 3

Eliminate by orientation

All 5 options show 8 holes in the right positions. The only difference is the triangle direction — use that to eliminate 4 options immediately.

Core rule

At Level E, all options show the correct number of holes — the question tests whether you can track orientation through multiple folds, not just count holes. Answering from hole count alone will not eliminate any option.

Track the fold sequence

Follow each fold step in order. Each step changes the number of layers and the orientation of the triangle hole when reflected.

StepActionPaper shapeLayers
StartFull blue squareSquare1
Fold 1Diagonal fold TL→BR — upper-right over lower-leftRight triangle2
Fold 2Top portion folds downSmaller triangle4
Fold 3Right portion folds leftSmall triangle8
Punch1 triangle + 1 circle hole punched through all layersSmall triangle8
UnfoldedAll folds reversed — holes reflected symmetricallyFull square4△ + 4○ = 8 ✓

Why orientation matters here

The diagonal fold (fold 1) is the critical step. When a triangular hole is reflected across a diagonal line, its pointing direction rotates. The two subsequent folds (top down, right left) then mirror those reflections symmetrically — producing a consistent orientation across all 4 triangle holes. That consistent orientation is what option A shows.

Option check

A

Correct

4 triangles pointing consistently upward + 4 circles, arranged symmetrically. This matches the orientation produced when a triangle hole is reflected across the diagonal fold (TL→BR) and then mirrored through the two subsequent folds.

B

Eliminate

Triangles point downward — a vertical flip of option A. This would result from reversing fold 2 (folding the bottom up instead of the top down). The fold direction was top-down, so the reflections produce upward-pointing triangles, not downward.

C

Eliminate

Triangles alternate up and down. An alternating pattern would require the fold lines to produce inconsistent reflections — which cannot happen when all three folds are applied uniformly to the whole paper.

D

Eliminate

Triangles point right. A horizontal orientation would result from a vertical fold axis — this fold sequence uses a diagonal first fold, which cannot produce horizontally-pointing triangle holes.

E

Eliminate

Triangles point left — the horizontal mirror of D. Same reason as D: a horizontal triangle orientation is impossible with a diagonal-first fold sequence.

Use this checklist on every Figure Analysis question

  • Count the folds first — each fold doubles the number of holes when unfolded.
  • At Level E all options show the correct hole count — eliminate by orientation, not by number.
  • Track the diagonal fold carefully — it rotates triangle orientations and is always the hardest reflection to visualise.

Reflection

The Level E challenge here is not counting the holes — all five options show 8. It is tracking how the diagonal fold changes the triangle orientation. Students who only count holes will have five equally plausible options remaining. Orientation is the only filter.

Bridge forward

In any paper-folding question with a diagonal fold, visualise the triangle hole as an arrowhead. Ask yourself: after reflecting across that diagonal line, which direction does the arrowhead now point? That mental image resolves the orientation question without needing to draw it out.

Conclusion

The answer is A. Three folds create 8 layers. Two punched holes (triangle + circle) produce 4 triangles and 4 circles when unfolded — 8 holes total. The diagonal first fold reflects the triangular hole so it points consistently upward across all four positions. Option A is the only choice showing this orientation.

Step-by-step visual solution for the CAT4 Level E Figure Analysis question: four panels showing the punched folded paper, then progressive unfolding steps revealing how the triangle and circle holes multiply and reflect across the diagonal and subsequent fold lines, resulting in 4 triangles and 4 circles on the fully unfolded square

Spatial Ability · Figure Recognition

CAT4 Level E Figure Recognition sample question. The test shape is an irregular closed polygon with angular edges — roughly C-shaped with its opening facing left. It has a near-horizontal top edge, an angular point at the upper-right, a V-shaped notch cutting back to the left, then a wider base extending to the lower-right. Five answer options labelled A to E each show a larger complex figure that may or may not contain this exact shape hidden within it in the same orientation.

Figure Recognition · CAT4 Level E

Memorise every part of the test shape's outline before looking at any option — then search for that exact outline hidden inside one of the larger figures, in the same direction, with nothing changed.

Fix-then-find method — works on all Figure Recognition questions

Question type

Figure Recognition

Skill tested

Finding a hidden shape in the same orientation

Difficulty

Hard

What to notice first

The test shape is an irregular closed polygon with angular edges — roughly C-shaped with its opening facing left. It has four distinctive features: a near-horizontal top edge, an angular point at the upper-right, a V-shaped notch cutting back toward the left, and a wider base extending to the lower-right. At Level E, all five options contain complex, busy line patterns designed to camouflage the hidden shape. The only way to find it reliably is to fix every part of that outline in your mind first, then trace it inside each option — ignoring all surrounding lines.

Check 1

Fix the outline precisely

Name every part: top edge, upper-right point, V-notch cutting left, wider lower-right base, opening facing left. Do this before looking at any option.

Check 2

Direction must match exactly

The shape must appear in the same orientation — not flipped, not rotated. A shape that looks similar but points the other way is a different shape.

Check 3

Trace — ignore surrounding lines

In each option, ignore all extra lines. Ask only: can the exact outline be traced cleanly within this figure? In option B, it can.

Core rule

At Level E, the options are deliberately complex. The extra lines are there to prevent you from seeing the hidden shape at a glance. Do not compare whole pictures — trace one specific outline and ignore everything else.

Model the pattern

1

Step 1 — Break the test shape into parts

Do not think of it as "a C-shape." Name its exact parts: top edge (near-horizontal), upper-right angular point, V-notch (cuts back to the left), lower-right base (wider). You are looking for these four features in the same arrangement.

2

Step 2 — Ask one strict question per option

Can I trace the top edge, the upper-right point, the V-notch, and the wider base — all in the correct orientation — as a clean connected outline inside this figure? If any part is missing, wrong direction, or distorted, eliminate immediately.

3

Step 3 — Confirm in option B

Inside the complex pentagon-like figure of option B, the exact angular C-shape can be traced in full — top edge, upper-right point, V-notch, wider base — all in the same left-facing orientation as the test shape. The extra lines surrounding it are distractors only.

Option check

A

Eliminate

The figure has many intersecting lines going in multiple directions. The angular C-shape cannot be traced as a clean connected outline in the correct orientation — the crossing lines break every attempted trace.

B

Correct

The exact test shape — top edge, upper-right angular point, V-notch, wider lower-right base, opening facing left — can be traced cleanly within this figure. The surrounding pentagon lines and interior diagonals are distractors. The hidden outline is intact and unchanged.

C

Eliminate

The dominant structure is a triangular mountain form with rectangular elements. This belongs to a completely different shape family — the angular C-outline and its V-notch cannot be found anywhere within it.

D

Eliminate

The figure uses diagonal lines within a quadrilateral frame. The specific sequence of features — upper-right point, V-notch cutting left, wider base — does not appear in the correct orientation within this arrangement.

E

Eliminate

The angular forms present here resemble letter-like structures. While some lines are similar in angle, the complete test shape outline — with its V-notch and left-facing opening — cannot be traced in the correct orientation.

Use this checklist on every Figure Recognition question

  • Break the test shape into named parts before scanning any option — top edge, corners, notches, direction of opening.
  • The shape must appear in the same orientation — a flipped or rotated version is always wrong.
  • In complex options, ignore all surrounding lines and trace the test outline alone — if even one part cannot be found, eliminate that option.

Reflection

At Level E, Figure Recognition options are intentionally dense with lines. The complexity is the distraction — not the difficulty. Once you stop comparing whole pictures and focus on tracing one specific outline, the correct option becomes the only one where every part fits cleanly.

Bridge forward

In all Figure Recognition questions, the more complex the options look, the more important it is to name the test shape's parts before you begin. Students who skip this step compare whole pictures and get confused by the extra lines. Students who name the parts first have a precise checklist — and only one option passes every check.

Conclusion

The answer is B. It is the only option that contains the exact test shape — an irregular angular C-shaped polygon with an upper-right point, a V-notch cutting left, and a wider lower-right base — hidden within a larger complex figure, in exactly the same orientation as the test shape.

Step-by-step solution for the CAT4 Level E Figure Recognition question: the test shape is shown in orange on the left, and the same shape is highlighted in red within option B on the right, confirming that the angular C-shaped polygon appears in the same orientation hidden inside the larger complex figure

Get full access to 1,000+ CAT4 Level E practice questions with expert tips, mock exams, and step-by-step explanations.

Get Full Practice

CAT4 Level E (Year 8) Practice Test Walkthrough

Step-by-step answers to real CAT4 Level E exam-style questions for Year 8 students — covering all four batteries: Figure Matrices, Verbal Reasoning, Number Analogies, Number Series, Verbal Classification, Figure Analysis, and Figure Recognition.

CAT4 Level E (Year 8) Practice Test Walkthrough — step-by-step answers to real CAT4 exam-style questions for Year 8 students across all four batteries

CAT4 Level E (Year 8) Practice Test Walkthrough · Step-by-step answers across all 4 batteries · Watch on YouTube →

What Do CAT4 Level E Scores Mean for Year 8?

CAT4 Level E results are reported using three standardised score types, developed by GL Assessment to measure reasoning ability consistently across the national cohort. Each one gives schools and parents a different angle on how a Year 8 child's cognitive abilities compare with pupils of the same age nationally. CAT4 Level E is the CAT4 test Year 8 schools use to review and update the reasoning profile established at secondary entry — with GCSE options decisions and set reviews on the immediate horizon, these results carry significant weight.

Standard Age Score (SAS)

The main score used to measure a child's performance against other children of exactly the same age. SAS scores run from 60 to 140, with 100 set as the national average. A score above 100 means the child performed better than the typical child of that age; below 100 means below average. On CAT4 Level E, the SAS is age-standardised specifically for Year 8 pupils and gives schools an updated cognitive benchmark — one that can confirm, challenge or revise the set placements made from Year 7 Level D results.

National Percentile Rank (NPR)

Expresses a child's result as a position within the national population. An NPR of 75, for example, means the child scored higher than 75 out of every 100 same-age pupils nationally. NPR values range from 1 to 99. For Year 8 CAT4 Level E results, the NPR is a valuable reference point for parents navigating set movement discussions with school — a meaningful shift in percentile rank between Year 7 and Year 8 is a strong case for set review.

Stanine

A nine-point performance band that maps directly from the NPR. Stanines run from 1 (Very Low) to 9 (Very High) and group pupils into broad, easy-to-read bands. They help parents and teachers get a clear at-a-glance picture of where a child sits without needing to interpret a precise number. In CAT4 Level E reports, stanines give Year 8 teachers a consistent, comparable measure of reasoning development — particularly useful when assessing whether a student's profile has shifted since their Year 7 assessment.

Learn more about CAT4 scores and what they mean for Year 8 pupils →

What is a Good CAT4 Score in Year 8?

All CAT4 scores are centred on a national average of 100, standardised by GL Assessment across the full Year 8 cohort. Knowing which band your child's CAT4 Level E score falls into helps you understand their reasoning profile clearly and in context. On CAT4 Level E, most Year 8 pupils score between 85 and 115. With GCSE option choices typically made at the end of Year 8 or start of Year 9, a strong CAT4 test Year 8 result is one of the clearest indicators of which subject pathways a child is best positioned to pursue.

Average (90–110)

Scores within this range are considered typical for a child's age. A score of exactly 100 is the national average; scores between 90 and 110 indicate reasoning ability that is broadly in line with same-age peers. For CAT4 Level E, this band represents the majority of the national Year 8 cohort and reflects steady cognitive development through the first two years of secondary school.

Above Average (111–119)

Scores in this range indicate reasoning ability above the national average for the child's age. Children scoring here are performing meaningfully better than most same-age peers, though not yet in the high-ability band. On CAT4 Level E, an above-average score in Year 8 strengthens the case for upper-set placement and positions a child well for the more demanding GCSE subjects ahead.

High Ability (120–129)

Scores in the 120–129 range point to strong reasoning skills and are often seen in children who pick up new concepts quickly or show early academic confidence. On the CAT4 Level E assessment, a score in this band places a Year 8 child in the top 10% nationally — a level that supports top-set placement across core subjects and signals strong readiness for triple science, higher-tier maths and other demanding GCSE pathways.

Gifted and Talented (130+)

A score of 130 or above is typically classified as Gifted and Talented , reflecting exceptional reasoning ability compared with pupils of the same age across the country. On CAT4 Level E, a score of 130 or above in Year 8 places a child in the top 2% nationally — a strong indicator for accelerated GCSE programmes, selective sixth form entry, and early scholarship consideration at independent schools.

Tips for CAT4 Level E

To excel in CAT4 Level E, adopting effective strategies and creating a focused preparation plan is essential. Here are some tips to enhance your performance:

Understand the test format

Take the time to understand the structure and format of CAT4 Level E thoroughly.

This will help you manage your time and approach each section with confidence.

Practice with sample questions and mock tests

Regularly practice with sample questions and mock tests designed explicitly for CAT4 Level E.

This will familiarize you with the types of questions and improve your speed and accuracy.

Get a Full-length preparation course with accurate simulations

You can download our CAT4 Practice Test PDF Grade 8

You can also use our interactive Free CAT4 Practice Test.

Identify and strengthen weak areas.

Through practice, identify your weaker areas in each cognitive domain and focus on improving them.

Seek additional resources and guidance from educators, or work with tutors to strengthen your skills.

Develop Critical Thinking Skills

Engage in activities that promote critical thinking, such as puzzles, brain teasers, and logical reasoning exercises.

This will sharpen your cognitive abilities and enhance your performance on the assessment.

Manage Your Time Effectively

Time management is crucial during the CAT4 Level E exam.

Practice solving questions under timed conditions to improve your speed and ability to work efficiently. Allocate the appropriate time to each section based on its weight and the number of questions.

Review Key Concepts

Take the time to review and refresh key concepts in verbal reasoning, non-verbal reasoning, quantitative reasoning, and spatial reasoning.

Use study materials and online resources to reinforce your understanding.

Seek Guidance and Support

If you encounter difficulties or have questions while preparing, seek guidance from teachers, tutors, or educational professionals.

They can provide valuable insights, clarify concepts, and offer personalized strategies.

Stay Relaxed and Maintain a Positive Mindset

Approach the CAT4 Level E exam calmly and positively.

Practice relaxation techniques and positive self-talk to alleviate stress and anxiety. Trust in your preparation and believe in your abilities.

These tips can enhance your performance and maximize your potential in the CAT4 Level E assessment.

Support

Spotted something that needs fixing?

If you notice an error, broken link, or unclear explanation, email us and we’ll review it.

Conclusion

CAT4 Level E & CAT tests Year 8 tests evaluate how well students think and solve problems. It’s essential to understand what it’s about and how it works.

This guide has tips to help you prepare, like practising sample questions and managing your time wisely.

With practice and a positive attitude, you can do well on the test and get a high score. You can learn more about CAT4 levels here.

Get full access to 1,000+ CAT4 Level E practice questions with expert tips, mock exams, and step-by-step explanations.

Get Full Practice

CAT4 Level E — Frequently Asked Questions

What is CAT4 Level E?

CAT4 Level E is the Cognitive Abilities Test typically used in Year 8 (ages 12–13) to profile pupils’ reasoning at lower secondary.

Who takes this level and when?

Most Year 8 pupils take it. Schools set the date, but cohorts are usually assessed in the same term for fair comparison.

What does this level assess?

Four areas of reasoning: verbal, non-verbal, quantitative, and spatial, giving a balanced view of learning potential beyond curriculum tests.

How is the test structured?

It comprises four short, timed tests delivered in two parts, with fixed timings suitable for Year 8 pupils.

Is it paper or online?

Schools may run it on paper or digitally; your child’s school will confirm the format and provide instructions in advance.

How are scores reported?

Results are shown as Standard Age Scores (mean 100), percentiles, and stanines (1–9), comparing performance with same-age peers.

What is a good score at this level?

Around 100 SAS is average for age. Higher SAS and stanines indicate stronger reasoning, but schools consider the full profile, not a single number.

How do schools use the results in Year 8?

Teachers use the profile to tailor support and challenge, inform grouping and targets, and guide subject choices and interventions.

How can my child prepare?

Familiarity helps: review sample item types, keep practice short and positive, and ensure good rest and a calm routine on test day.