Non-Verbal Reasoning · Figure Classification
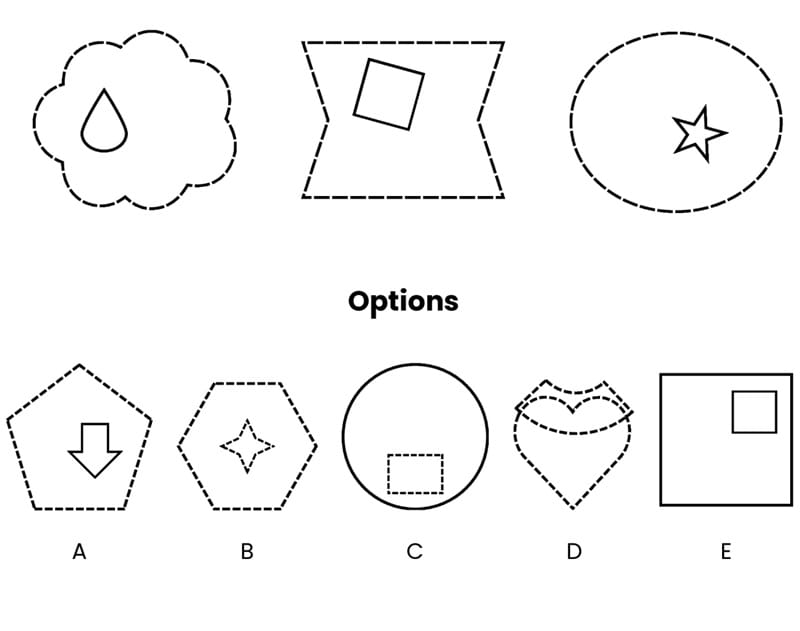
Figure Classification · CAT4 Level A
Focus on the line styles across all three stem figures — not the shape names — and carry that exact pattern into the answer options.
What to notice first
All three stem figures follow the same two-part structure. A dashed cloud, a dashed concave quadrilateral, and a dashed circle — three completely different outer shapes, but every one of them is drawn with a dashed outline. Inside each, the smaller shape is drawn with a solid outline. Shape identity is not the rule. Line style is.
Check 1
Look at the outer shape
Cloud, concave quadrilateral, circle — all three outer shapes are dashed, even though the shapes themselves differ.
Check 2
Look at the inner shape
In every stem figure, the smaller shape inside is drawn with a solid outline — no dashes.
Check 3
Match the line-style pattern
The correct answer must copy both parts of that rule exactly — dashed outside, solid inside — regardless of which shapes are used.
Core rule
Choose the figure with a dashed outer shape and a solid inner shape. Both conditions must hold at the same time — one alone is not enough.
Model the pattern
Step 1 — Ignore shape identity
The three stem figures use a cloud, a concave quadrilateral, and a circle. Since the shapes are all different, shape type cannot be the shared rule.
Step 2 — Identify what stays the same
What is consistent across all three stems is the outline pattern: dashed outside, solid inside. That is the rule to carry forward.
Step 3 — Test each option against the rule
Check the outer line style first, then the inner. Only Option A — a dashed pentagon with a solid arrow inside — satisfies both conditions.
Option check
Correct
A dashed pentagon with a solid arrow inside — both conditions of the stem rule are met exactly.
Eliminate
A dashed hexagon with a dashed star inside — the inner shape must be solid, not dashed.
Eliminate
A solid circle with a dashed square inside — the line styles are the exact reverse of the stem rule.
Eliminate
Both the outer and inner shapes are dashed — the inner shape breaks the rule; it must be solid.
Eliminate
A solid square containing a solid square — the dashed outer outline seen in every stem figure is missing entirely.
Use this checklist on every Figure Classification question
- Check whether the shared rule is about outline style rather than shape type.
- Compare outer-shape style and inner-shape style as two separate checks.
- Choose the option where both conditions match the stem rule exactly.
Reflection
The three stem shapes — cloud, concave quadrilateral, circle — look very different from each other. That is the question's way of telling you shape identity is irrelevant. Focus only on what they share: dashed outside, solid inside.
Bridge forward
In other Figure Classification questions, check line style, shading, rotation, and size before looking at shape family. The shared rule is almost never just "they are the same shape."
Conclusion
The answer is A — a dashed pentagon with a solid arrow inside. It is the only option that satisfies both conditions of the stem rule: dashed outer shape, solid inner shape.
Non-Verbal Reasoning · Figure Matrices
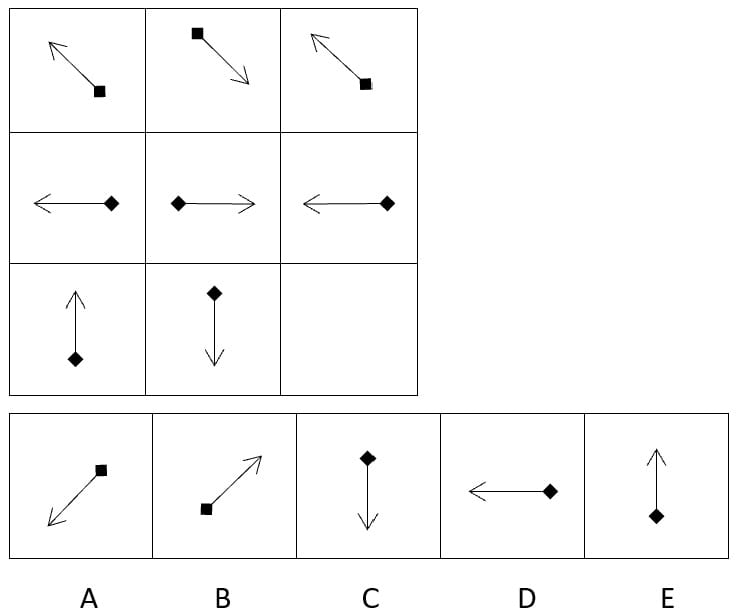
Figure Matrices · CAT4 Level A
Track the arrow direction across each row — not the drawing details. Each row has its own axis, and the direction alternates along that axis.
What to notice first
Each row has its own direction axis, and within that row the arrow alternates between two opposite directions. The top row uses a diagonal axis: up-left, down-right, up-left. The middle row uses a horizontal axis: left, right, left. The bottom row uses a vertical axis: up, down — so the missing third box must point up to complete the alternation.
Check 1
Read the row pattern
In every row, the arrow direction flips to its opposite in the middle box, then returns to the original direction in the third box.
Check 2
Identify the bottom row's axis
The bottom row uses a vertical axis. The first arrow points up, the second points down — so the third must point up again.
Check 3
Choose the matching option
The answer must show a straight upward arrow with a square at its lower end — matching the style of the first box in the bottom row.
Core rule
Within each row the pattern is: original direction → opposite direction → original direction. Each row has its own axis — diagonal, horizontal, or vertical — but the alternation rule is the same in all three.
Model the pattern
Step 1 — Confirm the rule across the top two rows
Top row: up-left → down-right → up-left. Middle row: left → right → left. In both cases the direction alternates and then returns. The rule is consistent.
Step 2 — Apply to the bottom row
The bottom row uses a vertical axis. Box 1 points up, box 2 points down. Following the same alternation rule, box 3 must point up.
Step 3 — Match the exact style
The missing figure needs a straight upward arrow with a small square at its lower end — the same tail position as the first box in the bottom row. That is Option E.
Option check
Eliminate
Points down-left diagonally — wrong axis entirely. The bottom row uses a vertical axis, not a diagonal one.
Eliminate
Points up-right diagonally — again the wrong axis. A diagonal arrow belongs to the top row's pattern, not the bottom row's.
Eliminate
Points downward vertically — correct axis, wrong direction. This repeats the middle box rather than returning to the original upward direction.
Eliminate
Points left horizontally — wrong axis. A horizontal arrow belongs to the middle row's pattern, not the bottom row's.
Correct
Points upward vertically with a square at the lower end — correct axis, correct direction, correct tail position. It completes the bottom row's alternation exactly.
Use this checklist on every Figure Matrices direction question
- Identify the axis each row uses — diagonal, horizontal, or vertical.
- Confirm the direction alternates and returns across the first two complete rows.
- Apply the same alternation to the incomplete row and match every detail — direction and tail position.
Reflection
Options A, B, C, D each use the wrong axis or the wrong direction within the correct axis. Only E gets both right — vertical axis and upward direction. Checking axis first eliminates most options immediately.
Bridge forward
In other Figure Matrices questions, look for a repeated change across rows or columns first — direction, rotation, size, or shading. The rule is almost always simpler than it first appears.
Conclusion
The answer is E — an upward vertical arrow with a square at its lower end. Each row alternates direction along its own axis: diagonal in row one, horizontal in row two, vertical in row three. The missing box must point up to complete the vertical alternation.
Spatial Ability · Figure Analysis
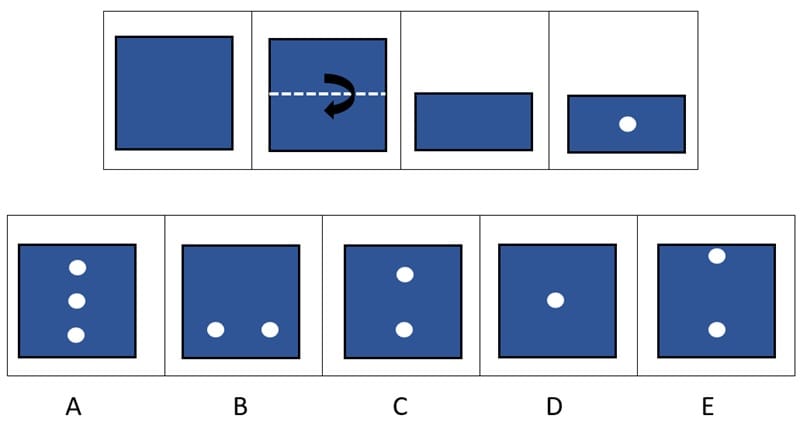
Figure Analysis · CAT4 Level A
Follow the fold first, then place the holes — do not try to imagine the final result before you have tracked each step in order.
What to notice first
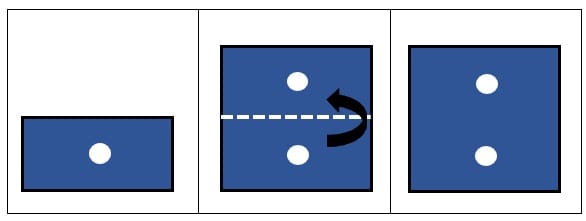
The paper is a blue square. It is folded upward along a horizontal centre line, so the top half folds over the bottom half, creating a rectangle with two layers. A single hole is then punched through the centre of the folded rectangle — which means it passes through both layers at once. When the paper is unfolded, that one punch reveals two holes: one in the bottom half where the punch landed, and one reflected directly above it in the top half.
Check 1
Find the fold line
The fold is horizontal along the centre — the top half folds over the bottom half, creating two layers.
Check 2
Track the hole through both layers
The punch goes through both layers at once. One punch through a single fold always produces exactly two holes.
Check 3
Unfold symmetrically
When unfolded, the two holes must be vertically aligned — one in each half — at the same left-right position as the punch.
Core rule
One fold creates two layers. One punch through two layers creates two holes. The holes reflect across the fold line — same left-right position, opposite halves of the paper.
Model the pattern
Step 1 — Identify the fold
The blue square folds upward along its horizontal centre line. The result is a rectangle — half the original height — with the top and bottom halves stacked directly on top of each other.
Step 2 — Locate the punch
The hole is punched through the centre of the folded rectangle — centred both left-to-right and top-to-bottom within the folded shape. Both layers are pierced at the same central point.
Step 3 — Unfold and place the holes
Open the paper back to its full square. One hole appears in the centre of the bottom half; its reflection appears in the centre of the top half, directly above it. Two holes, vertically aligned, both centred. That is Option C.
Option check
Eliminate
Shows three holes. One punch through a single fold produces exactly two holes — never three.
Eliminate
Shows two holes side by side horizontally. A horizontal fold reflects holes vertically — one above the other — not across the page.
Correct
Shows two holes vertically aligned, one centred in the top half and one centred in the bottom half — exactly what a horizontal fold and a central punch produce.
Eliminate
Shows only one hole. The folded paper has two layers, so one punch must appear twice when unfolded.
Eliminate
Shows two holes that are not correctly reflected across the horizontal fold line. The holes are offset from centre — they do not match the central punch position.
Use this checklist on every Figure Analysis question
- Find the fold direction first — horizontal, vertical, or diagonal.
- Count the layers: one fold creates two layers, two folds create four.
- Reflect the hole across the fold line without changing its position on the other axis.
Reflection
The most common mistakes here are choosing three holes (Option A) or two side-by-side holes (Option B). Both errors come from skipping the fold direction. One horizontal fold always produces a vertical pair of holes.
Bridge forward
In other paper-folding questions, always locate the fold line first. That single step tells you whether the final holes appear above-below, left-right, or as diagonal mirror pairs.
Conclusion
The answer is C. A horizontal fold creates two layers. One central punch through both layers produces two holes when unfolded — one centred in the top half, one centred in the bottom half, vertically aligned.
Spatial Ability · Figure Recognition
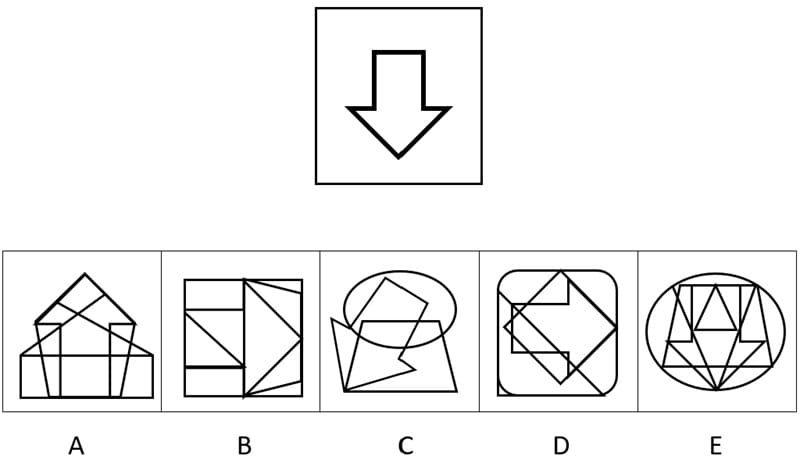
Figure Recognition · CAT4 Level A
Memorise the exact outline of the test shape first — then hunt for that precise outline hidden inside one of the larger figures.
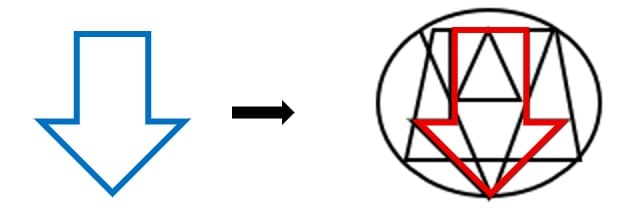
What to notice first
The test shape is a downward-pointing arrow. It has a rectangular shaft at the top, short horizontal shoulders on each side, and two diagonal edges that slope inward and meet at a single point at the bottom. Every part of that outline must be present — in the same direction — in the correct answer. A flipped, rotated, or distorted version does not count.
Check 1
Fix the exact outline in your mind
Study the arrow's parts: rectangular shaft at the top, flat shoulder corners at the sides, then two diagonal edges meeting at a single bottom point.
Check 2
Keep the same direction
The arrow points down. The matching hidden shape must also point down — a flipped or rotated version is a different shape and must be rejected.
Check 3
Search inside the larger figure
Ignore all extra lines. The task is to trace the exact arrow outline cleanly inside the option — nothing added, nothing missing.
Core rule
Choose the option that contains the same downward-pointing arrow in the same orientation and structure. A near match is still wrong — every part of the outline must be exactly right.
Model the pattern
Step 1 — Study the test shape in detail
Do not think of it as just "an arrow." Notice its exact build: a straight rectangular shaft at the top, short horizontal shoulders at each side, then two inward diagonal edges meeting at one point at the bottom.
Step 2 — Ask one strict question per option
Can this exact downward-pointing arrow be traced inside the larger picture — shaft, shoulders, diagonal sides, and bottom point — without bending or altering any part of it?
Step 3 — Confirm the answer
Only Option E contains the same arrow shape. The extra lines surrounding it are distractors — the complete downward-pointing arrow can still be traced clearly within the design.
Option check
Eliminate
Several straight-edged shapes are present, but they do not combine to form the same downward arrow with the correct shaft and bottom point.
Eliminate
The lines create a large angular wedge, but the exact arrow outline — shaft, shoulders, single bottom point — cannot be traced within it.
Eliminate
Irregular angled lines are present, but the downward arrow with its rectangular top and pointed bottom cannot be found in the correct structure.
Eliminate
Overlapping shapes are present, but they do not produce the arrow outline in the correct downward orientation.
Correct
The same downward-pointing arrow can be traced inside this larger figure. The shape, direction, shaft, shoulders, and bottom point all match the test shape exactly.
Use this checklist on every Figure Recognition question
- Study the exact outline of the test shape — shaft, corners, edges, and direction — before looking at any option.
- Match direction carefully: a rotated or flipped version is a different shape and must be rejected.
- Ignore extra lines inside the options and ask only: can the exact outline be traced cleanly within this figure?
Reflection
This question becomes much easier once you stop comparing whole pictures and focus only on tracing one specific outline. The extra lines in the options are there to distract — ignore them and look for the arrow alone.
Bridge forward
In other Figure Recognition questions, name the exact parts of the test shape before scanning the options — corners, straight sections, curves, and direction. A near match with one part wrong is still a wrong answer.
Conclusion
The answer is E. It is the only option that contains the same downward-pointing arrow — rectangular shaft, horizontal shoulders, and single bottom point — hidden within a larger figure, in the same orientation as the test shape.