Non-Verbal Reasoning · Figure Matrices
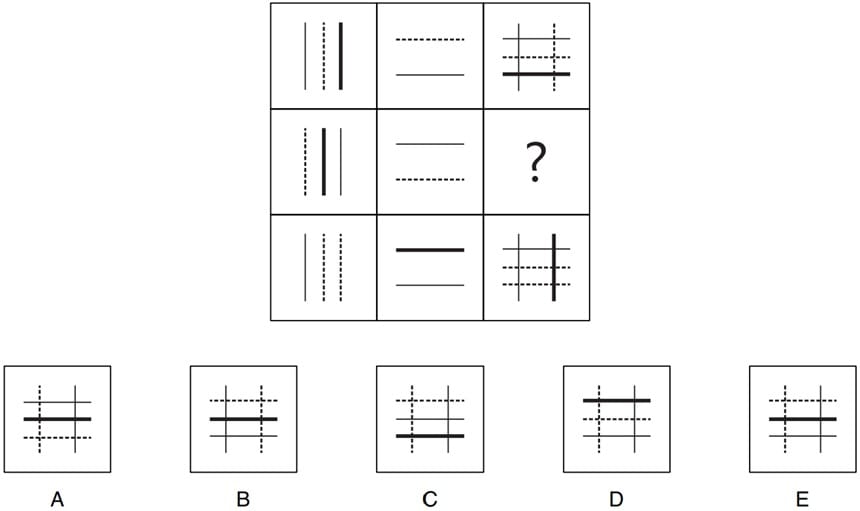
Figure Matrices · Level G
The trap in a matrix question is to scan the five options hoping one "looks right." Don't. This grid runs on a rule you can apply yourself: in every row, the first two boxes are each turned 90° clockwise and then layered into the third. Work that rule on the second row, build the missing box yourself, and you will know the answer before you read a single option.
What to notice first
Don't go hunting for a vague "missing shape." This matrix is governed by a single row rule. In each row, the figure in the first box and the figure in the second box are each rotated 90° clockwise, and the two rotated results are then layered together in the third box. Row 1 lays the rule out and Row 3 confirms it — so the missing box (second row, third position) must be built from the second-row left box and the second-row middle box using exactly that rotate-then-layer rule, and nothing else.
Check 1
Confirm the rule's direction
Row 1 demonstrates the method and Row 3 repeats it. The rule runs across rows, not down columns — so Row 2 must obey it too.
Check 2
Rotate, don't just count
Three vertical lines become three horizontal lines; two horizontal lines become two vertical lines. The same number of lines is not enough — their style and position must survive the turn.
Check 3
Layer in the right order
The answer must hold every line in its correct rotated place — broken, bold, and thin each land somewhere specific. Position is graded just as strictly as count.
Core rule
Across each row, Box 1 and Box 2 are each rotated 90° clockwise, then layered together to form Box 3.
Model the pattern
Step 1 — Read the source boxes
Look only at the second row. Box 1 holds three vertical lines: broken on the left, bold in the middle, thin solid on the right. Box 2 holds two horizontal lines. These are your raw materials — ignore the rest of the grid for now.
Step 2 — Rotate Box 1
Turn Box 1 90° clockwise. The three vertical lines fall into three horizontal lines: the broken line moves to the top, the bold line stays in the middle, and the thin solid line drops to the bottom.
Step 3 — Rotate Box 2, then build and match
Turn Box 2 90° clockwise — its two horizontal lines stand up into two verticals, broken on the left and thin solid on the right. Now layer the two rotated boxes into one figure: three horizontals (broken, bold, thin, top to bottom) crossed by two verticals (broken left, thin right). Build that full picture in your mind before you look down — only one option matches it.
Option check
Eliminate
Horizontals out of order. The two vertical lines are placed correctly, but the broken horizontal sits at the bottom. After the rotation it belongs at the top.
Eliminate
Verticals reversed. The three horizontal lines are right, but the verticals are the wrong way round — the broken line should be on the left and the thin solid line on the right.
Eliminate
Solid lines swapped. The verticals fit, but the bold and thin horizontals have traded places. The bold line belongs in the middle, the thin solid line at the bottom.
Eliminate
Bold line misplaced. The verticals are correct, but the bold horizontal has jumped to the top. It must stay in the middle, exactly where it sat before the rotation.
Correct
Exact match. The only option with all five lines in their correct rotated positions: a broken horizontal on top, a bold horizontal in the middle, a thin solid horizontal at the bottom, crossed by a broken vertical on the left and a thin solid vertical on the right.
Use this checklist next time
- Decide first whether the rule runs across rows or down columns — then commit to that direction.
- Apply the transformation to each source box carefully before you glance at any option.
- Check line style and line position together: after a rotation, both have to be right.
Reflection
This question is only hard if you guess. Rebuild the missing box step by step and it turns into a simple matching exercise — and notice that the order of the lines is graded just as strictly as the rotation itself.
Bridge forward
Every figure-matrix question rewards the same discipline: find the direction of the rule, apply the transformation precisely, then test your constructed answer against all five options rather than picking the one that merely looks close.
Conclusion
Option E is correct. The missing box is built by rotating the first two boxes of the second row 90° clockwise and layering them in the right order — three horizontal lines (broken, bold, thin, top to bottom) crossed by two vertical lines (broken left, thin solid right). E is the only option that reproduces that layout exactly.
Non-Verbal Reasoning · Figure Classification
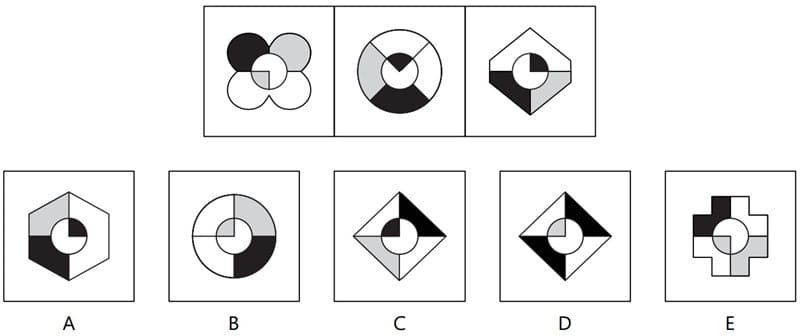
Figure Classification · Level G
This is a relationship question, not a shape-naming one. The outer shape is a decoy — it changes in every figure on purpose. What stays fixed is the shading: two neighbouring quarters coloured grey and black, and an inner circle whose shaded quarter matches the colour of the quarter diagonally across from it. Find the option that keeps all of that, and ignore what shape it happens to wear.
What to notice first
Don't name the shapes — they are a deliberate distraction. Across the three given figures the outer shape keeps changing (overlapping circles, a divided circle, a hexagon), but three things never change. First, the outer shape is always split into four equal quarters. Second, two neighbouring quarters are shaded — one grey, one black, always side by side. Third, the inner circle holds a single shaded quarter, and its colour matches the colour of the outer quarter diagonally opposite it. That third relationship — the diagonal colour match — is the real test, and it is where most distractors are built to fail.
Check 1
Four equal quarters
Whatever the outer shape, it must be divided into four equal parts. No four-part split, no match.
Check 2
Adjacent grey and black
The two coloured quarters must be neighbours, sharing an edge. Grey and black placed diagonally breaks the rule.
Check 3
Diagonal inner match
The inner circle's one shaded quarter must match the colour of the outer quarter diagonally across the centre — not an adjacent one.
Core rule
Outer shape split into four equal quarters; two adjacent quarters grey and black; the inner circle's shaded quarter matches the colour of the outer quarter diagonally opposite it. The shape is a decoy — the diagonal colour match is the deciding test.
Model the pattern
Step 1 — Drop the shape
Ignore what the outer shape is called. Confirm only that it is divided into four equal quarters, then work from colour and position alone for the rest of the question.
Step 2 — Locate the coloured pair
Find the grey quarter and the black quarter. They must be neighbours, sharing an edge. If they sit diagonally across from each other, the option is already out — no need to check the inner circle.
Step 3 — Run the deciding test
Read the colour of the inner circle's shaded quarter, then look at the outer quarter diagonally opposite it. The two colours must be the same. Only the option that survives all three checks is the answer.
Option check
Correct
All three conditions hold. The outer shape is split into four equal quarters, the grey and black quarters are adjacent, and the inner circle's shaded quarter matches the colour of the outer quarter diagonally opposite it. Nothing in the rule is broken.
Eliminate
Diagonal match fails. The outer grey and black are correctly adjacent, but the inner circle breaks the deciding test: its shaded quarter is grey while the outer quarter diagonally opposite it is black. Right outer colours, wrong inner match.
Eliminate
Colours not adjacent. The grey and black quarters sit diagonally across from each other rather than side by side. The adjacency condition fails before the inner circle even comes into play.
Eliminate
Diagonal match fails. The four-part split and the adjacent grey/black are fine, but the inner circle's shaded quarter does not match the colour of the outer quarter diagonally opposite it — the same key relationship B gets wrong, broken a second way.
Eliminate
Structure broken. This is not four equal quarters at all — it is a cross with the colours placed diagonally. It fails the very first condition, so it cannot follow the rule the three given figures share.
Use this checklist next time
- Is the outer shape divided into four equal quarters?
- Are the grey and black quarters neighbours, sharing an edge — not diagonal?
- Does the inner circle's shaded quarter match the colour of the quarter diagonally opposite it?
Reflection
Four of the five options look plausible because the shape and the colours are all present. What separates them is one relationship — the diagonal inner match — applied precisely. Strong candidates test that relationship rather than trusting a general resemblance.
Bridge forward
When the outer shape changes from figure to figure, treat it as noise. The rule lives in what stays constant — here, adjacency and the diagonal colour match. Find the invariant first, then test every option against it.
Conclusion
Option A is correct. It is the only option that keeps all three conditions: four equal quarters, adjacent grey and black, and an inner shaded quarter matching the colour of the quarter diagonally opposite it. B and D break the diagonal inner match, C places the colours diagonally instead of adjacent, and E abandons the four-quarter structure altogether.
Spatial Ability · Figure Analysis
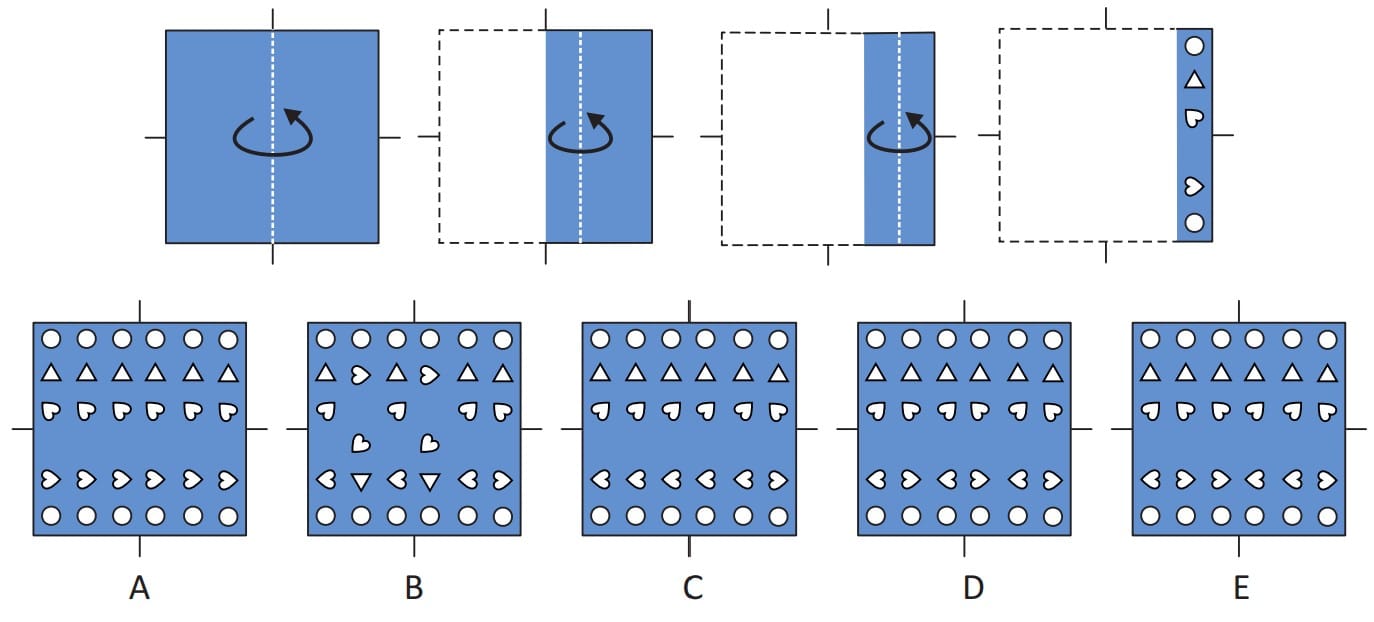
Figure Analysis · Level G
Don't judge this by how the finished square looks overall — that is how the distractors catch you. Work it the safe way: start from the narrow strip, open one fold at a time, and reflect the symbols across each fold line. The catch is that not every symbol survives the mirror the same way, and that difference is the whole question.
What to notice first
Don't read the answer off the overall look of the final square. Start at the narrow strip and open the paper one fold at a time — each unfold places a mirror copy of the symbols across the fold line. Here is the key insight: a mirror leaves symmetrical symbols unchanged but reverses asymmetrical ones. Circles are symmetrical, so they look identical in every copy. The triangles are symmetrical across the fold line too, so they also stay the same. The curved shapes are not symmetrical, so each reflection flips their direction. That means the finished square must show steady, uniform rows of circles and triangles, but curved rows whose direction alternates from one copy to the next.
Check 1
Read the strip
The narrow strip is the only part shown after folding. Top to bottom it gives the five rows the full square must contain: circle, triangle, curved, curved, circle.
Check 2
Unfold by reflection
Each unfold is a mirror copy across the fold line, so the strip's rows repeat sideways across the square, copy after copy.
Check 3
Track what flips
Circles and triangles are mirror-symmetric, so they never change. The curved shapes reverse with every reflection — so the two curved rows must alternate direction, and that is what you check.
Core rule
When the paper unfolds, symmetrical symbols (circles, triangles) keep the same appearance in every copy, while asymmetrical symbols (the curved shapes) appear as mirror flips across each fold line.
Model the pattern
Step 1 — Start from the strip
Begin with the folded strip — it is the only thing shown after the folds, and it lists the five symbol rows the answer must contain. Do not start from the options.
Step 2 — Open one fold at a time
Unfold the paper one step at a time. Each new section is a mirror copy of what was already there, so the same five rows repeat across the square.
Step 3 — Check each row's behaviour
The circle rows and the triangle row must stay identical in every copy; the two curved rows must switch direction each time a mirror copy appears. The option that gets every row right is the answer.
Option check
Eliminate
Curved flip pattern wrong. The circle and triangle rows repeat correctly, but the curved shapes do not reverse in the right pattern as the copies mirror across the fold lines.
Eliminate
Not a clean unfold. The reflected row structure is broken — one or more symbols sit in positions that no single mirror reflection from the strip could produce.
Eliminate
Curved shapes don't alternate. The curved rows mostly keep the same direction throughout, but a true unfold reverses them with every reflection. Same-direction curves are the giveaway.
Correct
Every row behaves. The only option that holds the circle and triangle rows uniform across all copies while flipping the curved shapes' direction exactly as each mirror reflection requires.
Eliminate
Sequence just off. The closest distractor — the curved rows do flip, but not in the exact order the unfolding produces, so at least one curved shape ends up facing the wrong way.
Use this checklist next time
- Start from the final folded strip, not from the answer options.
- Unfold one fold at a time and treat each new section as a mirror copy.
- Separate the symmetrical symbols from the asymmetrical ones and track only which ones flip.
Reflection
The question looks busy, but the work is narrow: once you know circles and triangles are mirror-proof and only the curved shapes flip, you are checking just two rows, not the whole square.
Bridge forward
Every symbol paper-folding question rewards the same routine: rebuild from the folded strip, reflect across each fold line, and watch the asymmetrical shapes — they are always where the answer is decided.
Conclusion
Option D is correct. Unfolding the strip across each fold line keeps the circle and triangle rows identical in every copy while reversing the curved shapes with each reflection — and D is the only option that reproduces both behaviours. A, C, and E mishandle the curved flips, and B breaks the reflected structure entirely.
Spatial Ability · Figure Recognition
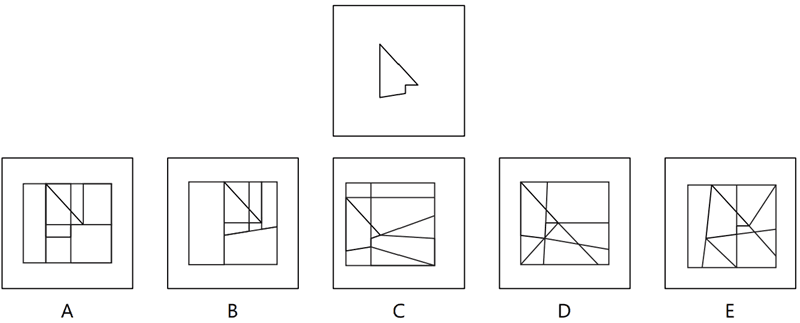
Figure Recognition · Level G
The single rule that cracks every Figure Recognition question: the target hides inside one option at exactly the same size and the same orientation — never rotated, never flipped, never resized. So you are not looking for a shape that resembles the target; you are looking for the target itself, untouched, buried in the lines. Every wrong option here takes that exact shape and turns it, mirrors it, or stretches it — close enough to tempt a fast eye.
What to notice first
Study the target before you look at a single option. It is a narrow arrowhead — a near-vertical left edge dropping from a top point to a bottom-left corner, a diagonal right edge running back up to that top point, a small square notch cut into the lower-right, and a base that tilts very slightly. That notch and the slight tilt of the base are the target's fingerprints. Because the shape is never rotated or flipped, the correct option must show this same outline standing the same way up, at the same size. Fix those features in your mind and most options fall away immediately.
Check 1
Lock the orientation
The shape is never turned or mirrored. Whatever you find must point the same way — apex up, notch at the lower-right.
Check 2
Pick a fingerprint feature
Don't try to match the whole outline at once. Lock onto one distinctive detail — here, the notch and the slightly tilted base — and hunt for that.
Check 3
Trace, don't glance
Follow the actual lines inside each option to see whether they form the exact outline. A shape that only resembles the target is a trap.
Core rule
The target is hidden in exactly one option at the same size and the same orientation — never rotated, flipped, or resized. Match the exact outline, not a look-alike.
Model the pattern
Step 1 — Memorise the fingerprints
Hold the target's defining features in mind: apex at the top, near-vertical left edge, diagonal right edge, a notch at the lower-right, and a slightly tilted base. Spend five seconds here — it saves far more later.
Step 2 — Reject by orientation first
Any option whose matching shape is turned on its side, mirrored, or blown up to a different size is out, however similar it looks. This clears most of the field fast.
Step 3 — Trace the survivors
On what remains, follow the actual lines. The correct option must contain the full outline — including the notch and the tilted base — standing exactly as it does in the test box.
Option check
Eliminate
Right family, wrong proportions. A holds a triangle in the same position with the same diagonal, so it tempts you — but its lower edges are rectangular and horizontal, with no notch and a flat, untilted base. The outline is broken, not the target.
Correct
The target, untouched. The only option that contains the exact outline at the same size and the same orientation: vertical left edge, diagonal right edge meeting at the apex, the small notch at the lower-right, and the same slightly tilted base. Nothing is turned, flipped, or resized.
Eliminate
Rotated. The matching wedge here points sideways — the shape has been turned about 90°. Same shape, wrong orientation, so it fails the rule.
Eliminate
Rotated or mirrored, and larger. The triangles sit at the wrong angles and at a bigger scale. Neither the orientation nor the size matches the target.
Eliminate
Distorted. The shape is there in spirit but stretched to the wrong proportions — a taller, skewed version rather than the exact outline.
Use this checklist next time
- Study the target for five seconds and name its most distinctive feature before looking at the options.
- Reject any option whose match is rotated, flipped, or resized — orientation and size are fixed.
- Trace the actual lines inside the survivors; a resemblance is not a match.
Reflection
Figure Recognition feels like a spot-the-shape puzzle, but it is really an orientation test. The makers always include the same shape turned, mirrored, and stretched — so the moment you commit to "same way up, same size," the look-alikes stop fooling you.
Bridge forward
In every Figure Recognition question, lock the target's orientation and one fingerprint feature first, then scan. Finding a similar shape is never enough — it has to be the exact shape, standing exactly the same way.
Conclusion
Option B is correct. It is the only option that hides the target at the same size and the same orientation — apex up, vertical left edge, diagonal right edge, the notch, and the tilted base all intact. A keeps the rough shape but flattens the base and loses the notch, C turns the shape on its side, D rotates and enlarges it, and E stretches it out of proportion.