
Quantitative Reasoning · Number Series
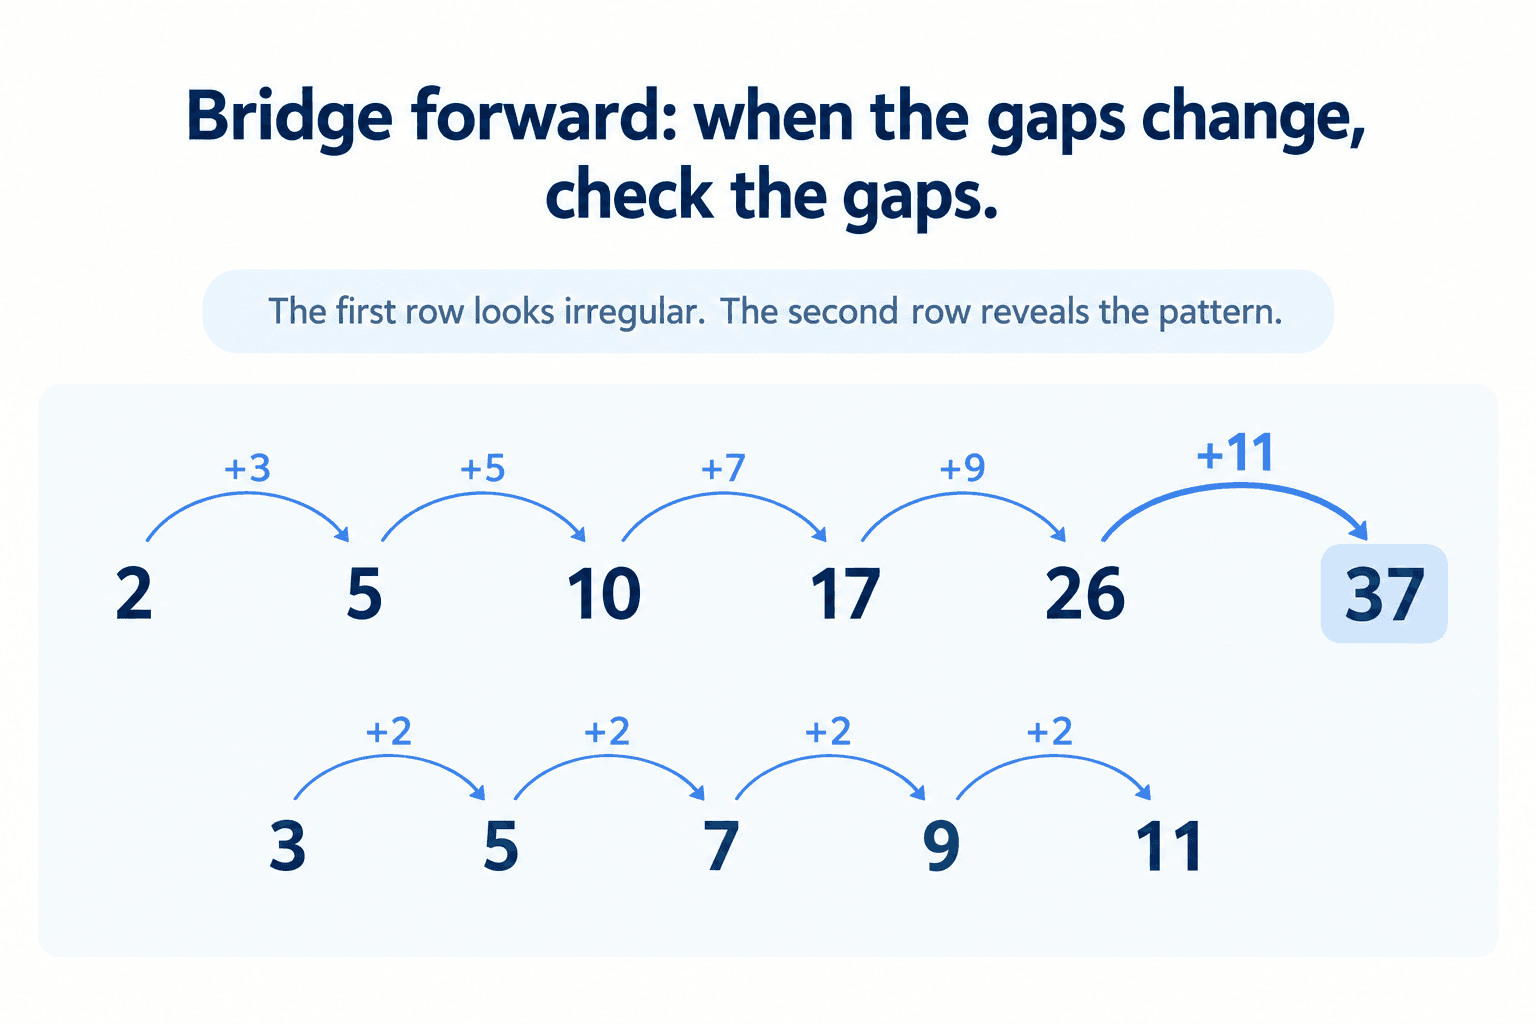
2 5 10 17 26 ?
Number Series · CAT4 Level C
When the jumps between terms are not equal, write out the differences between consecutive terms — the pattern may be hiding one level down.
What to notice first
The terms are 2, 5, 10, 17, 26. The gaps between them are not equal — so there is no simple +n rule. Write the differences between each consecutive pair: 5−2=3, 10−5=5, 17−10=7, 26−17=9. The differences themselves form a pattern: consecutive odd numbers, each increasing by 2. The next difference must be 11, giving 26+11=37.
Check 1
Write the differences
5−2=3 · 10−5=5 · 17−10=7 · 26−17=9. The gaps are 3, 5, 7, 9 — consecutive odd numbers.
Check 2
Extend the difference pattern
Each difference increases by 2. After 9 comes 11. That is the gap before the missing term.
Check 3
Apply to find the answer
26 + 11 = 37. The missing term is 37.
Bonus method — squares
Each term also equals n²+1 for its position: 1²+1=2, 2²+1=5, 3²+1=10, 4²+1=17, 5²+1=26, 6²+1=37. If you know your square numbers, this gives the answer in one step — but the differences method works just as reliably without needing to spot the squares.
Model the pattern
Step 1 — Check whether a simple rule exists
The gaps between terms are 3, 5, 7, 9 — they are not equal, so there is no single +n rule. This is the signal to go one level deeper and look at the differences themselves.
Step 2 — Find the pattern in the differences
The differences are 3, 5, 7, 9 — each one is 2 more than the last. These are consecutive odd numbers. The rule at this level is simple: +2 each time. The next difference will be 9+2=11.
Step 3 — Add the next difference to the last term
The last given term is 26. Add the next difference: 26+11=37. Always go back to the original series to add — not to the differences row.
Option check
Eliminate
33 = 26+7. This comes from reverting to an earlier difference in the sequence rather than continuing the pattern forward. The differences increase — they do not repeat or reverse.
Eliminate
35 = 26+9. This is the most common error — repeating the last difference instead of extending the pattern. The next difference is 11, not 9. Always check whether the differences themselves are changing before applying the last one again.
Correct
37 = 26+11. The differences are 3, 5, 7, 9, 11 — consecutive odd numbers increasing by 2. Adding 11 to the last term gives 37. Also confirmed by the n²+1 method: 6²+1=37.
Eliminate
39 = 26+13. This skips one step in the difference pattern. The differences increase by 2 each time — from 9 the next step is 11, not 13.
Eliminate
41 = 26+15. This overshoots by two steps in the difference pattern. Students who choose this may have misread the sequence or applied the difference rule from the wrong starting point.
Use this checklist on every Number Series
- Write out the differences between every consecutive pair of terms before guessing.
- If the differences are not equal, look for a pattern in the differences themselves.
- Never repeat the last difference without first checking whether differences are growing or changing.
- Always add the next difference to the last term in the original series — not to the differences row.
Reflection
Option B (35) catches students who spot that differences exist but stop one step too early. The habit of writing all differences out — rather than eyeballing them — eliminates this error entirely.
Bridge forward
Second-order differences appear regularly at Level C and above. If a series looks irregular at first glance, the differences between terms almost always reveal a clean pattern. Treat it as a two-row problem, not a one-row problem.
Conclusion
The answer is C — 37. The differences between terms are 3, 5, 7, 9 — consecutive odd numbers increasing by 2. The next difference is 11, giving 26+11=37. This is also confirmed by the n²+1 pattern: 6²+1=37.
Non-Verbal Reasoning Sample Questions
Non-Verbal Reasoning · Figure Classification
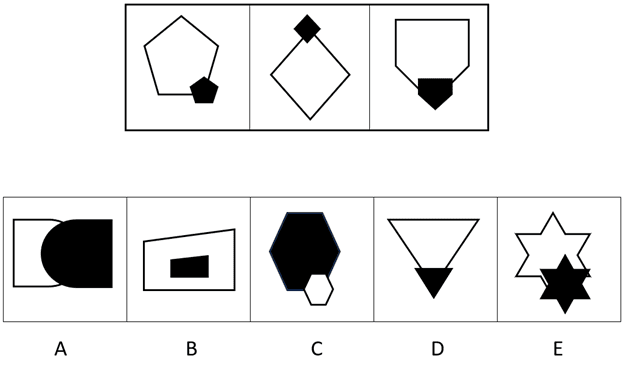
Figure Classification · CAT4 Level C
Look at what the small black shape has in common with the large white shape in the same figure — not at what the three stem figures have in common with each other. The key relationship is always within each figure, not across them.
What to notice first
The three stem figures each show a different large white outlined shape — a pentagon, a diamond, and a shield. They are intentionally unlike each other. This is the question telling you that the shared rule has nothing to do with which shape is used. Instead, look within each figure: in every case, the small solid black shape is an exact copy of the large white shape it sits in — just smaller and filled. The small pentagon copies the large pentagon. The small diamond copies the large diamond. The small shield copies the large shield. That copy relationship — plus the small shape straddling exactly one corner — is the complete rule.
Check 1
Black copies white
The small black shape must be the same type as the large white shape in the same figure. A pentagon produces a small black pentagon. A diamond produces a small black diamond.
Check 2
Fill contrast
Large shape = white outline. Small shape = solid black. If the large shape is filled, or the small shape is an outline, the fill rule is broken.
Check 3
One corner only
The small black copy straddles exactly one corner of the large white shape — partly inside, partly outside. Two corners means it does not fit the rule.
Why the stems use three different shapes
If all three white shapes were the same — for example, all pentagons — a student could guess "the rule is pentagons" and accidentally pick the right answer. Using three different white shapes forces you to look for what is consistent within each figure — the copy relationship between black and white — rather than which shape appears across the stems.
Model the pattern
Step 1 — Ask: does the black shape copy the white shape?
Look at the large white shape in the option first. Now ask: is the small black shape the same type? A white inverted triangle must produce a small black inverted triangle. If the black shape is a different type entirely, the copy rule is broken and the option is eliminated immediately — before anything else needs checking.
Step 2 — Confirm fill contrast
Check the large shape first: if it is solid black, eliminate the option. Then check the small shape: if it is an outline, eliminate it. The contrast must run in one direction only — large white, small black. Both conditions must hold simultaneously.
Step 3 — Count the corners straddled
The small black copy must straddle exactly one corner of the large shape — partly inside, partly outside. Count carefully: if the small shape is fully inside with no corner straddled, wrong. If it straddles two corners at once, wrong. One corner only is the rule.
Option check
Eliminate
The large white shape is a rectangle but the small black shape is a circle — the black shape does not copy the white shape. The copy rule breaks at the very first check, before fill or position even need to be considered.
Eliminate
The copy rule and fill contrast are both correct — the small black rectangle does copy the large white rectangle. But the small shape sits fully inside the large shape and is centred. No corner is straddled. Fails Step 3.
Eliminate
The large hexagon is solid black and the small shape is an outline — the fill contrast is exactly reversed from the rule. Also, the small circle does not copy the hexagon. Fails on two counts at Step 2.
Correct
The small solid black inverted triangle copies the large white outlined inverted triangle exactly ✓. Fill contrast is correct ✓. The small copy straddles exactly one corner of the large shape ✓. All three rules satisfied.
Eliminate
The copy rule ✓ and fill contrast ✓ are both correct — three out of three rules pass. But the small solid star straddles two corners of the large star simultaneously, not one. This is the deliberate trap for students who stop checking too early.
Use this checklist on every Figure Classification question
- Look within each figure first — ask what the black shape has in common with its own white shape, not what the three stems share with each other.
- Check the copy rule: black must be the same type as white in the same figure.
- Check fill contrast: large = white outline, small = solid black. Verify both directions.
- Check position last and most carefully — count how many corners the small shape straddles. One only.
Reflection
Option E is placed last deliberately. Students who feel relieved after eliminating A, B, and C will rush to select E because the copy rule and fill are both correct. Always check position on every option — the trap is almost always the rule you check last.
Bridge forward
At Level C, Figure Classification questions almost always include one distractor that satisfies every rule except one. When an option looks nearly perfect, slow down and check the one rule you have not tested yet — at this level, it is almost always position.
Conclusion
The answer is D. The large white outlined inverted triangle produces a small solid black inverted triangle — the black shape copies the white shape exactly ✓. Fill contrast is correct ✓. The small copy straddles exactly one corner ✓. Every other option breaks at least one of the three rules.
Non-Verbal Reasoning · Figure Matrices
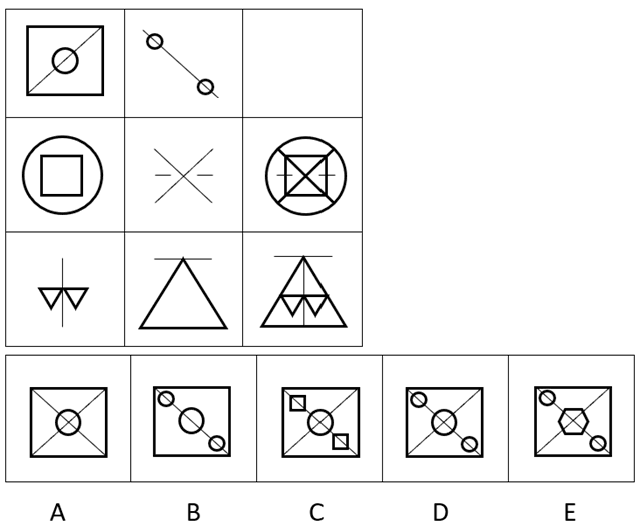
Figure Matrices · CAT4 Level C
In this matrix the pattern runs left to right across each row. Read what is in box 1 and box 2 separately, then find the option that shows both combined into one figure — nothing added, nothing removed.
What to notice first
Before looking at the missing cell, study the two completed rows — they show you the rule in action. In the middle row: box 1 has a large circle with a square inside; box 2 has an X pattern with short horizontal lines at its centre; box 3 shows both combined — the circle and square from box 1, with the X and short lines from box 2 overlaid through it. In the bottom row: box 1 has a horizontal line with two downward triangles; box 2 has a large triangle with a line at its apex; box 3 shows both merged — the large triangle containing the horizontal structure from box 1. The rule is consistent: box 3 always equals box 1 plus box 2 combined. Now apply that rule to the top row to find what is missing.
Check 1
Confirm the rule from completed rows
Both the middle and bottom rows confirm: box 3 = box 1 + box 2. Nothing is added or changed — only combined.
Check 2
Read box 1 and box 2 of the top row
Box 1: a square containing a diagonal line with a circle on it. Box 2: a diagonal line with a circle at each end. List every element separately before looking at the options.
Check 3
Find the option with both combined
The correct answer must show: the square from box 1 as the outer container, with the diagonal line and circles at each tip from box 2 placed inside it.
The most common error in combination matrices
Options A and E both show an X pattern — two diagonal lines crossing. But neither box 1 nor box 2 contains two diagonal lines. Box 1 has one diagonal, box 2 has one diagonal in the same direction. They do not cross to form an X. Any option with an X is adding an element that was never in the source boxes and must be eliminated.
Model the pattern
Step 1 — List every element in box 1
Top row, box 1 contains: a square outer shape, a single diagonal line running through it, and a small circle sitting on that line. Write these three elements down before moving to box 2.
Step 2 — List every element in box 2
Top row, box 2 contains: a single diagonal line running in the same direction, with a small circle at each end. Note that this line runs in the same direction as the line in box 1 — they are not perpendicular, so they will not create an X when combined.
Step 3 — Describe what box 3 must look like
Box 3 must contain: the square as the outer container (from box 1), a single diagonal line running through it, and small circles at each end of that diagonal (from box 2). One diagonal only. Circles at both tips only. Nothing else.
Option check
Eliminate
Shows a square with two diagonal lines crossing to form an X and one circle at the centre. Neither box 1 nor box 2 justifies a second diagonal line — the X shape has been invented. Eliminated on element count.
Eliminate
Shows the diagonal line with circles from box 2, but the square sits outside rather than acting as the container. The elements from box 1 and box 2 are placed alongside each other rather than combined into one figure.
Eliminate
Shows a square containing a smaller square and a circle, but the diagonal line is entirely missing. The central element of both box 1 and box 2 — the diagonal — has been dropped. Fails the combination check.
Correct
Shows a square containing a single diagonal line with a small circle at each end. The square comes from box 1 ✓. The diagonal and circles at each tip come from box 2 ✓. Every element is accounted for and nothing extra has been added ✓.
Eliminate
Shows a square with two diagonal lines forming an X — the same error as option A. The second diagonal does not come from either source box. Students who rush and assume the two source lines must cross will choose this — slow down and check the direction of each line.
Use this checklist on every Figure Matrices question
- Always study the completed rows first — they show the rule before you need to apply it.
- List every element in box 1 and box 2 separately before looking at the options.
- The correct answer must contain all listed elements — nothing added, nothing missing.
- Count lines carefully — two lines in the same direction do not become an X when combined.
Reflection
Options A and E are the traps for students who see two diagonal lines across both source boxes and assume they must cross. They do not — both lines run in the same direction and combine into one. Checking line direction before checking the options prevents this error entirely.
Bridge forward
In all combination matrices at Level C, your precision on quantity matters most. One line stays one line. One circle stays one circle. Write a short list of elements before scanning options — it takes five seconds and eliminates the most common mistakes.
Conclusion
The answer is D. The square outer shape comes from box 1. The single diagonal line with a small circle at each end comes from box 2. Option D shows exactly these elements combined — nothing added, nothing missing. Every other option either invents an extra diagonal, misplaces the square, or drops the diagonal entirely.
Spatial Ability Sample Questions
Spatial Ability · Figure Analysis
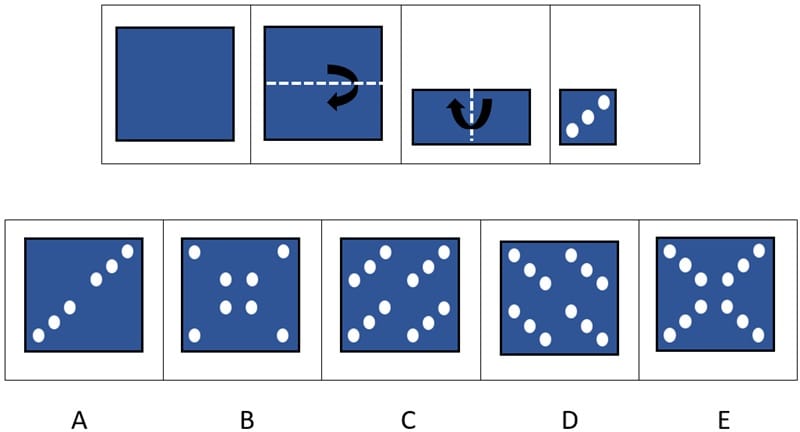
Figure Analysis · CAT4 Level C
Count the folds first — they tell you how many layers exist and therefore how many holes to expect. Then reverse each fold in order to find exactly where every hole lands.
What to notice first
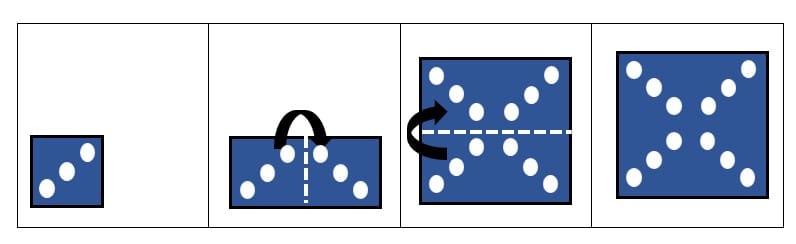
The paper is folded twice before any holes are punched. Each fold doubles the number of layers. Fold 1 (horizontal — top meets bottom) creates 2 layers. Fold 2 (vertical — left meets right) doubles those again to 4 layers. Three holes are then punched through all four layers simultaneously. When the paper is opened, each of the three holes has passed through four layers — so 3 holes become 12 holes in total. Any answer showing fewer than 12 holes is already wrong before you check position. This count alone eliminates Option A.
Check 1
Count folds and layers
2 folds = 4 layers. 3 holes × 4 layers = 12 holes total when unfolded. Check every option against this count first.
Check 2
Reverse fold 2 (vertical)
The left half of the paper is mirrored to the right half. The 3-hole diagonal pattern now appears in both the left and right halves — 6 holes across two quadrants.
Check 3
Reverse fold 1 (horizontal)
The bottom half is mirrored to the top half. The 6-hole pattern now appears in all four quadrants — 12 holes total, 3 per quadrant.
The most common error — stopping after one fold
Option A shows 6 holes in two quadrants only. This is exactly the result of reversing only one fold and forgetting the second. It feels plausible because the positions look roughly right — but the hole count (6, not 12) confirms something is missing. Always check the count before checking position.
Model the pattern
Step 1 — Count folds, layers, and expected holes
Before touching the options: 2 folds → 4 layers → 3 punched holes × 4 layers = 12 holes when fully unfolded. Write this down. Any option not showing 12 holes is eliminated immediately.
Step 2 — Identify where the holes are on the folded paper
The three holes are punched in a diagonal line from bottom-left to top-right on the small folded square. This diagonal is the pattern that will be reflected when each fold is reversed.
Step 3 — Reverse both folds to find hole positions
Reverse fold 2 (vertical): the diagonal pattern mirrors into the right half. Reverse fold 1 (horizontal): both halves mirror into the top of the paper. The result is 3 holes in each of the four quadrants, arranged symmetrically across both the horizontal and vertical centre lines of the paper.
Option check
Eliminate
Shows only 6 holes in 2 quadrants — lower-left and upper-right. This is the result of reversing only one fold. The second fold reflection has been missed entirely, leaving two quadrants empty.
Eliminate
Shows 8 holes — one near each corner and four in a grid at the centre. This does not match the diagonal punch pattern on the folded paper. The positions are entirely wrong regardless of how the folds are reversed.
Eliminate
Shows holes in an irregular cross-like arrangement that does not follow from reversing two clean horizontal and vertical folds. The pattern lacks the quadrant symmetry that both folds must produce.
Eliminate
Shows a pattern similar to C but mirrored. The same problem applies — the irregular arrangement does not reflect the correct outcome of reversing a horizontal fold followed by a vertical fold.
Correct
12 holes, with 3 in each of the four quadrants ✓. Each group of 3 forms a diagonal matching the punched pattern ✓. The arrangement is perfectly symmetric across both fold lines ✓. All three checks pass.
Use this checklist on every Figure Analysis question
- Count the folds before anything else — folds tell you layers, layers tell you total holes.
- Calculate expected holes (punched holes × layers) and eliminate any option that does not match the count.
- Reverse the last fold first, then work back to the first fold.
- The correct answer must show perfect symmetry across every fold line — check both axes.
Reflection
Option A is the trap for students who successfully reverse one fold but forget the second. Six holes in two quadrants feels plausible — but counting expected holes (12) exposes the error before any position check is needed. Always count first.
Bridge forward
At Level C, Figure Analysis questions always involve two folds. The moment you see the question, count folds → calculate layers → calculate expected holes. This takes five seconds and immediately eliminates most wrong options without needing to trace positions at all.
Conclusion
The answer is E. Two folds create four layers. Three holes punched through four layers produce 12 holes when unfolded — three in each quadrant, symmetrically placed across both fold lines. Option E is the only choice showing the correct count and the correct symmetric positions.
Spatial Ability · Figure Recognition
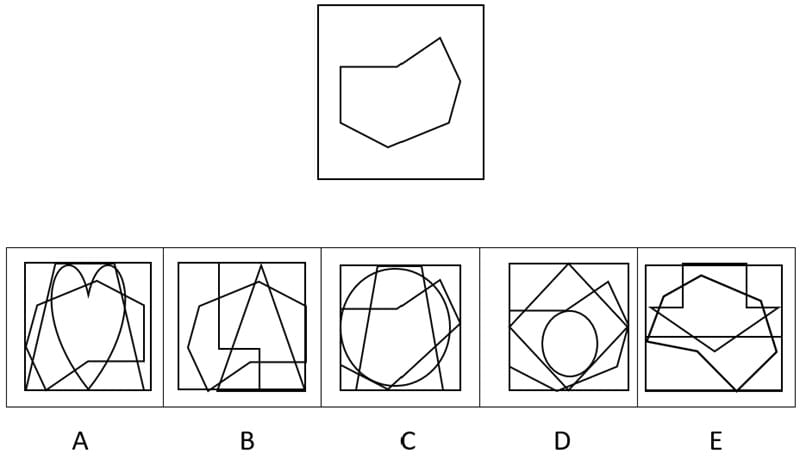
Figure Recognition · CAT4 Level C
Study the test shape carefully before looking at any option. The shape must appear in exactly the same orientation — not rotated, not flipped, not resized. Find it by tracing its most distinctive feature through each complex figure.
What to notice first
Before looking at any option, spend a few seconds memorising the test shape. It is an irregular polygon with a distinctive concave indentation on one side — the outline curves inward rather than outward at that point. This concave feature is your search target: it is the hardest detail to fake with a rotation or a flip, and it will eliminate most wrong options immediately. The shape must appear in the correct answer in exactly the same direction — not turned, not mirrored, not stretched.
Check 1
Memorise the distinctive feature
Lock in the concave indentation and the direction it faces. This is the one detail that cannot be replicated by a different shape — use it as your search filter.
Check 2
Trace lines in each option
In each complex figure, ignore the overall image and look only for line sequences that could form the test shape's outline. Trace candidate outlines mentally.
Check 3
Verify orientation
When you find a candidate, check that it faces the same direction as the test shape. A shape that is rotated or flipped is not a match — even if the outline is otherwise identical.
Why orientation matters
Several options contain versions of a similar polygon, but rotated or flipped. At Level C, the wrong options are specifically designed to trick students who find a shape that looks right but have not checked its direction. Always verify orientation as a separate final step — after confirming the outline matches.
Model the pattern
Step 1 — Study the test shape before opening the options
Look at the test shape for at least five seconds. Identify its most unusual feature — here, the concave indentation on one side. Note exactly which side it is on and which direction it faces. This is your primary search target.
Step 2 — Trace the outline in each option
In each complex figure, ignore all shapes except the lines that could form the test shape. Mentally trace a path along those lines and ask: does this sequence of lines create the same outline? Most options can be eliminated quickly at this step.
Step 3 — Confirm orientation before selecting
Once you find a match in option D, confirm that the concave indentation is on the same side and facing the same direction as the test shape. Only then select the answer. This final check prevents the most common error — choosing a rotated version.
Option check
Eliminate
The complex figure contains curved heart-like outlines and crossing diagonal lines. No sequence of lines in this figure traces the irregular concave polygon of the test shape in the correct orientation.
Eliminate
Contains angular shapes with a large triangular form and rectangular elements. The outline structure does not produce the test shape's concave polygon in the correct direction.
Eliminate
Contains large overlapping rounded outlines. Similar polygon shapes appear but none match the exact outline and orientation of the test shape — the concave indentation is either absent or facing the wrong direction.
Correct
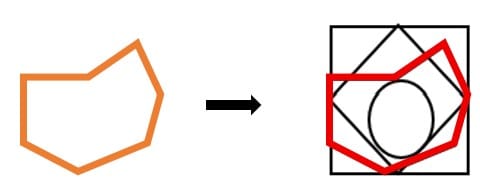
Tracing the relevant lines within this complex figure reveals the test shape's outline — the same irregular concave polygon in exactly the same orientation ✓. The concave indentation appears on the correct side, facing the correct direction ✓.
Eliminate
Contains overlapping angular polygonal shapes. Similar-looking outlines are present but they are either rotated, flipped relative to the test shape, or have a different structure — the orientation does not match.
Use this checklist on every Figure Recognition question
- Study the test shape for at least five seconds before looking at any option.
- Identify its single most distinctive feature — an unusual angle, a concave side, an asymmetric point — and use that as your search filter.
- Trace lines in each option rather than looking at the overall image.
- Always verify orientation as a separate final step — a rotated match is not a correct match.
Reflection
Students who scan options without first memorising the test shape waste time re-checking. Spending an extra five seconds studying the test shape before looking at any option saves far more time than it costs.
Bridge forward
At Level C, Figure Recognition options always include at least one rotated or flipped version of the target shape as a distractor. Never skip the orientation check — finding the shape is only half the task.
Conclusion
The answer is D. Tracing the relevant lines within option D's complex figure reveals the test shape — the same irregular concave polygon in exactly the same orientation as shown in the test box. Options A, B, C, and E either use rotated or flipped versions, or contain shapes with a different structure entirely.
CAT4 Level C (Year 6) Sample Questions — All 8 Types Solved
Step-by-step answers to CAT4 Level C exam-style questions for Year 6 students aged 10–11 — covering all four reasoning batteries: Spatial Ability, Non-Verbal Reasoning, Quantitative Reasoning and Verbal Reasoning, including Figure Analysis, Figure Recognition, Figure Classification, Figure Matrices, Number Analogies, Number Series, Verbal Analogies and Verbal Classification.

CAT4 Level C (Year 6) Sample Questions · 20:00 · Step-by-step answers across all 4 batteries · Watch on YouTube →
- 0:00 Introduction how CAT4 Level C works
- 0:16 Spatial Ability Figure Analysis - paper folding and punched holes
- 3:43 Spatial Ability Figure Recognition - find the hidden shape
- 5:16 Non-Verbal Reasoning Figure Classification - the small shape copies the large one
- 8:42 Non-Verbal Reasoning Figure Matrices - box 1 plus box 2 combined
- 11:11 Quantitative Reasoning Number Analogies - two step rules
- 13:42 Quantitative Reasoning Number Series - the pattern inside the gaps
- 15:42 Verbal Reasoning Verbal Analogies - opposites and the synonym trap
- 17:40 Verbal Reasoning Verbal Classification - precise word groups
- 20:05 Free CAT4 Level C resources