CAT4 Level F (Year 9–10) 2026: Free Practice Test, PDF & Prep Guide

Free sample questions, a downloadable practice PDF, and expert preparation tips for CAT4 Level F — the cognitive reasoning test taken by Year 9 and Year 10 students in UK and international schools.

  • Free CAT4 Level F practice PDF with real-style sample questions and worked explanations
  • Understand the Level F format, timing, scoring, and all four CAT4 batteries
  • Expert preparation strategies for Year 9 and Year 10 students aiming for top CAT4 scores
  • No sign-up needed — access the free guide and PDF instantly

Test at a Glance

72 minDuration
4Batteries
13–15Age range
DigitalFormat

Who Takes This Test?

United KingdomAges 13–15
Year 9–10
GlobalAges 13–15
Grade 8–9
Free — no sign-up required · Updated for 2026 · Covers all 4 CAT4 batteries · Trusted by UK & international families

Why Is CAT4 Level F (Year 9–10) Important?

CAT4 Level F plays a key role in how schools support and place Year 9–10 students:

Personalised Learning

Schools use CAT4 results to design tailored learning programmes and targeted support strategies for each student.

Admissions & Placement

Many selective schools and programmes include CAT4 Level F scores in their entry criteria and setting decisions.

Performing well on CAT4 Level F can open doors to advanced academic opportunities, help identify hidden strengths, and build confidence ahead of GCSEs and beyond.

What to Expect in the CAT4 Level F Test

CAT4 Level F Test Structure and Timing

Batteries Verbal Non-Verbal Quantitative Spatial

Part 1 → Part 2 → Part 3

  1. Part 120 min
  2. Part 226 min
  3. Part 326 min

Part 1

Non-Verbal battery

20 min
  • Figure Classification

    10 min · 24 questions

    10:00
  • Figure Matrices

    10 min · 24 questions

    10:00

Part 2

Verbal + Quantitative

26 min
  • Verbal Classification

    8 min · 24 questions

    8:00
  • Verbal Analogies

    8 min · 24 questions

    8:00
  • Number Analogies

    10 min · 18 questions

    10:00

Part 3

Quantitative + Spatial

26 min
  • Number Series

    8 min · 18 questions

    8:00
  • Figure Analysis

    9 min · 18 questions

    9:00
  • Figure Recognition

    9 min · 18 questions

    9:00

CAT4 Level F (Year 9–10): 4 batteries · 8 timed subtests · 3 parts totalling 72 minutes.

Timings exclude instructions, examples, practice items and breaks. Format can vary slightly by school delivery.

Source: GL Education Support — Pre-testing essentials

Preparing for the CAT4 Test: Sample Questions & Explanations

Free CAT4 sample questions from all four batteries — Verbal, Quantitative, Non-Verbal, and Spatial. Choose your answer, then reveal the full step-by-step explanation.

Verbal Reasoning Sample Questions

CAT4 Level F Verbal Analogies sample question — degree and intensity scale.

Verbal Reasoning · Verbal Analogies

irritated – furious : apprehensive – ?

Verbal Analogies · Level F Question

The key to this question is recognising that both pairs follow the same emotional intensity scale — from a mild form of a feeling to its most extreme version.

Degree / scale method — name the emotion, then find its most intense form

Question type

Verbal Analogies

Skill tested

Degree / intensity scale

Difficulty

High

What to notice first

Start with the first pair. Irritated and furious are both forms of anger — but they are not equal. Irritated is mild; furious is extreme. That is a degree relationship moving upward in intensity. Now apply the same logic to apprehensive. It is a mild form of fear. You need the word that sits at the extreme end of that same fear scale.

Check 1

Name the emotion family

Irritated and furious are both anger. The move is from mild to intense — that is a degree scale.

Check 2

Identify the same family in pair two

Apprehensive belongs to the fear family. You need the intense end of that same scale — not a synonym, not a related idea.

Check 3

Confirm the intensity jump matches

The gap from irritated to furious is large. The correct answer must show an equally large jump from apprehensive.

Core rule

In a degree analogy, both pairs must travel the same distance along the scale — from mild to intense, not mild to moderate.

Model the pattern

1

Step 1

Look at irritated and furious. Both are anger, but the intensity jump is significant. Irritated is a minor feeling; furious is an overwhelming one. Write the rule: mild anger → extreme anger.

2

Step 2

Now apply the rule to apprehensive. It is mild fear — a low-level anxiety. You need the word that represents extreme fear, with the same large intensity gap that existed between irritated and furious.

3

Step 3

Test the options against the rule. The answer must be an extreme form of fear — not a synonym of apprehensive, not a behaviour, not a moderate upgrade. Terrified is the only word that sits at the intense end of the fear scale.

Option check

A

Eliminate

Nervous is a thematic lure. It belongs to the fear family but sits at roughly the same level as apprehensive — it does not represent the required intensity jump.

B

Correct

Terrified is the extreme form of fear, mirroring exactly how furious is the extreme form of anger. The intensity gap matches the first pair perfectly.

C

Eliminate

Worried is a partial match. It is in the fear family but is no more intense than apprehensive — it fails to replicate the large degree jump shown in the first pair.

D

Eliminate

Cautious is a wrong relation trap. It describes a behaviour or attitude, not an emotion on the fear intensity scale. It shifts the dimension entirely.

E

Eliminate

Uneasy is a reversed direction trap. It is milder than apprehensive, not more intense — it moves in the wrong direction along the scale.

Use this quick checklist next time

  • Name the emotion family in the first pair before looking at the options.
  • Check the size of the intensity jump — the second pair must match it, not just be in the same topic area.
  • Reject words that are in the same family but at the same or lower intensity level.

Reflection

What made this hard is that four of the five options all belong to the fear-anxiety family. The question is not testing whether you know what fear means — it is testing whether you can measure the precise distance along the scale.

Bridge forward

Whenever all the options look similar, the relationship type is almost certainly degree / scale. Slow down, name the scale, then measure the gap — do not just pick the word that feels most related.

Conclusion

Option B, terrified, is correct because irritated and furious are mild and extreme forms of anger, and apprehensive and terrified are mild and extreme forms of fear — the same degree relationship applied to a new emotion pair.

CAT4 Level F Verbal Classification sample question — synonym group, gradual decrease.

Verbal Reasoning · Verbal Classification

diminish · dwindle · subside

Verbal Classification · Level F Question

All three stem words mean roughly the same thing — but at Level F, that is not enough. You need to identify the precise shared quality that separates the group from words that only seem similar.

Synonym group method — find the exact shared meaning, not just the broad topic

Question type

Verbal Classification

Skill tested

Synonym group — gradual decrease

Difficulty

High

What to notice first

Diminish, dwindle, and subside all describe something becoming less — but with a specific quality attached: the process is gradual, self-contained, and does not require an external agent to cause it. They are intransitive — you do not diminish something, you watch it diminish on its own. That precision is what makes this a Level F question. Every distractor touches the idea of reduction but fails on at least one of those qualities.

Check 1

Name the shared meaning precisely

All three stem words describe a gradual, self-driven decrease in amount, strength, or intensity — with no external agent required.

Check 2

Test word class strictly

The stem words are intransitive — they do not take a direct object. Any option that requires an object to act on fails this test immediately.

Check 3

Check the manner of decrease

The decrease must be gradual, not sudden or catastrophic. An option describing abrupt change belongs to a different group.

Core rule

The correct answer must be an intransitive verb describing a slow, self-driven decrease in strength or amount — not just any word connected to the idea of becoming less.

Model the pattern

1

Step 1

Read diminish, dwindle, and subside together. They all describe something becoming gradually less without needing someone to cause it. The storm subsides. Support dwindles. Enthusiasm diminishes. No external agent is required.

2

Step 2

Build a precise label: intransitive verbs meaning to gradually decrease in strength or amount. Keep that label sharp — "becoming less" alone is too broad and will allow wrong answers in.

3

Step 3

Test every option against the label. The correct answer must be intransitive, gradual, and self-driven. Any option that fails even one of those three conditions is eliminated.

Option check

A

Eliminate

Collapse is a thematic lure. It describes a sudden, complete failure — not a gradual decrease. The manner of change is entirely different from the stem words.

B

Eliminate

Reduce is a wrong subcategory trap. It is transitive — you reduce something. The stem words are intransitive and self-driven. This difference in word class disqualifies it.

C

Eliminate

Fade is a partial match. It is intransitive and gradual, but it primarily describes a decrease in colour or visibility — a different dimension from strength or amount. It belongs to a neighbouring but distinct group.

D

Correct

Wane is correct. It is intransitive, gradual, and self-driven — describing a decrease in strength, power, or intensity over time. It matches all three defining qualities of the stem group precisely.

E

Eliminate

Deteriorate is a wrong attribute trap. It describes a decline in quality or condition, not a decrease in amount or intensity. The dimension is different, so it belongs to a separate category.

Use this quick checklist next time

  • Build a precise label for the stem group — broad labels let wrong answers slip through at Level F.
  • Check word class first: is the option intransitive like the stem words, or does it need an object?
  • Check the manner and dimension of change — gradual vs sudden, amount vs quality are different groups.

Reflection

Every distractor in this question touches the theme of becoming less. What separates the correct answer from the wrong ones is not topic — it is precision. Level F classification questions are won by making your group label sharper, not broader.

Bridge forward

When every option looks related to the stem words, slow down and add more conditions to your label. Ask: what is the word class? What is the manner of change? What dimension does it operate on? Each condition you add eliminates more distractors.

Conclusion

Option D, wane, is correct because it is an intransitive verb describing a gradual, self-driven decrease in strength or intensity — matching all three defining qualities shared by diminish, dwindle, and subside.

Get full access to 1,000+ CAT4 Level F practice questions with expert tips, mock exams, and step-by-step explanations.

Get Full Practice

Quantitative Reasoning Sample Questions

CAT4 Level F Quantitative Reasoning sample question — Number Analogies, two-step rule.

Quantitative Reasoning · Number Analogies

[6 → 17]   [9 → 26]   [8 → ?]

Number Analogies · Level F Question

Two pairs are given — that is your advantage. Use both to confirm the rule before applying it to the third. A rule that works on only one pair is not the rule.

Two-step rule method — confirm across both pairs before applying

Question type

Number Analogies

Skill tested

Two-step rule: ×3 then −1

Difficulty

High

What to notice first

Start with the first pair: 6 → 17. Ask what operation turns 6 into 17. Multiplying by 3 gives 18 — one too many. So the rule might be ×3 then −1. Test it: 6 × 3 = 18, then 18 − 1 = 17. That works. Now verify with the second pair before touching the question: 9 × 3 = 27, then 27 − 1 = 26. Confirmed. The rule is consistent across both pairs — now apply it to 8.

Check 1

Test the rule on pair one

6 × 3 − 1 = 17. The two-step rule holds for the first pair.

Check 2

Verify on pair two

9 × 3 − 1 = 26. The same rule holds for the second pair. It is confirmed.

Check 3

Apply to the question

8 × 3 = 24, then 24 − 1 = 23. The rule gives 23 cleanly.

Core rule

Always verify a suspected rule on both given pairs before applying it. A rule that fits only one pair is unreliable — a rule that fits both is certain.

Model the pattern

1

Step 1

Look at 6 → 17. Multiplying 6 by 3 gives 18, which is one more than 17. That suggests the rule is ×3 then −1. Write it down: n × 3 − 1.

2

Step 2

Test the rule on the second pair before moving on. 9 × 3 = 27, then 27 − 1 = 26. The second pair confirms the rule. You now have certainty, not a guess.

3

Step 3

Apply to 8. Multiply first: 8 × 3 = 24. Then subtract: 24 − 1 = 23. The answer is 23.

Option check

A

Eliminate

22 comes from applying ×3 − 2 instead of ×3 − 1. The constant subtracted is wrong — the rule does not change between pairs, so −2 fails verification on both given pairs.

B

Correct

23 is correct. 8 × 3 = 24, then 24 − 1 = 23. The two-step rule ×3 − 1 is consistent across both given pairs and produces 23 cleanly.

C

Eliminate

24 comes from applying ×3 only and forgetting the second step. It is a partial rule trap — the subtraction of 1 is a required part of the rule, not optional.

D

Eliminate

25 comes from applying ×3 + 1 instead of ×3 − 1. The direction of the constant is reversed — a wrong direction trap that fails immediately when tested against the given pairs.

E

Eliminate

26 copies the result of the second pair directly. This is a transfer error trap — the answer to 9 → 26 has nothing to do with 8 → ?. The input changed, so the output must be recalculated.

Use this quick checklist next time

  • Always test your rule on both given pairs — never commit after one.
  • Apply every step of the rule in order: multiply first, then adjust.
  • If your answer matches a number already in the question, stop — you have likely made a transfer error.

Reflection

What made this question hard is that 24 — the result of ×3 alone — feels like a complete answer. The −1 step is easy to miss under time pressure. Two-step rules are designed to catch students who stop one step too early.

Bridge forward

Whenever the first multiplication does not land exactly on the given output, ask immediately: what small adjustment is needed? That adjustment is almost always the second step of the rule — and it will be the same across all pairs.

Conclusion

Option B, 23, is correct. The rule is ×3 − 1, confirmed by both given pairs: 6 × 3 − 1 = 17 and 9 × 3 − 1 = 26. Applying the same rule to 8 gives 8 × 3 − 1 = 23.

CAT4 Level F Number Series sample question — second-order differences, consecutive odd numbers.

Quantitative Reasoning · Number Series

3  ·  4  ·  7  ·  12  ·  19  ·  28  ·  ?

Number Series · Level F Question

When no obvious single rule jumps out, write down the differences between consecutive terms. At Level F, those differences often have their own pattern — and that second layer is where the answer lives.

Second-order differences method — find the pattern inside the gaps

Question type

Number Series

Skill tested

Second-order differences — consecutive odd numbers

Difficulty

High

What to notice first

The sequence 3, 4, 7, 12, 19, 28 does not follow a simple add-the-same-number or multiply-by-the-same-number rule. That tells you immediately to move to the next level — write down the differences between each pair of terms. The differences are: +1, +3, +5, +7, +9. Those are consecutive odd numbers. The next difference in that sequence must be +11. Add 11 to the last term: 28 + 11 = 39.

Check 1

Write the first-level differences

4−3=1, 7−4=3, 12−7=5, 19−12=7, 28−19=9. The gaps are +1, +3, +5, +7, +9.

Check 2

Identify the pattern in the differences

+1, +3, +5, +7, +9 are consecutive odd numbers increasing by 2 each time. The next must be +11.

Check 3

Apply the next difference

28 + 11 = 39. The answer follows directly once the second-order pattern is identified.

Core rule

When the sequence has no obvious single rule, always write out the differences between terms. If those differences follow their own pattern, you are dealing with a second-order series — a hallmark of Level F Number Series questions.

Model the pattern

1

Step 1

Write the sequence with gaps labelled underneath: 3 → 4 → 7 → 12 → 19 → 28. Differences: +1, +3, +5, +7, +9. No single operation connects all terms directly — the pattern is one level deeper.

2

Step 2

Look at the differences themselves: 1, 3, 5, 7, 9. These are consecutive odd numbers, each two more than the last. The sequence of differences is its own arithmetic series. The next term in that series is 11.

3

Step 3

Add the next difference to the last known term: 28 + 11 = 39. Check: does 11 fit the odd-number pattern? Yes — 1, 3, 5, 7, 9, 11. The answer is confirmed.

Option check

A

Eliminate

37 comes from repeating the last difference: 28 + 9 = 37. This is a static difference trap — it assumes the gap stays at +9 rather than recognising that the differences themselves are increasing.

B

Eliminate

38 comes from adding +10 instead of +11. The student spotted that the differences are growing but miscounted the next odd number — adding 1 to 9 gives 10, not the next odd number which is 11.

C

Correct

39 is correct. The differences +1, +3, +5, +7, +9 are consecutive odd numbers. The next difference is +11. 28 + 11 = 39. Every step of the method confirms this answer.

D

Eliminate

40 comes from adding +12 instead of +11. The student correctly identified that the differences increase by 2 each time but over-incremented — 9 + 2 = 11, not 12.

E

Eliminate

41 comes from adding +13, which skips the next odd number entirely. This is a pattern-jump trap — jumping from +9 to +13 skips +11 and breaks the consecutive odd number sequence.

Use this quick checklist next time

  • If no single rule is obvious, always write the differences between consecutive terms before doing anything else.
  • Check whether the differences themselves follow a pattern — if they do, you have a second-order series.
  • Identify the next difference precisely, then add it to the last term. Do not guess or round.

Reflection

All five options sit within two of the correct answer. That is deliberate — it means you cannot eliminate by feel or estimation. The only reliable path is writing out the differences and reading the second-order pattern precisely.

Bridge forward

Second-order difference questions appear regularly in CAT4 Level F and G. Whenever your first scan of a sequence produces no clean rule, go one level deeper immediately. Writing the differences takes ten seconds and almost always reveals the pattern.

Conclusion

Option C, 39, is correct. The differences between consecutive terms are +1, +3, +5, +7, +9 — consecutive odd numbers. The next difference is +11, giving 28 + 11 = 39.

Get full access to 1,000+ CAT4 Level F practice questions with expert tips, mock exams, and step-by-step explanations.

Get Full Practice

Non-Verbal Reasoning Sample Questions

CAT4 Level F Figure Classification sample question — four-fill orientation rule across identical shapes.

Non-Verbal Reasoning · Figure Classification

CAT4 Level F Figure Classification question: three stem figures each showing four identical shapes in a cross arrangement — top shape solid black, left shape vertical stripes, right shape horizontal stripes, bottom shape white outline

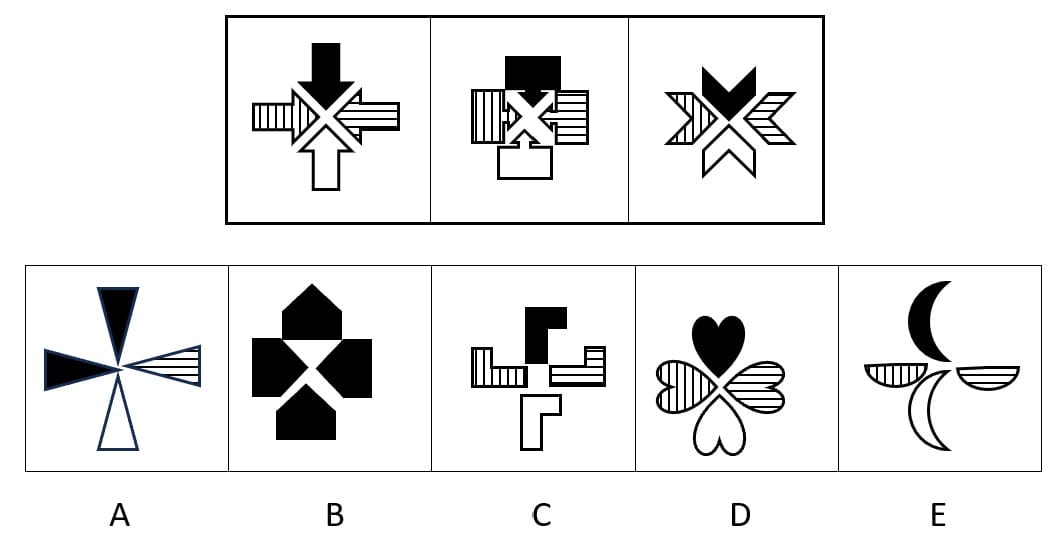
Figure Classification · Level F Question

The shape type changes across each stem figure — but something else stays exactly the same every time. Finding that constant rule is the entire task. Ignore the shape. Describe the fills.

Four-fill rule method — describe what each position carries, then match it exactly

Question type

Figure Classification

Skill tested

Identifying a positional fill rule across varied shapes

Difficulty

High

What to notice first

Each stem figure contains four identical shapes arranged in a cross — one at the top, one at the bottom, one on the left, one on the right. The shape itself changes between figures: arrows in figure one, squares in figure two, chevrons in figure three. But the fill assigned to each position never changes. Top is always solid black. Left always carries vertical stripes. Right always carries horizontal stripes. Bottom is always white with an outline only. That four-position fill rule is the constant. The correct answer must be a figure where four identical shapes sit in a cross arrangement and each position carries exactly the right fill.

Check 1

Ignore the shape type

The shape changes between figures — arrows, squares, chevrons. That is a deliberate distraction. The shape type is not part of the rule.

Check 2

Read the fill at each position

Top = solid black. Left = vertical stripes. Right = horizontal stripes. Bottom = white outline. This four-fill pattern is identical across all three stem figures.

Check 3

Find the option that preserves all four fills in the right positions

Only one option shows four identical shapes in a cross where top is black, left is vertically striped, right is horizontally striped, and bottom is white.

Core rule

Four identical shapes in a cross arrangement. Top = solid black. Left = vertical stripes. Right = horizontal stripes. Bottom = white outline. All four fills must be present and in the correct positions.

Model the pattern

1

Step 1

Look at the three stem figures together. In every figure, four shapes meet at a central point in a cross. Write down what each position carries: top = black, left = vertical stripes, right = horizontal stripes, bottom = white. That is your rule.

2

Step 2

Confirm the rule holds across all three figures before moving to the options. If the same four fills appear in the same four positions in every stem figure, you have the right rule. Here they do — the rule is confirmed.

3

Step 3

Check each option against all four conditions simultaneously. Reject any option that fails even one: wrong fill, wrong position, missing a shape, or only two or three fills present instead of four.

Option check

A

Eliminate

Option A has a pinwheel arrangement with some black and striped sections, but the shapes are not all identical and the bottom position carries a white triangle rather than the same shape type as the others. The four-shape rule is broken.

B

Eliminate

Option B has four large shapes meeting at the centre, but all four are either solid black or white. There are no striped sections at all — neither vertical nor horizontal. Two of the four required fills are entirely missing.

C

Eliminate

Option C shows a cross shape with striped and outline sections, but the top position is not solid black — it carries a solid square that breaks away from the cross arrangement. The positional fill rule is not consistently applied across all four arms.

D

Correct

Option D shows four hearts in a cross arrangement. The top heart is solid black. The left heart has vertical stripes. The right heart has horizontal stripes. The bottom heart is white with an outline only. All four positions carry the correct fill. This is the only option that satisfies every condition of the rule.

E

Eliminate

Option E has crescent and bowl shapes — a completely different shape family with no consistent cross arrangement. The fills present are black and striped, but the bottom and left positions do not follow the required pattern, and the shapes are not identical to each other.

Use this checklist next time

  • Ignore the shape type first — describe the fill at each position instead.
  • Confirm the rule holds across all three stem figures before reading the options.
  • Check all four positions in each option — reject anything that fails even one condition.

Reflection

This question is designed to make the changing shape type feel like the main feature. Students who focus on shape — arrows, squares, chevrons — cannot find a rule, because the shape is not the rule. Students who switch attention to fill and position solve it in seconds.

Bridge forward

In any Figure Classification question where the shapes look different across stem figures, the rule is almost never the shape itself. Look at fill, shading, size, orientation, and position instead — one of those will be constant across all three.

Conclusion

Option D is correct. The rule is a four-position fill pattern: top shape solid black, left shape vertical stripes, right shape horizontal stripes, bottom shape white outline. Option D — four hearts in a cross — is the only answer that satisfies all four conditions simultaneously.

CAT4 Level F Figure Matrices sample question — rotation, overlay, and fill removal rule.

Non-Verbal Reasoning · Figure Matrices

CAT4 Level F Figure Matrices question: 3x3 grid where each row shows two solid black shapes in columns one and two — circular arrows, chevrons, and crescents — which are rotated 90 degrees, overlaid on each other, and converted to outline only in column three. The missing cell is bottom right.

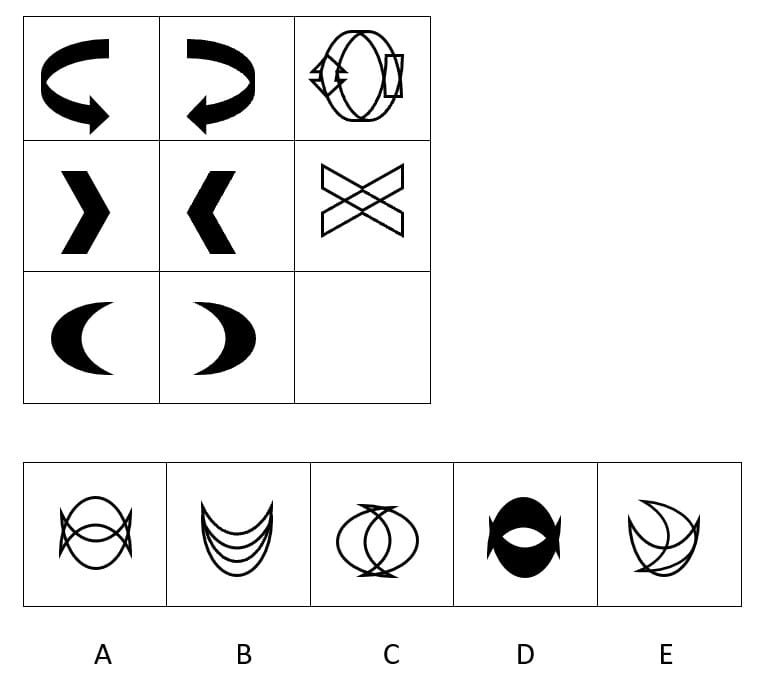
Figure Matrices · Level F Question

In a Figure Matrices question, the rule always runs consistently across every row. Find what transforms column one and column two into column three in the first two rows — then apply exactly that transformation to produce the missing cell in row three.

Row rule method — confirm the transformation across two rows before applying it to the third

Question type

Figure Matrices

Skill tested

Rotation, overlay, and fill removal across rows

Difficulty

High

What to notice first

Read row one first. Column one shows a large solid black circular arrow. Column two shows a second solid black circular arrow, slightly smaller and rotated. Column three is not a new shape — it is both arrows rotated 90 degrees, placed on top of each other, and with all black fill completely removed, leaving only an outline. Now verify that rule on row two. Column one is a solid black right-pointing chevron. Column two is a solid black left-pointing chevron. Column three shows both chevrons overlaid at 90 degrees — and again all black fill is gone, leaving only the outline skeleton of both shapes merged. The rule is confirmed: take columns one and two, rotate and overlay them, remove all fill. Apply this to row three: two solid black crescents overlaid at 90 degrees, all fill removed.

Check 1

Read the row one transformation

Two solid black circular arrows in columns one and two become one outline-only merged shape in column three — rotated 90°, overlaid, all fill removed.

Check 2

Verify on row two

Two solid black chevrons become an outline-only hourglass X in column three — same rotation, overlay, and fill-removal rule confirmed.

Check 3

Apply to row three

Two solid black crescents must become an outline-only merged shape — rotated 90°, overlaid, no black fill remaining anywhere.

Core rule

The column one and column two shapes are rotated 90 degrees and placed on top of each other to form the column three result. All solid black fill is removed — the result is always outline only.

Model the pattern

1

Step 1

Confirm the rule on row one. The two black circular arrow shapes in columns one and two are combined — rotated 90 degrees and overlaid — to produce the outline oval with overlapping arrow silhouettes in column three. No black fill survives into the result.

2

Step 2

Verify on row two. The solid black right chevron and left chevron are combined the same way — rotated 90 degrees, overlaid — producing the outline-only X hourglass in column three. The rule holds. You now have certainty.

3

Step 3

Apply to row three. Take the two solid black crescents from columns one and two. Rotate 90 degrees, overlay them, and remove all black fill. The result should be an outline-only oval shape with the two crescent silhouettes merged inside — no solid fill anywhere.

Option check

A

Correct

Option A shows an oval outline with the two crescent shapes overlaid inside — rotated 90 degrees relative to each other and merged — with no solid black fill anywhere. This matches the row rule precisely across all three transformations.

B

Eliminate

Option B shows multiple nested curved lines descending — a thematic lure that references the crescent shape family but applies no rotation or overlay. It does not follow the transformation rule established in rows one and two.

C

Eliminate

Option C shows two overlapping circles — a partial match trap. It has the outline-only quality correct but uses circular shapes rather than the crescent silhouettes, and the internal overlap geometry does not match what the two crescents produce when combined at 90 degrees.

D

Eliminate

Option D retains solid black fill — the oval has a large black area remaining. This directly violates the fill-removal rule that is consistent across both confirmed rows. Any option with solid black is immediately eliminated.

E

Eliminate

Option E shows a crescent with overlapping curved lines, but the shapes are not symmetrically overlaid and the result is not a clean merged outline. The rotation and overlay are incomplete — it resembles a single crescent with decoration rather than two crescents combined.

Use this checklist next time

  • Always read two complete rows before looking at the options — one row is never enough to confirm the rule.
  • Track three things separately: rotation, overlay, and fill. All three must be present in the correct answer.
  • Eliminate any option that retains solid black fill immediately — the fill-removal step is non-negotiable in this rule.

Reflection

The most common error here is choosing option C — two plain overlapping circles. It has the right fill (outline only) but the wrong internal geometry. At Level F, one condition correct is not enough. Every condition must be satisfied simultaneously.

Bridge forward

In any Figure Matrices question, build your rule from two confirmed rows before reading the options. Students who look at the options before confirming the rule are easily misled by partial matches. Confirm first, then eliminate.

Conclusion

Option A is correct. The row rule is: take the two solid black shapes from columns one and two, rotate them 90 degrees, overlay them on top of each other, and remove all solid fill — leaving an outline-only merged result. Applied to the two black crescents in row three, this produces the outline oval with overlapping crescent silhouettes shown in option A.

Get full access to 1,000+ CAT4 Level F practice questions with expert tips, mock exams, and step-by-step explanations.

Get Full Practice

Spatial Ability Sample Questions

CAT4 Level F Figure Analysis sample question — two folds, hole multiplication, and triangle orientation after unfolding.

Spatial Ability · Figure Analysis

CAT4 Level F Figure Analysis question: a blue square is folded diagonally then folded again into a smaller triangle, two triangular holes are punched through all layers, and the question asks which option shows the correct hole positions and orientations when the paper is fully unfolded

Figure Analysis · Level F Question

Counting holes is only the first step. Every time a crease is opened, the holes on the reflected half mirror across that fold line — which means the triangular holes change direction with each unfold. You must track both the number and the orientation of every hole.

Unfold and mirror method — track hole count AND triangle direction at every crease opening

Question type

Figure Analysis

Skill tested

Hole multiplication and orientation change on each unfold

Difficulty

High

What to notice first

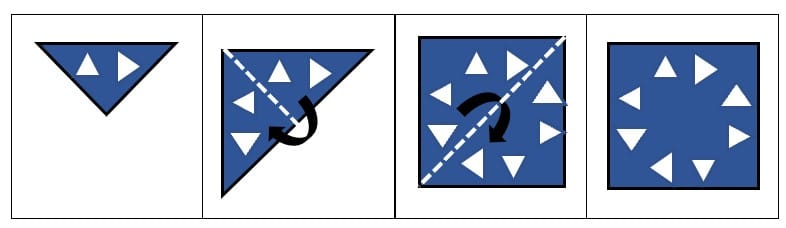
This question has two layers of difficulty. The first is hole count — two folds create four layers, so two punched holes become eight holes when unfolded. The second, and harder, layer is orientation. The triangular holes are not all pointing the same direction on the final sheet. Each time a crease is opened, the holes on the folded-over portion are mirror reflections of the holes on the original portion — so their pointing direction flips across the fold axis. Options B, C, and E fail not because they have the wrong number of holes, but because the triangles inside those holes are pointing in the wrong directions after the reflections are correctly applied.

Check 1

Calculate the total holes

Two folds = four layers. Two holes punched = eight holes when fully unfolded. Any option without eight holes is eliminated immediately.

Check 2

Track the first unfold

When crease one opens, the reflected half carries mirror images of the original two holes — the triangle directions flip across the diagonal fold axis.

Check 3

Track the second unfold

When crease two opens, the same mirroring happens again across the second fold axis — producing the final set of eight holes each with a specific orientation determined by how many times it was reflected.

Core rule

Every crease opening mirrors the holes across that fold line. Triangle holes do not all point the same way after unfolding — each group of reflected holes carries the flipped orientation of the group it was mirrored from. Count is necessary but not sufficient: orientation must also be correct.

Step-by-step unfolding

Step-by-step diagram showing how the two triangular holes multiply and change orientation at each crease opening, from the punched triangle through two unfold stages to the final eight-hole pattern in option D
1

Step 1 — Punched state

The paper has been folded twice into a small triangle with four layers. Two triangular holes are punched through all four layers. At this stage you can see two holes — one pointing up and one pointing right. These are the original orientations before any unfolding begins.

2

Step 2 — First crease opens

The second fold opens. The half that unfolds is a mirror reflection of the half that stayed in place. The two original holes are now joined by two mirrored holes — but those mirrored holes point in the reflected direction across the fold axis, not the same direction as the originals. You now have four holes, two pairs, with orientations that differ between the original and reflected halves.

3

Step 3 — Second crease opens

The first fold opens. The entire lower triangle unfolds as a mirror reflection of the upper triangle. All four existing holes are reflected across the diagonal axis — producing four more holes, each with the mirrored orientation of its corresponding upper-half hole. The result is eight holes, distributed symmetrically, with each quadrant carrying the triangle orientation determined by the number of reflections applied to reach that position.

Option check

A

Eliminate

Option A shows eight holes but the triangle orientations do not correctly reflect the mirroring that occurs when both creases open. The triangles across the diagonal axis should be mirror images of each other — in option A the directions are inconsistent with a diagonal fold reflection.

B

Eliminate

Option B shows triangles arranged around the perimeter but many are pointing in the same direction throughout. This ignores the mirroring rule — when a crease opens, the reflected half must carry flipped orientations, not copies of the original direction.

C

Eliminate

Option C has triangles that appear symmetrically placed but the orientations across the two fold axes do not match what the double-reflection produces. The triangles in the lower-left quadrant should be mirrored versions of the upper-right — option C breaks this rule.

D

Correct

Option D shows exactly eight holes with each triangle pointing in the correct direction for its position on the sheet. The orientations across the diagonal fold axis are mirror images of each other, and the orientations across the second fold axis are mirror images of those — perfectly matching what the step-by-step unfolding diagram confirms.

E

Eliminate

Option E shows triangles that do not consistently mirror across either fold axis. Several triangles in neighbouring positions point in the same direction when they should be reflected opposites. The orientations reveal this option was constructed without tracking the fold reflections correctly.

Use this checklist next time

  • Calculate the total hole count first — two folds give four layers, so multiply holes punched by four.
  • Track triangle orientation at every crease opening — each reflected half must show flipped directions, not copied ones.
  • Use the fold axes as mirror lines and check that triangles on opposite sides of each axis are genuine reflections of each other.

Reflection

The options in this question are designed to catch students who stop at hole count. Options B, C, and E all have plausible numbers of holes — the discriminating factor is entirely in the triangle orientations. At Level F, the correct answer satisfies every condition, not just the most obvious one.

Bridge forward

In any Figure Analysis question involving shaped holes rather than plain circles, always track orientation as well as position. Shaped holes rotate and reflect just like the paper does — the direction they point after unfolding is determined by the fold sequence, not by the original punched direction alone.

Conclusion

Option D is correct. Two folds produce four layers, giving eight holes from two punches. More importantly, each crease opening mirrors the triangular holes across the fold axis — changing their pointing direction. Option D is the only answer showing eight holes with every triangle oriented correctly for its position after both reflections are applied.

CAT4 Level F Figure Recognition sample question — identifying a target shape at the same orientation within a complex figure.

Spatial Ability · Figure Recognition

CAT4 Level F Figure Recognition question: a target shape showing an irregular polygon with a sharp triangular notch cut into one side is displayed at the top. Five answer options each embed the target shape within a more complex figure — only one option contains the shape in the exact same orientation without rotation or reflection.

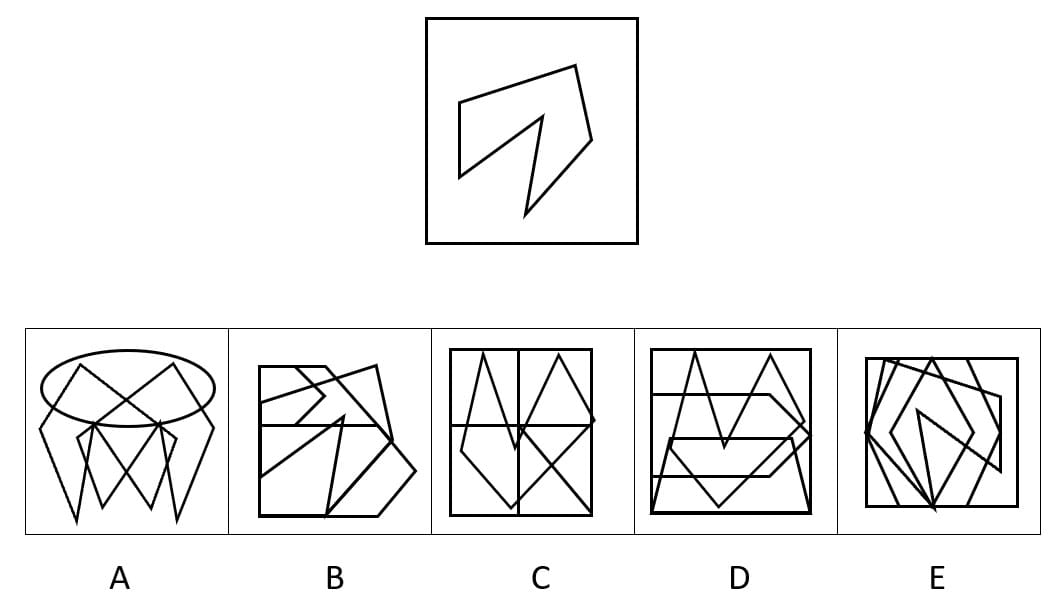
Figure Recognition · Level F Question

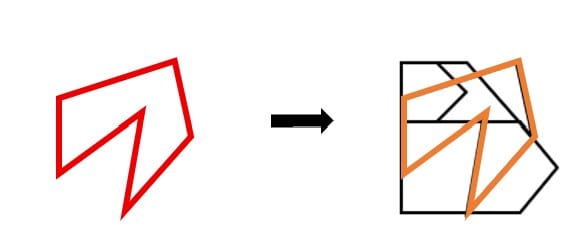
The target shape is always hidden inside a more complex figure — but it must appear in exactly the same orientation. Not rotated. Not flipped. Not mirrored. The shape you are looking for is the same angle, the same direction, the same structure as the original.

Exact-match method — orientation is fixed, reject anything rotated or reflected

Question type

Figure Recognition

Skill tested

Locating a target shape at identical orientation within a complex figure

Difficulty

High

What to notice first

Study the target shape before looking at any option. It is an irregular polygon with a sharp triangular notch cut into one side — creating a pointed recess that bites into the interior of the shape. The outer boundary sits at a specific tilt and the notch points in a specific direction. Both of those features are fixed. Your job is not simply to find a figure that contains similar lines — your job is to find the option where the outer boundary sits at exactly the same tilt and the triangular notch points in exactly the same direction. Every option contains lines that reference the target shape, but most have rotated or flipped it. The complex background lines in each option are designed to disguise the shape and make rotated versions look plausible.

Check 1

Memorise the outer boundary angle

The outer polygon tilts in a specific direction. Lock that tilt in your mind before scanning options — it is your primary filter.

Check 2

Check the notch direction

The triangular notch points in a specific direction inside the boundary. In a rotated version it will point differently. Use this as your second filter after the outer boundary passes.

Check 3

Reject anything rotated or flipped

If the outer boundary tilt matches but the notch points differently — or vice versa — the shape has been rotated or reflected. Eliminate it immediately.

Core rule

The target shape must appear in the answer option in exactly the same orientation as shown — same outer boundary tilt, same notch direction, not rotated, not flipped, not mirrored in any way.

Step-by-step answer

Answer diagram showing the target shape highlighted in orange within option B, confirming the outer boundary tilt and triangular notch direction both match the original exactly with no rotation or reflection applied
1

Step 1 — Describe the target precisely

The target is an irregular polygon tilted to the upper right, with a sharp triangular notch cut into one side creating a pointed recess inside the boundary. Both the outer tilt and the notch direction are fixed features — they must both appear correctly in the answer.

2

Step 2 — Scan options for the outer boundary first

Ignore the background lines in each option and look only for the outer polygon boundary at the correct tilt. Several options contain a similar polygon outline — but check whether it sits at the same angle as the target or whether it has been rotated. Eliminate any option where the outer boundary tilt differs from the original.

3

Step 3 — Confirm the notch direction

Once the outer boundary passes the tilt check, verify that the triangular notch points in the same direction as in the target. Option B passes both checks — the outer boundary sits at the identical tilt and the notch points in the same direction. The answer image confirms this with the orange highlight tracing both features precisely.

Option check

A

Eliminate

Option A embeds the shape within a circular overlay that distorts the visual boundary. The outer polygon and triangular notch do not sit at the correct tilt — both features have been altered from the original orientation, making this a structural mismatch rather than a hidden match.

B

Correct

Option B contains the target shape in exactly the same orientation — the outer irregular polygon sits at the identical tilt and the triangular notch points in the same direction as the original. The complex background lines are distractors. The target shape is present, unaltered, and traceable exactly as shown.

C

Eliminate

Option C shows lines arranged in a more symmetrical grid. The polygon boundary present is a rotated version of the target — the outer tilt differs from the original, and the triangular notch points in a different direction as a result. Both filters fail.

D

Eliminate

Option D contains a shape with a similar outer boundary, but the triangular notch has been flipped — it points in the opposite direction from the target. The outer boundary passing the tilt check is not sufficient on its own. Both features must match simultaneously.

E

Eliminate

Option E shows the shape rotated — the outer polygon sits at a different tilt from the target and the notch direction follows accordingly. The shape has been turned, not preserved. Rotation disqualifies an option regardless of how structurally similar it appears at first glance.

Use this checklist next time

  • Describe the target shape in two parts before scanning options: outer boundary angle and notch direction.
  • Check the outer boundary tilt first — eliminate any option where the polygon sits at a different angle.
  • Confirm the triangular notch direction second — both features must match simultaneously for the option to be correct.

Reflection

Figure Recognition at Level F is won by precision, not approximation. The background lines in each option are deliberately chosen to make the wrong orientation look convincing. Checking two independent features — outer boundary angle and notch direction — gives you a reliable two-stage filter that the distractors cannot pass simultaneously.

Bridge forward

In any Figure Recognition question, always establish your two-feature description of the target before opening the options. Students who scan options without a precise description in mind are vulnerable to rotated versions that feel familiar. Describe first, then match — never the other way around.

Conclusion

Option B is correct. It is the only answer that contains the target shape — an irregular polygon with a sharp triangular notch cut into one side — in exactly the same orientation as shown. The outer boundary tilt and notch direction both match precisely. All other options show the shape rotated, flipped, or structurally altered.

Support

Spotted something that needs fixing?

If you notice an error, broken link, or unclear explanation, email us and we’ll review it.

CAT4 Level F Practice Test Video Walkthrough

Step-by-step answers to real CAT4 Level F exam-style questions across all four batteries — Figure Matrices, Verbal Reasoning, Number Series, and more.

CAT4 Level F Practice Test Walkthrough — step-by-step answers to real CAT4 Level F exam-style questions

CAT4 Level F Practice Test Walkthrough · Step-by-Step Answers · Watch on YouTube →

How to Prepare for CAT4 Level F

CAT4 Level F tests reasoning, not subject knowledge — so preparation is about sharpening how you think, not memorising facts. The four strategies below are the most effective for Year 9–10 students.

  • Practice daily with real-style questions. Short, focused sessions beat long irregular cramming. Aim for 20–30 minutes a day across all four batteries.
  • Use timed mock tests. Familiarity with the format and time pressure is half the battle. Use our free CAT4 Level F PDF to simulate real conditions.
  • Review every wrong answer. Understanding why an answer is wrong builds faster pattern recognition across all question types.
  • Set weekly milestones. Break preparation into measurable goals — one battery per week — and track progress to stay on course.

CAT4 Level F Exam Strategies

Time Management

  • Read each question once, carefully. Misreading instructions is the most common — and most avoidable — source of lost marks.
  • Attempt easier questions first. Securing straightforward marks early keeps confidence high and time pressure low.
  • Use elimination on multiple choice. Ruling out two implausible options turns a guess into a 50/50 — significantly improving your expected score.
  • Don't dwell on hard questions. Flag them, move on, and return with fresh eyes if time allows.

Common Pitfalls to Avoid

  • Overthinking. CAT4 Level F rewards pattern recognition. If you're spending more than 90 seconds on one question, move on.
  • Skipping preparation. Even naturally strong students benefit from structured practice. Familiarity with the format reduces anxiety and improves pacing.
  • Neglecting weaker batteries. A low score in one battery pulls down your overall profile significantly. Give equal attention to all four areas.

Timed mock tests are the single best way to close the gap between knowing the content and performing under real exam conditions.

CAT4 Level F Practice Resources

Practice Papers & Mock Tests

Video Preparation

Is CAT4 Level F Used for School Admissions?

For most Year 9 and Year 10 students, CAT4 Level F is used internally by schools — but GL Assessment identifies admissions support and placement decisions as documented use cases for the assessment. In practice, selective independent schools, international schools and sixth form programmes use CAT4 Level F results alongside other evidence to evaluate a student's reasoning potential at the point of entry.

Setting and Streaming

The most common use of CAT4 Level F results is to inform setting and streaming decisions — placing students in teaching groups that match their reasoning ability across all four batteries. For Year 9 and Year 10 pupils, these placements directly shape the level of challenge and pace of delivery they receive across GCSE and IGCSE subjects.

Admissions and Scholarship Consideration

Some selective independent and international schools include CAT4 Level F scores as part of their entry or scholarship assessment process, using results to evaluate a student's reasoning potential alongside other evidence. For students applying to selective sixth forms or international programmes at this stage, a strong CAT4 Level F profile can be a meaningful part of the admissions picture.

Personalised Learning Plans

Schools use CAT4 Level F profiles to identify students who may benefit from additional challenge or targeted support — particularly in the lead-up to GCSEs, IGCSEs and equivalent qualifications such as the International Baccalaureate. The four-battery structure of CAT4 Level F makes it especially useful for pinpointing whether a student's reasoning strengths are evenly distributed or concentrated in specific areas.

Measures Potential, Not Learned Content

Unlike subject exams, CAT4 Level F focuses on how students think rather than what they have been taught — making it a particularly useful tool for schools assessing students from varied educational backgrounds, including those transitioning from international curricula such as the IB Middle Years Programme or overseas national systems.

What Do CAT4 Level F Scores Mean for Year 9 and Year 10?

CAT4 Level F results are reported using three standardised score types, developed by GL Assessment to measure reasoning ability consistently across the national cohort. Each one gives schools and parents a different angle on how a Year 9 or Year 10 child's cognitive abilities compare with pupils of the same age nationally. CAT4 Level F is the assessment used during the core GCSE years — when reasoning ability has a direct and measurable impact on academic outcomes and subject performance.

Standard Age Score (SAS)

The main score used to measure a child's performance against other children of exactly the same age. SAS scores run from 60 to 140, with 100 set as the national average. A score above 100 means the child performed better than the typical child of that age; below 100 means below average. On CAT4 Level F, the SAS is age-standardised for the Year 9–10 cohort and is used by schools as a reliable predictor of GCSE grade potential across subjects.

National Percentile Rank (NPR)

Expresses a child's result as a position within the national population. An NPR of 75, for example, means the child scored higher than 75 out of every 100 same-age pupils nationally. NPR values range from 1 to 99. For CAT4 Level F results, the NPR gives parents a nationally benchmarked view of their child's reasoning ability at the stage when GCSE performance expectations are at their most concrete.

Stanine

A nine-point performance band that maps directly from the NPR. Stanines run from 1 (Very Low) to 9 (Very High) and group pupils into broad, easy-to-read bands. They help parents and teachers get a clear at-a-glance picture of where a child sits without needing to interpret a precise number. In CAT4 Level F reports, stanines are used alongside GCSE predicted grades to give teachers a fuller picture of whether a student is performing in line with their cognitive potential.

Learn more about CAT4 scores and what they mean for Year 9 and Year 10 pupils →

What is a Good CAT4 Score in Year 9 and Year 10?

All CAT4 scores are centred on a national average of 100, standardised by GL Assessment across the full cohort. Knowing which band your child's CAT4 Level F score falls into helps you understand their reasoning profile clearly and in context. On CAT4 Level F, most pupils score between 85 and 115. For the CAT4 test Year 9 cohort, results help confirm whether set placements are correctly matched to each student's reasoning trajectory as GCSEs get underway; for the CAT4 test Year 10 cohort, a strong score is one of the most reliable indicators of final grade potential with examinations approaching.

Average (90–110)

Scores within this range are considered typical for a child's age. A score of exactly 100 is the national average; scores between 90 and 110 indicate reasoning ability that is broadly in line with same-age peers. For CAT4 Level F, this band represents the majority of the Year 9–10 national cohort and reflects reasoning ability consistent with the expected range of GCSE grade outcomes across core subjects.

Above Average (111–119)

Scores in this range indicate reasoning ability above the national average for the child's age. Children scoring here are performing meaningfully better than most same-age peers, though not yet in the high-ability band. On CAT4 Level F, an above-average score signals strong GCSE potential across multiple subjects and supports the case for higher-tier entry and more demanding examination pathways.

High Ability (120–129)

Scores in the 120–129 range point to strong reasoning skills and are often seen in children who pick up new concepts quickly or show early academic confidence. On the CAT4 Level F assessment, a score in this band places a student in the top 10% nationally — a level strongly associated with grades 7–9 at GCSE and a meaningful indicator for selective sixth form and A-level pathway planning.

Gifted and Talented (130+)

A score of 130 or above is typically classified as Gifted and Talented , reflecting exceptional reasoning ability compared with pupils of the same age across the country. On CAT4 Level F, a score of 130 or above places a student in the top 2% nationally — a strong predictor of the highest GCSE grades and a compelling foundation for scholarship applications and highly selective sixth form entry.

Final Thoughts on CAT4 Level F Preparation

CAT4 Level F is not a test of what Year 9 and Year 10 students know — it is a test of how they think. That distinction matters, because it means the skills being measured can be practised, sharpened, and improved before test day.

The sample questions on this page cover all four CAT4 Level F batteries — Verbal Reasoning, Quantitative Reasoning, Non-Verbal Reasoning, and Spatial Ability. Working through them carefully, reviewing every explanation, and identifying which question types feel least comfortable is the most productive preparation a student can do. The goal is not to memorise answers — it is to internalise the reasoning method behind each question type so that unfamiliar questions on test day feel approachable rather than daunting.

Download the free PDF

Real-style CAT4 Level F sample questions — no sign-up needed.

Get the free PDF →
Full CAT4 Level F course

Structured mock tests and in-depth preparation via PretestPlus.

View full course →

CAT4 Level F is designed to measure how students think, not what they have been taught. Preparation will not change a student's underlying reasoning ability — but it will ensure they are not held back by unfamiliar formats, poor time management, or avoidable errors on the day. The resources on this page give every Year 9 and Year 10 student the best possible chance of showing what they are genuinely capable of.

CAT4 Level F (Year 9–10) — Frequently Asked Questions

What is CAT4 Level F?

CAT4 Level F is a cognitive ability assessment for Year 9–10 students, measuring verbal, non-verbal, quantitative and spatial reasoning.

Who takes Level F and when is it used?

Schools typically administer Level F to students aged ~13–15 (Years 9–10) for placement, setting, and personalised learning insights.

Which question types appear in Level F?

Common types include: Figure Matrices, Figure Classification, Figure Analysis/Recognition, Verbal Classification/Analogies, Number Analogies and Number Series.

How should students prepare effectively?

Use short daily practice, timed drills, review of mistakes by topic, and mock tests that mirror Level F timing and difficulty.

How is CAT4 Level F scored?

Scores are converted to standardised measures and may be presented with stanines/percentiles to show relative performance across batteries.

Does CAT4 affect school placement?

Many schools use CAT4 alongside other evidence for setting/streaming and to tailor support and enrichment programmes.

What are the most common mistakes?

Spending too long on a single item, skipping instructions, and neglecting weaker batteries (e.g., spatial) during prep.

Can practice improve results?

Yes. Familiarity with item formats, timed practice, and targeted review typically improve speed, accuracy, and test confidence.