Free Year 5 CAT Test (CAT4 Level B) Practice Questions & Expert Guide
Clear guide for Year 5 families with a free CAT4 Level B practice PDF, sample questions, and simple preparation tips.
- ✓Free CAT4 Level B practice PDF with sample questions and clear guidance
- ✓Understand the Level B format, timing, and all four CAT4 batteries
- ✓Learn how to prepare calmly with age-appropriate strategies for Year 5 children
- ✓No sign-up needed to access the free guide and downloadable PDF
Test at a Glance
Who Takes This Test?
What to Expect in the CAT4 Level B Test
What Is CAT4 Level B and How to Help Your Child Succeed
CAT4 Level B is the second stage of the Cognitive Abilities Test (CAT4), designed for children in Year 5 (ages 9–10). This level gives schools and educators detailed insight into a child's reasoning abilities across four key areas: Verbal, Non-Verbal, Quantitative, and Spatial Reasoning.
The CAT4 assessment helps identify hidden potential, preferred learning styles, and areas where targeted support can make the biggest difference. For Year 5 pupils, Level B results are often used to inform setting decisions, personalise teaching, and plan secondary school transition support. CAT4 Level B is also used as an entry assessment by selective independent schools and international schools worldwide — making strong preparation essential for families applying to competitive programmes.
CAT4 Level B Structure and Time Frame
Free CAT4 Level B Sample Questions
Level B Verbal Reasoning Sample Question
Verbal Analogies
Tree → Leaves : Book →
Options:
A) pages
B) library
C) cover
D) desk
E) spine
Verbal Analogies · Question
If you don’t lock the relationship first, you’ll drift into “related words” instead of the exact match. This question is about part–whole structure, not general association.
Question type
Verbal Analogies
Skill tested
Part–whole relationships
Difficulty
Easy–Medium
What to notice first
A tree contains leaves. Leaves are physical parts that make up the tree. So the rule is: whole → its components. Apply the same structure to book.
Check 1
Identify the relationship
Tree → leaves means a whole object and its parts.
Check 2
Keep the same structure
Book must connect to something that physically makes it up.
Check 3
Apply to book
A book is made of pages, so pages is the correct match.
Core rule
When the first pair shows a whole and its parts, the missing word must be a real component of the second item.
Step-by-step solution
Start with the first pair
A tree is made up of leaves. This is not location or use — it is structure.
Apply the same rule
You now need something that makes up a book in the same physical way.
Select the match
Pages are the parts that form a book, so they match the relationship exactly.
Option check
Correct
Pages are the parts that make up a book, matching leaves in a tree.
Eliminate
A library is a place where books are kept, not a part of a book.
Eliminate
A cover is only one part, but the analogy needs the main structural components.
Eliminate
A desk is unrelated to the structure of a book.
Eliminate
A spine is just one part, not the full set of components like pages.
Use this checklist next time
- Ask: is this whole → parts, use, location, or type?
- Match the exact structure, not just a related idea.
- Prefer the main components, not a minor single part.
Conclusion
Option A is correct because a tree is made of leaves, and a book is made of pages.
Verbal Classification
broom, mop, duster
Options:
A) bucket
B) sponge
C) vacuum
D) cloth
E) sink
Verbal Classification · Question
If you go too broad here, you’ll pick something “related to cleaning” instead of something that belongs to the exact same tool category. Precision matters.
Question type
Verbal Classification
Skill tested
Function-based grouping
Difficulty
Medium
What to notice first
Broom, mop, and duster are all tools used to clean surfaces. They are not places, not containers, and not materials. So the correct answer must also be a cleaning tool that performs a similar function.
Check 1
Define the category
All three are tools used to clean floors or surfaces.
Check 2
Stay strict
Do not choose something used with cleaning or found in a cleaning setting. It must itself be a tool.
Check 3
Test each option
Ask: does this directly clean surfaces in the same way?
Core rule
Choose another tool that is used to clean surfaces.
Step-by-step solution
Identify the group
Broom, mop, and duster are all used to remove dirt or dust from surfaces.
Apply the same idea
The answer must also be a tool that performs cleaning directly, not something that supports the process.
Select the match
A vacuum is a cleaning tool used to remove dirt from surfaces, so it fits the same functional category.
Option check
Eliminate
A bucket is a container used during cleaning, but it does not clean surfaces by itself.
Eliminate
A sponge is used for wiping wet surfaces like dishes or counters — the group here is tools that sweep or vacuum dust and dirt from floors.
Correct
A vacuum is a tool used to clean surfaces, just like a broom, mop, and duster.
Eliminate
A cloth can be used for cleaning, but it is more general and does not match the main category as closely as a vacuum.
Eliminate
A sink is a place where cleaning happens, not a cleaning tool.
Use this checklist next time
- Define the category in one clear phrase.
- Choose something inside the category, not something related to it.
- Prefer the closest functional match, not a weaker or broader option.
Conclusion
Option C is correct because a vacuum belongs to the same functional group as broom, mop, and duster: tools used to clean surfaces.
Quantitative Reasoning Sample Questions
Number Analogies
[3 → 12] : [5 → ?]
Options:
A) 14
B) 10
C) 20
D) 25
E) 15
Number Analogies · Question
If you jump straight to subtraction, you’ll lock in the wrong rule. This question tests whether you can identify a multiplication relationship — not just spot a numerical difference.
Question type
Number Analogies
Skill tested
Identifying a multiplication rule
Difficulty
Easy–Medium
What to notice first
Look at the first pair: 3 → 12. Ask yourself what single operation takes 3 to 12. Multiplying by 4 works: 3 × 4 = 12. Now apply that same rule to 5. The answer must follow the exact same operation — not a similar one.
Check 1
Find the operation
3 → 12: try ×4. It works: 3 × 4 = 12. Do not stop at subtraction (12 − 3 = 9) — always test multiplication first.
Check 2
Verify, do not assume
Confirm the rule is clean. Does ×4 give exactly 12 from 3? Yes. Is there a simpler rule that also works? No — addition gives +9, which is less clean and harder to transfer.
Check 3
Apply to the second pair
5 × 4 = 20. That is the answer. Now check it against the options.
Core rule
Always test your rule against the first pair before applying it to the second. If the rule fails on pair one, it cannot be the right rule — eliminate it and try another operation.
Step-by-step solution
Analyse the first pair
3 → 12. Try multiplication: 3 × 4 = 12. The rule is ×4. Confirm it is not ×2 (that gives 6) or ×3 (that gives 9). Only ×4 works exactly.
Reject the addition trap
12 − 3 = 9. You could add 9 to 5 and get 14. But adding a fixed difference is a weaker rule than multiplying by a fixed factor. When multiplication fits cleanly, use it.
Apply the rule and confirm
5 × 4 = 20. Check that 20 appears in the options — it does. No other option is produced by the ×4 rule, so 20 is the only defensible answer.
Option check
Eliminate
14 is the addition trap: 12 − 3 = 9, then 5 + 9 = 14. This applies a difference, not a multiplication rule. Test it on the first pair: does adding 9 to 3 give 12? Yes — but ×4 is cleaner and transfers more reliably. Addition traps only work when no multiplication rule fits.
Eliminate
10 is the doubling trap: 5 × 2 = 10. But test ×2 on the first pair: 3 × 2 = 6 ≠ 12. The rule fails immediately on pair one — eliminate.
Correct
20 follows the ×4 rule exactly: 3 × 4 = 12 and 5 × 4 = 20. The same operation works on both pairs with no exceptions.
Eliminate
25 is the squaring trap: 5² = 25. But test squaring on the first pair: 3² = 9 ≠ 12. The rule fails on pair one — eliminate.
Eliminate
15 is the close multiplier trap: 5 × 3 = 15. But test ×3 on the first pair: 3 × 3 = 9 ≠ 12. The rule fails on pair one — eliminate.
Use this checklist next time
- Always test your rule on the first pair before applying it to the second.
- Try multiplication before addition — it is the more common rule in Number Analogies.
- If two operations both seem to fit the first pair, test both on the second pair and eliminate the one that does not produce an answer in the options.
Conclusion
Option C is correct. The rule is ×4: 3 × 4 = 12, and 5 × 4 = 20. Every other option fails when the rule is tested against the first pair — except the addition trap (A), which is eliminated because multiplication is the cleaner and correct operation here.
Number Series
50, 46, 42, ?, 34, 30
Options:
A) 36
B) 38
C) 40
D) 44
E) 48
Number Series · Question
If you only check one gap between numbers, you risk locking in the wrong step size. This question rewards checking the rule across all visible gaps before committing to an answer.
Question type
Number Series
Skill tested
Identifying a consistent subtraction rule
Difficulty
Easy–Medium
What to notice first
The sequence is going down. Calculate the gap between the first two visible numbers: 50 − 46 = 4. Then check the next gap: 46 − 42 = 4. The rule is consistent: subtract 4 at every step. Apply it to find the missing term between 42 and 34.
Check 1
Find the first gap
50 − 46 = 4. The sequence is decreasing by 4.
Check 2
Confirm across all gaps
46 − 42 = 4 and 34 − 30 = 4. The rule holds throughout — it is not a coincidence.
Check 3
Apply to the missing term
42 − 4 = 38. Then verify: 38 − 34 = 4. The rule still holds after the missing term.
Core rule
Always verify the rule on both sides of the missing term. If 38 is correct, then 38 − 34 must equal 4 — and it does. This double-check eliminates wrong step sizes and direction errors.
Step-by-step solution
Calculate the gaps between visible numbers
50 − 46 = 4. 46 − 42 = 4. 34 − 30 = 4. Every gap is exactly 4. The sequence decreases by 4 at every step.
Apply the rule to the missing term
The term before the gap is 42. Subtract 4: 42 − 4 = 38. The missing term is 38.
Verify on both sides
Check left: 42 − 38 = 4 ✓. Check right: 38 − 34 = 4 ✓. The rule holds on both sides of the missing term. 38 is confirmed.
Option check
Eliminate
36 is the wrong step size trap: the student subtracts 6 instead of 4. Test it: 42 − 36 = 6, but 46 − 42 = 4. The step size is inconsistent — eliminate.
Correct
38 follows the −4 rule exactly. 42 − 4 = 38, and 38 − 34 = 4. The rule is consistent on both sides.
Eliminate
40 is the wrong step size trap: the student subtracts 2 instead of 4. Test it: 42 − 40 = 2, but every other gap is 4. Inconsistent — eliminate.
Eliminate
44 is the direction reversal trap: the student adds instead of subtracts. 42 + 2 = 44. The sequence is decreasing — adding moves in the wrong direction. Eliminate.
Eliminate
48 is the direction reversal with wrong step trap: the student adds 6 instead of subtracting 4. Both the direction and the step size are wrong. Test it: 48 − 42 = 6, not −4. Eliminate.
Use this checklist next time
- Check at least two gaps before assuming you have the rule — one gap is never enough.
- Note whether the sequence is going up or down before calculating anything.
- After finding the missing term, verify it on both sides: check left and check right.
Conclusion
Option B is correct. The rule is −4 at every step: 50, 46, 42, 38, 34, 30. Every other option fails because it uses the wrong step size, the wrong direction, or both.
Non-verbal Reasoning Sample Questions
Figure Classification
Figure Classification · Question
If you only check what shapes are present and ignore where they sit, you will fall into the position trap. This question tests three rules at once — you need all three to hold before an option can be correct.
Question type
Figure Classification
Skill tested
Multi-rule visual pattern recognition
Difficulty
Medium
What to notice first
Look at the three reference images one at a time. In every one: a large shape acts as a container, and inside it sit exactly two smaller shapes. Now look more carefully — the shape in the lower-right is always a triangle. And crucially, the outer shape and both inner shapes are always all different from each other. You need an option that satisfies all three rules.
Rule 1
Container structure
One large outer shape. Two smaller inner shapes — one upper-left, one lower-right. Same layout in every reference image.
Rule 2
Triangle always lower-right
Circle → triangle lower-right. Square → triangle lower-right. Pentagon → triangle lower-right. The triangle position never changes.
Rule 3
All three shapes different
The outer shape, the upper-left inner shape, and the lower-right inner shape must all be different from each other. No shape repeats.
How to eliminate
Test each option against all three rules. One failed rule is enough to eliminate — you do not need to find all the problems with a wrong option.
Step-by-step solution
Extract the three rules from the reference images
Rule 1: one large container, two smaller inner shapes. Rule 2: triangle is always in the lower-right position. Rule 3: outer shape and both inner shapes are all different from each other.
Use the triangle rule to eliminate quickly
Scan each option for a triangle in the lower-right. Option 1 has the triangle in the upper-left — wrong position. Option 4 has no triangle at all. These two are eliminated immediately.
Use the all-different rule to finish
Options 2 and 5 both have a triangle as the outer shape and a triangle as an inner shape — the same shape appears twice. Rule 3 fails. Only option 3 remains: pentagon outer, circle upper-left, triangle lower-right — all three shapes different. ✓
Option check
Eliminate
Position trap: the triangle is in the upper-left, not the lower-right. The shapes are all present but in the wrong positions. Rule 2 fails.
Eliminate
Repeated shape trap: the outer shape is a triangle and one of the inner shapes is also a triangle. The same shape appears twice. Rule 3 fails.
Correct
Pentagon outer, circle upper-left, triangle lower-right. All three shapes are different. Triangle is in the correct position. All three rules hold.
Eliminate
Missing element trap: there is no triangle inside this option at all. The lower-right shape is a square. Rule 2 fails immediately.
Eliminate
Repeated shape trap: the outer shape is a triangle (right-pointing) and one inner shape is also a triangle. The same shape appears twice. Rule 3 fails — same reason as option 2.
Use this checklist next time
- Extract every rule from the reference images before looking at the options — do not guess from one image alone.
- Use the most specific rule first to eliminate: a fixed position or a fixed shape narrows the options fastest.
- Check that no shape appears more than once across the outer and inner positions.
Conclusion
Option 3 is correct. It is the only option where the outer shape and both inner shapes are all different, the triangle sits in the lower-right position, and the container structure matches the reference group exactly.
Figure Matrices
Figure Matrices · Question
If you only count how much is filled and ignore which part stays white, you will pick A instead of B. Both show three-quarters filled — but only one continues the orientation established in the column above.
Question type
Figure Matrices
Skill tested
Progressive fill pattern + orientation
Difficulty
Medium
What to notice first
Look down any column. In row 1, one quarter of the shape is filled. In row 2, two quarters (one half) are filled. The fill increases by exactly one quarter at each step. The missing cell is in row 3, so the diamond must be three-quarters filled. But you also need to check the orientation — which quarter stays white must match the direction already set in rows 1 and 2 of that column.
Rule 1
Fill increases by ¼ per row
Row 1 = ¼ filled. Row 2 = ½ filled. Row 3 must be ¾ filled. This holds across all three columns — check it on the circle and square columns to confirm.
Rule 2
Same shape per column
Column 1 is always a circle. Column 2 is always a square. Column 3 is always a diamond. The missing cell must be a diamond.
Rule 3
Orientation must be consistent
The white section follows a fixed direction as the fill grows. Check rows 1 and 2 of column 3 to see which quarter stays white — the same quarter must remain white in row 3.
Why orientation matters
Option A is the trap for students who only count the filled area. Once you know the answer must be ¾ filled, you still need to verify which quarter is white. Check this against the diamonds in rows 1 and 2 before choosing.
Step-by-step solution
Read the fill rule from the columns
Check all three columns. Row 1: ¼ filled in every column. Row 2: ½ filled in every column. Row 3: ¾ must be filled in every column. The rule is consistent — it is not a coincidence in one column.
Narrow to ¾ filled diamonds only
The missing cell must be a ¾ filled diamond. Eliminate C (fully filled — too much), D (barely filled — far too little), and E (half filled — matches row 2, not row 3). Only A and B remain.
Use orientation to choose between A and B
Look at the diamond in rows 1 and 2 of column 3. The white section is consistently on the upper-right. Option B continues this — the white quarter sits in the upper-right position. Option A places the white section differently. B is correct.
Option check
Eliminate
Orientation trap: the fill amount is close to ¾ but the white section is not in the position established by the column above. The fill direction does not match rows 1 and 2 of column 3.
Correct
Three-quarters filled with the white quarter in the correct position, consistent with the fill direction shown in rows 1 and 2 of column 3. Both the amount and orientation are right.
Eliminate
Overshoot trap: the diamond is fully filled (4/4). The pattern requires ¾ — this goes one step too far. There is no white section at all.
Eliminate
Wrong direction trap: the diamond is barely filled — far less than ¾. This reverses the pattern instead of continuing it downward.
Eliminate
Wrong step trap: the diamond is half filled, which matches row 2 — not row 3. The student has stopped one step too early.
Use this checklist next time
- Check the pattern in more than one column to confirm the rule is consistent — not a coincidence.
- Once you know the fill amount, check orientation before choosing — amount alone is not enough.
- Use early eliminations (C, D, E here) to narrow to two options, then apply the finer rule to decide.
Conclusion
Option B is correct. The rule is a ¼ fill increase going down each column: ¼ in row 1, ½ in row 2, ¾ in row 3. The missing diamond must be three-quarters filled with the white quarter in the position established by the column above. Only B satisfies both conditions.
Spatial Ability Sample Questions
Figure Analysis

Figure Analysis · Question
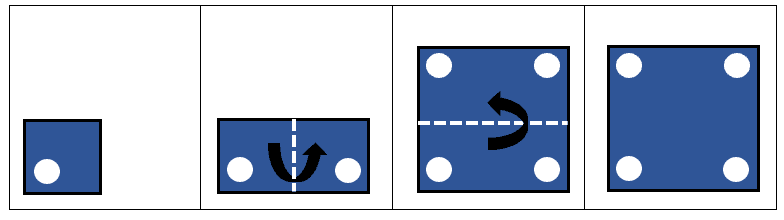
If you only count the holes and ignore their positions, you will choose C or E instead of D. The number of holes is only half the answer — where they land when unfolded is what separates the correct option from the traps.
Question type
Figure Analysis
Skill tested
Fold tracking and spatial symmetry
Difficulty
Medium
What to notice first
Read the fold sequence from left to right in the question strip. The paper is folded twice before the hole is punched. Each fold doubles the number of layers — so two folds give four layers, and one punch through four layers creates four holes when unfolded. You then need to trace where each hole lands by reversing each fold in order.
Step 1
Count the folds
Fold 1: horizontal — the top half folds down onto the bottom half. Two layers. Fold 2: vertical — the left half folds right onto the right half. Four layers total.
Step 2
Locate the hole
The hole is punched through the bottom-left corner of the folded quarter. Because all four layers are stacked, the punch goes through all of them at once.
Step 3
Unfold and mirror
Unfold the vertical fold first: the hole mirrors across the vertical fold line, creating a matching hole on the left half. Unfold the horizontal fold next: both holes mirror across the horizontal fold line, giving four holes total — one in each quadrant.
Key insight
Every fold line acts as a mirror. Unfold in reverse order — undo the last fold first — and reflect the hole position across that line each time. Two folds mean two reflections, producing four holes arranged in a symmetrical pattern across the centre of the paper.
Step-by-step solution
Establish the layer count
Two folds = four layers. One hole punch = four holes when unfolded. Any option showing fewer than four holes is immediately wrong. Eliminate A (three holes) and B (two holes) before reading any positions.
Unfold the vertical fold and mirror the hole
The hole sits in the bottom-left of the right half. Unfolding left-to-right mirrors it across the vertical fold line: a matching hole now appears in the bottom-right of the left half. We now have two holes — both in the bottom half, one in each half.
Unfold the horizontal fold and mirror both holes
Unfolding top-to-bottom mirrors both bottom holes upward across the horizontal fold line. Each bottom hole gains a matching top hole, giving four holes total — one in each quadrant, each the same distance from the centre. Only option D shows this symmetric four-hole pattern in the correct positions.

Option check
Eliminate
Wrong count trap: only three holes are shown, arranged diagonally. Two folds through four layers must produce exactly four holes. Three is not possible — eliminate immediately.
Eliminate
One-fold trap: only two holes are shown at the bottom. This is what you would get after just one fold, not two. The student has forgotten the second fold doubles the layers again — eliminate.
Eliminate
Wrong position trap: four holes are shown, but they are clustered in the centre of the paper rather than spread into each quadrant. The hole was punched in a corner of the folded quarter, so the unfolded holes must sit near the fold-line intersections — not the paper centre.
Correct
Four holes, one in each quadrant, symmetrically placed across both fold lines. This matches exactly what happens when a corner hole is punched through four layers and the paper is fully unfolded.
Eliminate
Wrong position trap: four holes are present but arranged incorrectly — they do not reflect the symmetry created by folding horizontally then vertically. The positions do not match the mirroring produced by either fold line.
Use this checklist next time
- Count the folds first, then calculate the layers: each fold doubles them. One punch through n layers = n holes.
- Unfold in reverse order — undo the last fold first — and mirror the hole across that fold line each time.
- Use hole count to eliminate wrong options before checking positions — it is the fastest first filter.
Conclusion
Option D is correct. Two folds create four layers. One punch produces four holes. Unfolding horizontally then vertically mirrors the hole into all four quadrants symmetrically. Only D shows four holes in the correct positions — one per quadrant, equidistant from the centre fold lines.
Figure Recognition

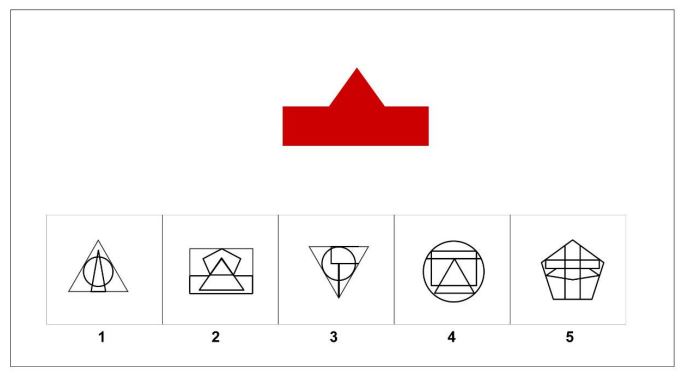
Figure Recognition · Question
If you search for the whole target shape in one glance, you will miss it — the shape is always hidden inside a more complex figure. Break the target into its parts first, then hunt for each part separately.
Question type
Figure Recognition
Skill tested
Spotting a hidden shape within a complex figure
Difficulty
Medium
What to notice first
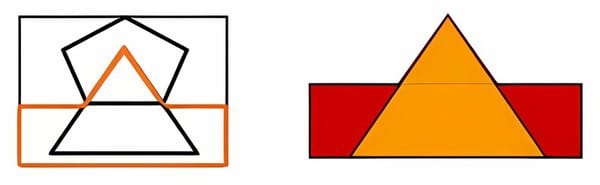
Study the target shape carefully before looking at the options. It has exactly two components: an upright triangle (pointing up) sitting directly on top of a rectangle, with the base of the triangle touching the top edge of the rectangle. Both shapes must be present, in the correct orientation, and touching at that join line. If either component is missing, wrong, or in the wrong position — eliminate.
Check 1
Is there an upright triangle?
The triangle must point upward. An inverted triangle (pointing down) is not the same shape — it fails immediately regardless of what else is present.
Check 2
Is there a rectangle below it?
The second component is a rectangle sitting beneath the triangle. A circle, pentagon, or any other shape in that position does not match — eliminate even if the triangle is correct.
Check 3
Do the two shapes connect correctly?
The base of the triangle must sit along the top edge of the rectangle. Both lines must be visible within the option figure. Extra lines from the surrounding shape are fine — ignore them and focus only on the target outline.
How to search efficiently
In each option, look for a horizontal line first — that is the shared base where the triangle meets the rectangle. Once you find a horizontal line, check whether an upright triangle sits above it and a rectangle sits below. This one line is the join point that confirms both components are present.
Step-by-step solution
Describe the target in words before searching
Upright triangle + rectangle beneath it, joined at one horizontal line. Two shapes, one join. Write this down mentally before looking at any option — it stops you from accepting a partial match.
Scan for the join line in each option
Look for a horizontal line inside each option that could be the shared base. Options 3 and 5 have no structure matching a triangle-over-rectangle join. Options 1 and 4 have triangles but the shape below is a circle — not a rectangle. Eliminate all four.
Confirm option 2
In option 2, a rectangle is clearly visible. Above its top edge, an upright triangle is present, with its base sitting along that same line. Both components match. The surrounding pentagon shape provides extra lines — ignore those and focus only on the triangle and rectangle outline. Option 2 is confirmed.

Option check
Eliminate
Wrong component trap: a triangle is present but the shape below it is a circle, not a rectangle. Only one of the two required components matches — eliminate.
Correct
An upright triangle sits above a rectangle, joined along a shared horizontal base line. Both components are present, correctly oriented, and correctly connected. The surrounding pentagon adds extra lines — those are part of the complex figure, not the target shape.
Eliminate
Wrong orientation trap: the triangle is inverted — pointing downward, not upward. An inverted triangle is a different shape entirely. The orientation must match the target exactly — eliminate.
Eliminate
Wrong container trap: a triangle is visible inside the figure but it sits within a circle, not above a rectangle. The surrounding shape is circular — there is no rectangle component present. Eliminate.
Eliminate
No match trap: the figure is a pentagon filled with a grid of crossing lines. There is no upright triangle above a rectangle visible anywhere within it — neither component of the target shape is present. Eliminate.
Use this checklist next time
- Break the target into its individual components before looking at the options — never search for the whole shape at once.
- Use the join line as your anchor: find the horizontal base first, then check what sits above and below it.
- Extra lines in the option figure are deliberate distractions — ignore anything that is not part of the target outline.
Conclusion
Option 2 is correct. It is the only figure that contains both components of the target shape — an upright triangle sitting directly above a rectangle, joined at a shared horizontal base line. All other options either have the wrong shape below the triangle, the wrong triangle orientation, or no matching structure at all.
Get full access to 1,000+ CAT4 Level B practice questions with expert tips, mock exams, and step-by-step explanations.
Get Full PracticeYear 5 CAT Video Practice Test
Top 4 Free CAT4 Level B Practice Tests
- 1 Download our free CAT4 Level B Practice Test PDF.
- 2 Read our CAT4 Test article and practise the sample questions.
- 3 Take a free CAT4 Sample Test.
- 4 Use the Free CAT4 Level B Sample Questions provided in this article.
Support
Spotted something that needs fixing?
If you notice an error, broken link, or unclear explanation, email us and we’ll review it.
5 Recommended Strategies for CAT4 Success
Strong CAT4 performance isn’t just about ability — it’s about preparation, awareness, and execution under timed conditions.
At the start of the test, focus fully on the teacher or proctor. Key details about structure, timing, and expectations are often explained — missing them can cost easy marks.
Familiarity with the CAT4 format reduces cognitive load during the test. Knowing what to expect allows students to allocate time more effectively across sections.
Regular practice is the most reliable way to improve performance. It helps students recognise patterns, build speed, and demonstrate their true reasoning ability.
More is not always better. Limit preparation to focused daily sessions, and increase intensity gradually as the test approaches to avoid burnout.
Cognitive performance depends heavily on rest. Aim for 7–9 hours of sleep before test day to maximise focus, memory, and processing speed.
Is the CAT4 Year 5 Test Used for School Admissions?
In many UK and international schools, the CAT4 Level B test (Year 5) is not only an assessment tool — it is also used as part of the school admissions process.
Some independent and international schools use CAT4 results to support admissions decisions. The test helps schools evaluate a child’s reasoning ability without relying solely on prior academic knowledge.
CAT4 scores can influence class placement, streaming, or scholarship consideration by providing insight into a student’s potential across verbal, non-verbal, quantitative, and spatial reasoning.
Unlike traditional exams, CAT4 focuses on how students think rather than what they have been taught. This makes it particularly useful for schools assessing applicants from different educational backgrounds.
CAT4 Level B Preparation Resources for Year 5
The right preparation materials help Year 5 pupils feel confident on test day. Here are the most useful resources for CAT4 Level B practice.
- CAT4 Study Guide
- A study guide gives a clear overview of the test material, including what to expect in each battery, worked practice questions, and practical tips for test day. A good starting point for any Year 5 pupil preparing for CAT4 Level B.
- CAT4 Practice Tests
- Timed practice tests let your child get used to the CAT4 format and pacing before the real test. They also help track progress over time, showing which areas are improving and where extra practice is still needed.
- Free CAT4 Level B PDF Sample Questions
- A free downloadable PDF with sample questions across all four CAT4 batteries. A useful study aid that can be used at home with no sign-up required.
- CAT4 Video Course
- A video-based preparation course covers all CAT4 question types with step-by-step explanations. Ideal for pupils who benefit from seeing strategies demonstrated visually, and for families who want a structured, all-in-one preparation programme.
Understanding CAT4 Level B Scores for Year 5
CAT4 Level B results are reported using three score types, each giving schools a different view of a Year 5 student’s reasoning ability relative to their peers.
Learn more about CAT4 test scores and what they mean for Year 5 pupils →
What is a Good CAT4 Score in Year 5?
CAT4 scores are centred around an average of 100. Understanding where your child falls helps you interpret their reasoning ability clearly and confidently.
A score above 100 indicates that the student performed better than the average student of the same age.
Scores between 120 and 129 suggest high reasoning ability and are often associated with academically strong or advanced learners.
Any score above 130 is typically classified as Gifted and Talented, indicating exceptional reasoning ability relative to peers.
Final Thoughts: How to Succeed in the CAT4 Year 5 Test
The CAT4 Level B test is more than just an assessment — it’s a key indicator of your child’s reasoning ability and, in some cases, a factor in school admissions decisions.
CAT4 measures how students solve problems, recognise patterns, and think under pressure — not what they have memorised in school.
Exposure to real CAT4-style questions helps students improve speed, accuracy, and familiarity with question types across all four batteries.
Students who practise strategically are better equipped to manage time, avoid common mistakes, and demonstrate their full potential on test day.
Get full access to 1,000+ CAT4 Level B practice questions with expert tips, mock exams, and step-by-step explanations.
Get Full Practice
